

Are you using Stripe and QuickBooks Online for your business and searching for new ways to optimize the workflow between the two platforms? If so, you’ve come to the right place.
Stripe, a leading payment gateway that powers over 1.35 million businesses globally, offers solutions for digital transactions. When coupled with QuickBooks Online, trusted by over 7 million businesses worldwide in 2025, the potential for streamlined company operations is vast. This integration empowers businesses with real-time data processing, automated financial management, and superior accuracy in accounting.
Let’s explore how to seamlessly integrate two platforms, QuickBooks Online and Stripe, using Synder as third-party software, and see how much it can impact company operations.
Key takeaways:
- While Stripe and QuickBooks Online are powerful tools on their own, integrating the two requires a third-party application.
- In QuickBooks, Stripe is configured as a “Bank” type account, which simplifies the management of incoming funds from sales before they’re transferred to your actual bank account.
- Using Synder with Stripe and QuickBooks Online as a third-party software shows how these tools can work together in real-time, making your financial management way more streamlined.
Can Stripe connect with QuickBooks without third-party apps?
The short answer is no. To integrate Stripe and QuickBooks, you need a third-party app to act as a bridge or connector between the two. Many options are available on both Stripe and QuickBooks app marketplaces. Some are designed for only Stripe and QuickBooks Online integration, while others are aimed at multichannel integration.
How does Stripe work with QuickBooks?
Doesn’t matter what app you choose for the Stripe and QuickBooks connection, the integration workflow will be pretty much the same.
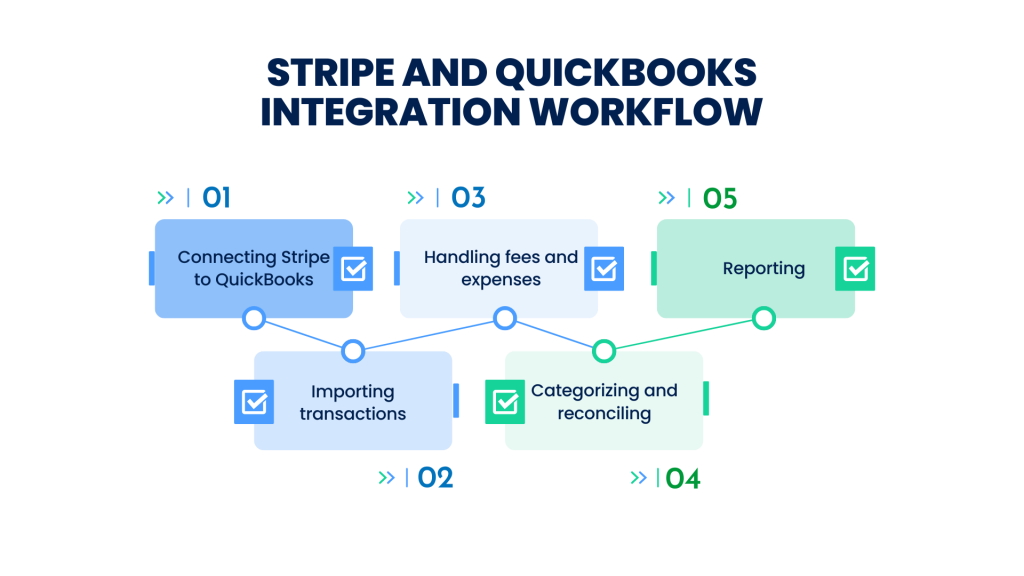
- Connecting Stripe to QuickBooks. Users must first connect their Stripe account to QuickBooks. The setup usually involves logging into both your Stripe and QuickBooks accounts and authorizing the integration.
- Importing transactions. Once connected, Stripe transactions, including all sales, refunds, and other transaction types, are automatically imported into QuickBooks.
- Handling fees and expenses. Stripe charges processing fees for transactions, which are also recorded in QuickBooks during the integration. This ensures that all expenses related to Stripe transactions are accounted for.
- Categorizing and reconciling. Imported transactions should be categorized and classified accurately. This helps reconcile books faster as transactions recorded in Stripe align with those in QuickBooks.
- Reporting. With Stripe transactions recorded into QuickBooks, users can generate more comprehensive reports that include detailed insights from their payment processing activities.
This is only a general overview of what the integration workflow between Stripe and QuickBooks might look like. The steps mentioned above and any additional steps can vary depending on your chosen third-party solution. We’ll discuss Stripe and QuickBooks connection in more detail below, using Synder as an example of a third-party connector between the two platforms.
When to consider the Stripe and QuickBooks connection
If any of the following sound familiar, it’s a strong signal that connecting Stripe with QuickBooks Online will improve accuracy and reduce manual work.
1. You need real-time financial visibility
Sales, cash flow, and reports lag behind actual activity, making it harder to evaluate performance or react to changes quickly.
2. Reconciliation is taking too long
Manual matching doesn’t scale. A survey shows finance teams spend 59% of their resources on transaction management, and 95% of that effort goes to transactions that are already matched, simply because manual processes are slow at identifying the few items that need attention.
3. Data accuracy is starting to slip
As transaction volume grows, manual entry increases the risk of missing, duplicated, or misclassified transactions.
4. Tax prep requires too much cleanup
Transactions need rework at period end because sales and expenses aren’t consistently categorized, slowing down filings and reviews.
Now that the why is clear, let’s move on to the how.
Example of Stripe and QuickBooks connection via Synder app
As we mentioned earlier, we’ll walk you through an example of connecting Stripe and QuickBooks using a third-party software Synder Sync. But before we dive into that, let’s first explore this solution in more detail so you can grasp how it operates.
Go to the Stripe and QuickBooks connection steps →
Synder seamlessly connects over 30 sales channels and payment gateways as third-party software, including Stripe, with QuickBooks and other accounting software (Xero, Sage Intacct, NetSuite, and Puzzle). If you’re considering an integration solution, here are some of the notable benefits that Synder provides.
- Automated Stripe bookkeeping – Stripe sales and related activity sync to QuickBooks Online automatically, including key transaction details and the right record types.
- Multi-channel connections – Connect Stripe plus additional platforms to keep all online sales activity in one QuickBooks Online view.
- Flexible sync modes – Choose Per Transaction for full detail or Summary Sync for consolidated entries by day, payout, or custom period. With multiple platforms on Summary Sync, QuickBooks Online receives separate summaries per platform.
- Reporting-ready data – Clean, structured records in QuickBooks Online support reliable P&L and Balance Sheet reporting.
Now, follow the steps below to create an account and connect Stripe to QuickBooks Online.ctions below to create an account and connect Stripe to QuickBooks Online.
Integrating QuickBooks with Stripe: How to connect Stripe and QuickBooks Online via Synder app
Step #1. Choose your role
The first step of the Synder onboarding to integrate with QuickBooks Online is to specify your role:
- Business owner/Executive manager;
- Accounting or bookkeeping firm;
- Staff accountant;
- IT & Technology department;
- Marketing;
- Other.

Step #2. Provide business details
Fill out the necessary organization information, so we’re aware of your needs and can provide you with personalized help and support in the future.
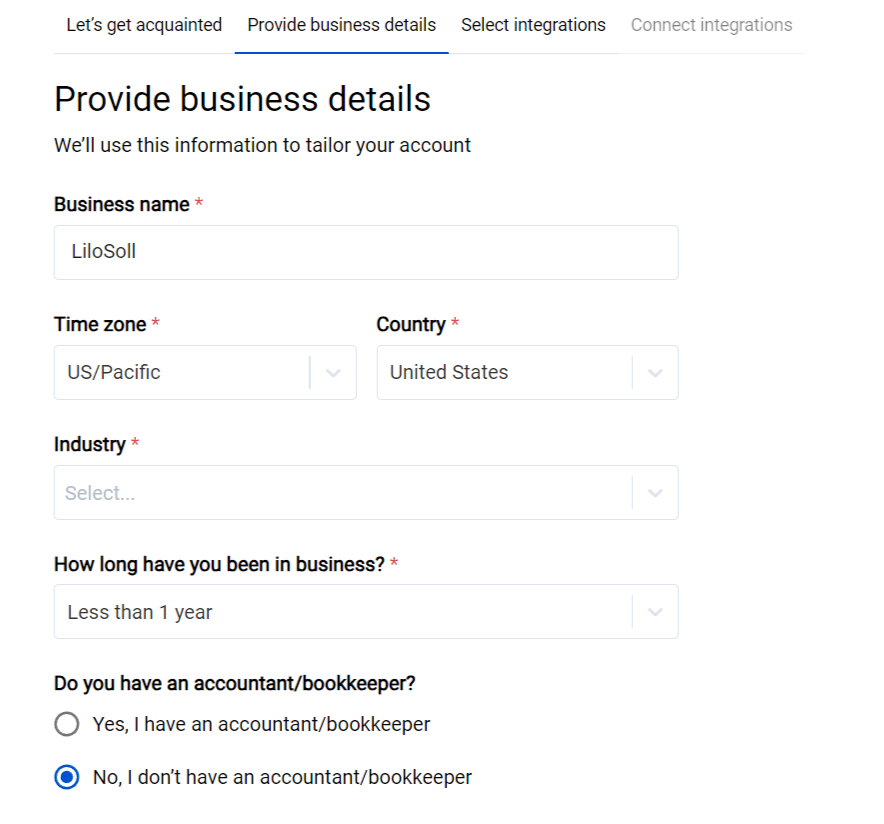
Note: If you don’t have an accountant or bookkeeper, you can find one among the qualified and trusted professionals in Synder’s accountant directory.
Step #3. Select Stripe
Choose the Stripe integration among the provided options.
If your Stripe account is integrated with an online store, it’s recommended to connect both your Stripe and ecommerce accounts to get all order and payment details synced to your QuickBooks Online account.
Note: If your chosen ecommerce platform includes an internal payment gateway (as shown on the screenshot with the example of Shopify and Shopify Payments), this payment method will be automatically linked to Synder and QuickBooks Online along with your store.
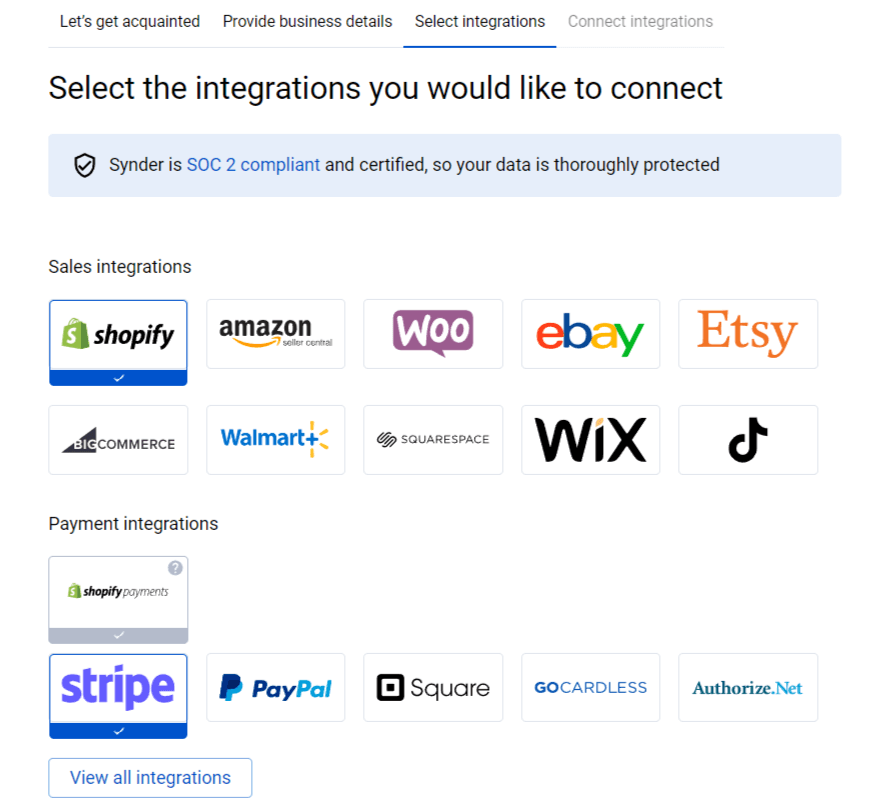
Note: Synder supports 30+ platforms for integration.
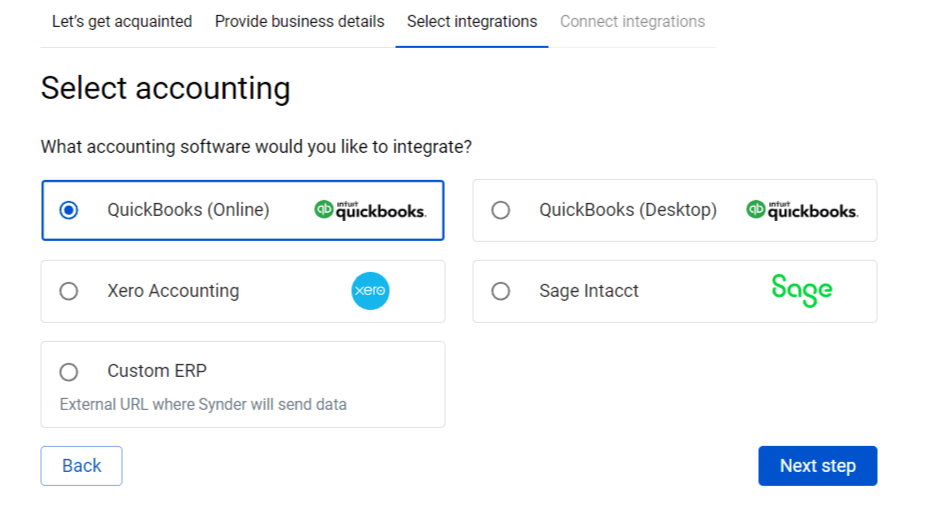
Step #4. Select QuickBooks Online among accounting software
Choose QuickBooks Online among the provided options.
Note: You need to create QuickBooks account beforehand.
Step #5. Choose the sync mode
As we already mentioned, Synder provides two options for transaction synchronization to QuickBooks Online: per transaction or summary (sync on a daily basis). Choose the one that suits you best.
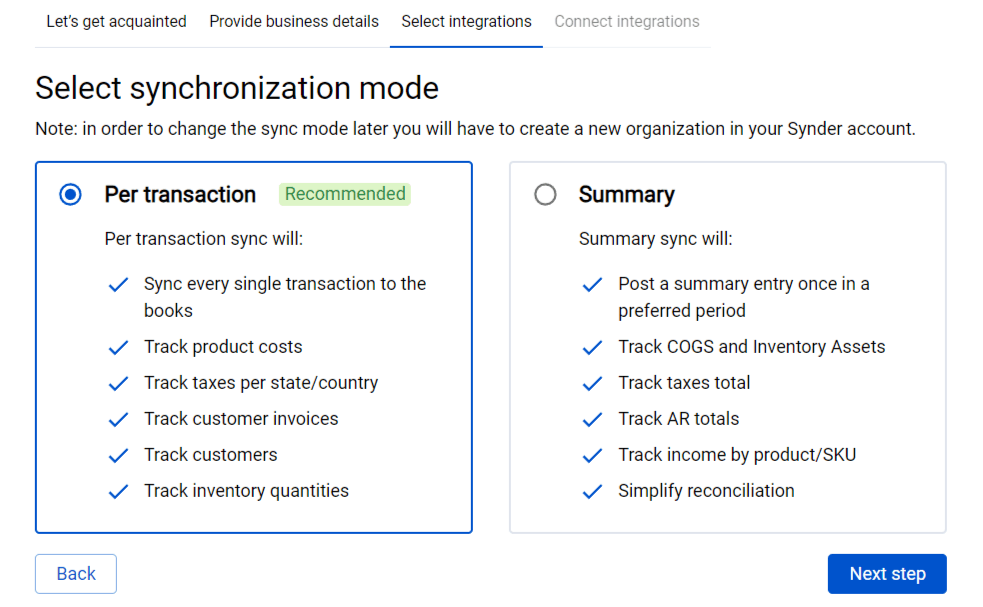
Don’t know which one to choose? Check out our guide to learn more about the workflow and benefits of both modes.
Step #6. Connect Stripe and QuickBooks
At this step, you’ll need to connect your QuickBooks Online and Stripe accounts. Click the “Connect” button (if you’re an admin) or “Invite” to send the link to the business owner (if you’re an accountant or a bookkeeper). Synder will only have the necessary permissions to sync data to your accounting for easy reconciliation.
Once permission is granted, you’ll gain access to your operational dashboard.
Now that the integration between the payment platform and QuickBooks Online is established, you need to customize your Stripe account settings in Synder. To complete the setup, enable auto-sync of all incoming transactions from Stripe. At this stage, you can already import your historical data for syncing.
Just like that, Synder will start synchronizing your Stripe transactions with Quickbooks Online.

Key features of the QuickBooks and Stripe connection via Synder
Now it’s time to get into more details and find out what exactly you can do with Stripe and QuickBooks Online integration when connecting them via Synder.
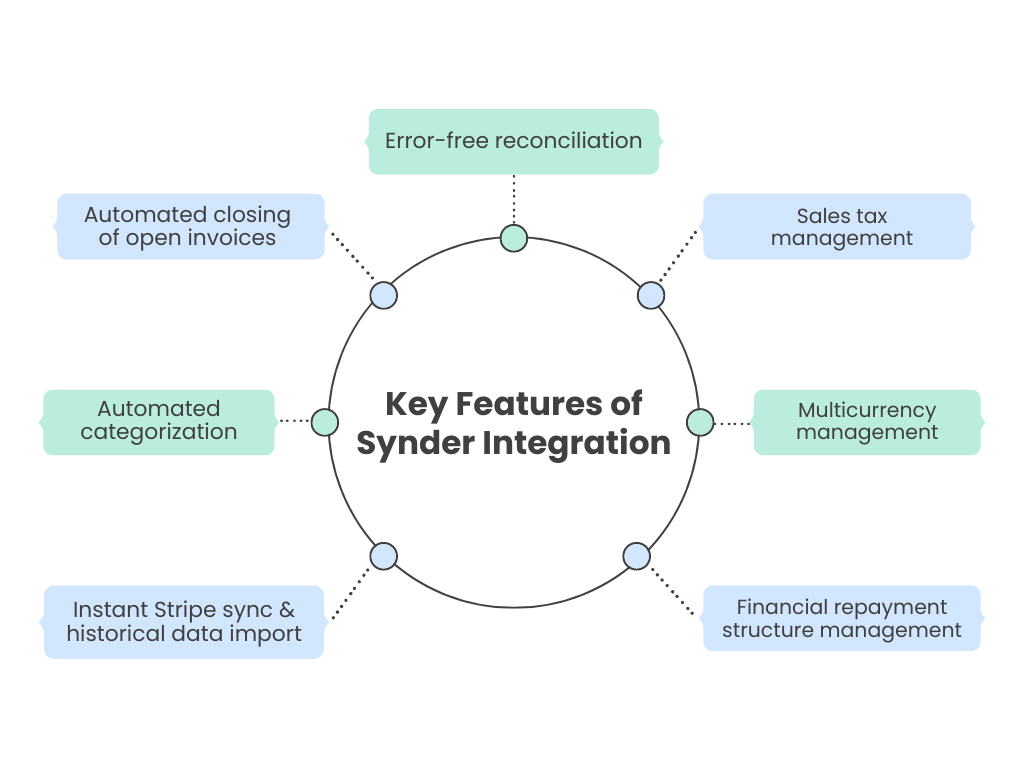
Real-time Stripe sync – Automatically records Stripe payments and historical data in QuickBooks Online with full transaction detail.
Automated categorization – Syncs Stripe metadata and applies Smart Rules to categorize transactions correctly in QuickBooks.
Automatic invoice closing – Applies Stripe payments to open QuickBooks invoices and closes them without manual matching.
Accurate reconciliation – Uses clearing accounts, prevents duplicates, and ensures payouts match bank deposits.
Sales tax handling – Applies correct tax codes to sales and expenses, including Stripe fees.
Multi-currency support – Records transactions in original currency and converts them to home currency using platform rates.
Stripe Capital accounting – Separates loan principal and interest repayments into the correct liability and expense accounts.
Did you know that Synder offers you a chance to reconcile one month of your Stripe transactions for free? Create a free account and test it yourself or book a demo to see how the Stripe QuickBooks integration works on your own data.
→ Learn how Synder eases the import of Stripe transactions to QuickBooks Online and helps accountants separate Stripe loan repayments in the books.
How do I sync Stripe records in QuickBooks?
Syncing Stripe payments from the Synder dashboard to QuickBooks Online is easy. Just click on the “Ready to sync” button for the payment you want to sync to QuickBooks.
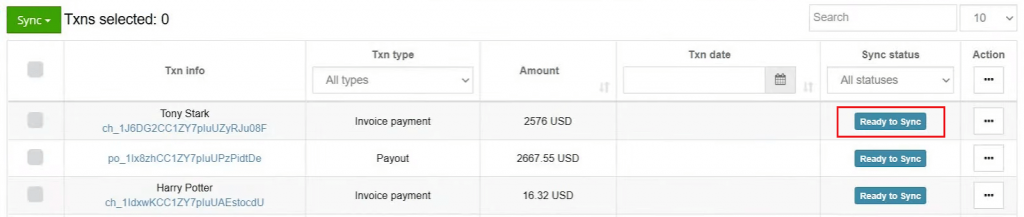
Once the status is changed to “Synced”, it means that the transaction has been recorded in QuickBooks Online, and you can check the result by clicking the link “Show in QB”:

All the transaction details will be recorded in QuickBooks Online, including customer name, shipping address, product names, quantity, taxes, and discounts.
By default, Synder will try to recognize your products from the payment system and match them to the items you’ve set up in QuickBooks Online. This way, your sales will automatically be categorized by the Income account assigned to certain products. If you’re tracking inventory, it will also be updated accordingly.
How do I categorize Stripe payments in QuickBooks?
Option #1. How to categorize income in QuickBooks
There are two ways of setting up the automated categorization of income in QuickBooks Online.
1. Categorize transactions in different income accounts based on the product names
Make sure that the product name in your payment processor matches the one in QuickBooks Online.
When syncing a transaction, the Synder app automatically matches the product with the same name in QuickBooks and assigns the newly recorded transaction to the income account with the exact same name.
If the names of the products differ, you can use a Product Mapping feature to add different options of naming the same product across platforms. Go to “Settings” → “Configure” under Stripe → “Products/Services” → “Product mapping”.
If the product has already been synced and assigned to the wrong account, you can change it manually in QuickBooks. Just go to the “Sales” → “Products & Services’ tab and click “Edit” on the line of the wrongly recorded product. Change the income account to the needed one and save.
2. Categorize all income transactions to one income account
For this option, you’ll need to edit your Synder app settings.
Go to “Settings” → “Configure” under Stripe → “Products/Services”. Here you need to enable “Generic product” and select the product name from the list.

Once you update the app settings, all the newly synced transactions from Stripe will be synchronized under the chosen default name.
Option #2. How to apply categories to expenses in QuickBooks
Let’s say you sell two products which cost $20 and $400. You want to record the fees from both of them to different categories:
- The $20 product → Commissions & Fees category;
- The $400 product → Legal & Professional Fees.
What assumptions can be made? Well, it seems that the fee amount for the first product will probably be <$10. The fee for the second product will hardly be less than $10, so $10>.
Now, let’s create the flow of how the fees will be recorded based on the categorization rule:
- Go to Smart Rules → Rules → Create Rule;
- Choose the trigger for the rule: Expense → Created;
- Choose the condition: if Total amount → Less or equals → 10;
- Choose the action: QuickBooks action → Expense → Update category.
Enter the category name and repeat the action for the cases when the condition isn’t met.
After that, each time the Synder app generates an expense in your QuickBooks account, this Rule will become active.
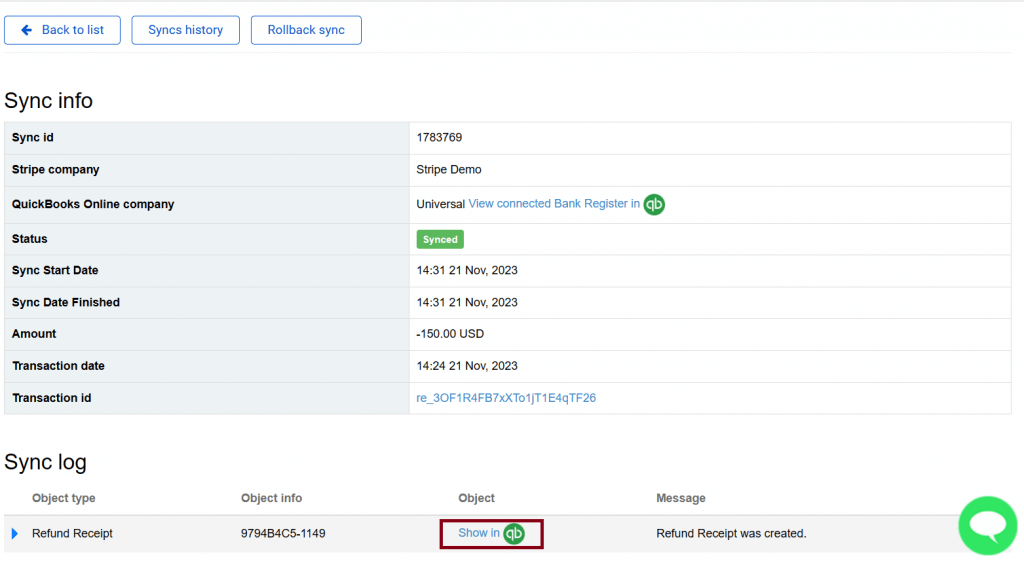
How do I record a Stripe refund in QuickBooks?
As usual, go to the Synder app’s main dashboard. Here, you’ll find all your transaction records. However, for refunds specifically, you can filter the transactions to display only your refunds.
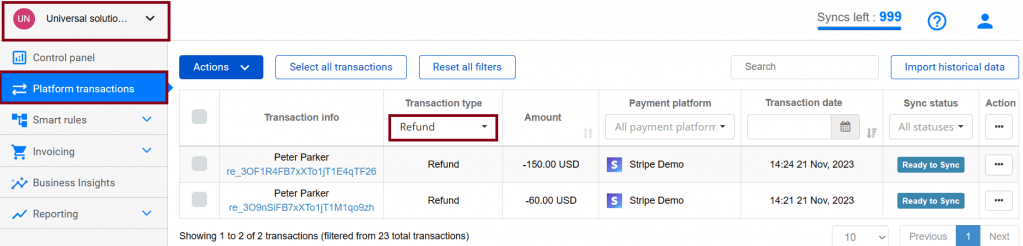
Select the Stripe transactions you want to sync or click on “Select all transactions”. Click on the “Actions” → “Sync”.
The Synder app transfers your refunds to QuickBooks and creates a refund receipt automatically. You can see the synced refund by checking the Clearing account of Chart of Accounts or by clicking “Show details” → “Show in QB”.
And that’s it!
How do I handle Stripe fees?
Stripe deducts processing and service fees from each payment, and tracking them correctly is critical for accurate profit and reconciliation. Fees typically include processing (2.9% + 30¢), plus extras like international cards, currency conversion, disputes, instant payouts, and ACH transfers.
How fees sync to accounting systems:
- QuickBooks Online – fees sync as Expenses
- QuickBooks Desktop – fees sync as Checks
Most standard Stripe accounts show fees embedded in sales transactions, while custom contracts or advanced Stripe features may list fees as separate line items.
Fee categorization and visibility:
Synder captures every Stripe fee and posts it to a dedicated account (for example, Stripe Fees). Per Transaction sync shows fees per sale for precise cost tracking, while Summary Sync aggregates daily fees into a single expense entry. Smart Rules can also route different fee types to separate accounts.
Example of the reconciliation flow:
For a $100 sale with a $3.20 fee:
- $100 recorded as income
- $3.20 recorded as a fee expense
- $96.80 deposited to the bank
This keeps revenue, fees, and payouts fully aligned.
What to do with Stripe balance reserves
Some businesses have funds temporarily held by Stripe as reserves. These held amounts reduce current payouts and are released later, typically after 30–180 days. Synder records reserved funds in a separate balance reserve asset account and moves them back when released.
This ensures your clearing account always matches Stripe’s available balance and makes reconciliation predictable and accurate.
How do I deal with invoices?
Synder manages the full invoice lifecycle, from creation to payment matching, while keeping accounts receivable accurate, even in edge cases like credit notes and failed payments.
The scenarios below cover how Synder handles invoice timing, refunds, payment matching, and common edge cases when syncing Stripe invoices.
- Invoice dates: Stripe invoices have both a created date and a finalized (issued) date. Synder tracks both and can use either, which matters when drafts are created well before being sent.
- Credit notes on paid invoices: If a refund is issued via a credit note, Synder syncs the original invoice, payment, and refund. Credit notes issued after an invoice is already synced may require a rollback and resync. Best practice: issue credit notes before syncing invoices.
- Automated payment matching: Synder matches Stripe payments to invoices using customer data, invoice numbers, amounts, and dates. It supports partial payments, overpayments (as customer credits), and automatically closes fully paid invoices.
- Customer matching flexibility: You can control how customers are matched using priority fields such as name, email, billing/shipping details, or custom mappings to handle inconsistent data.
- Payments without products: If a Stripe payment has no product, Synder uses a default product or can pull the product name from the transaction description. Smart Rules can further automate categorization.
How do I reconcile Stripe in QuickBooks?
Reconciling Stripe in QuickBooks ensures your sales, fees, and bank deposits line up correctly. The process relies on one key concept: the clearing account, which tracks money as it moves from Stripe to your bank.
The clearing account: how reconciliation works
A clearing account acts as a temporary holding account for Stripe activity. It separates gross sales, fees, and payouts, so bank deposits reconcile cleanly.
Why it’s required: Stripe payouts don’t equal sales totals because fees are deducted and funds are delayed. Without a clearing account, your books would show revenue that never hits the bank.
Example ($100 sale, $3.20 fee):
- Record sale:
- Income: $100
- Stripe clearing: $100
- Record fee:
- Stripe fees expense: $3.20
- Stripe clearing: –$3.20
- Record payout:
- Bank account: $96.80
- Stripe clearing: –$96.80
After payout, the clearing account returns to zero (or reflects only unpaid transactions).
What to monitor regularly:
- Stripe clearing balance should match Stripe’s available balance.
- Differences usually indicate unsynced transactions, timing delays, or duplicates.
- This balance is your fastest health check for reconciliation accuracy.
Note on reconciliation frequency: Reconcile weekly for high-volume or multi-channel sales, monthly for standard reporting, and monitor your Synder dashboard regularly to catch issues early.
Step-by-step reconciliation process
Once your clearing account is set up, follow these steps to reconcile Stripe activity in QuickBooks without manual cleanup.
- Confirm all Stripe activity is synced
In Synder, check that all transactions for the period show “Synced”. Resolve failed or pending items first. - Verify the clearing account balance
The Stripe clearing account balance in QuickBooks should match Stripe’s available balance, allowing for processing delays. - Review payout transactions
Ensure each Stripe payout matches the transferred amount, has the correct date, and is synced to QuickBooks. - Match payouts to bank deposits
In QuickBooks Banking, locate Stripe deposits and match them to transfers from the Stripe clearing account, confirming the amount and direction (Clearing → Bank). - Resolve unmatched deposits
If no match appears, use “Find match,” check for date differences, and confirm the payout was synced and not already matched. - Reconcile the bank account
Run the standard QuickBooks reconciliation, confirming the statement balance and date match, Stripe payouts are already matched, and the ending difference is $0.00. - Final clearing account check
After reconciliation, confirm the Stripe clearing account balance is $0.00. Any remaining balance represents funds not yet paid out by Stripe.
Common reconciliation challenges and solutions
Even with automated syncing, reconciliation issues can still appear due to timing differences, reserves, or missed adjustments. Knowing what to look for makes these problems quick to resolve instead of time-consuming investigations.
- Payout amounts don’t match bank deposits
Solution: Check for Stripe balance reserves that temporarily hold funds, and confirm instant payout fees are recorded as separate expenses. - Old transactions sitting in the clearing account
Solution: These are often refunds or chargebacks tied to earlier sales. Sync the related adjustment transactions from Stripe to bring the clearing account back to zero. - Duplicate transactions appear
Solution: Use Synder’s rollback feature to remove incorrect entries, then resync the transaction cleanly. Duplicate detection prevents most cases, but rollback ensures accuracy when issues slip through. - Clearing account doesn’t match Stripe’s available balance
Solution: Review failed syncs, manual entries, or unsupported transaction types. Synder’s sync logs help pinpoint missing or errored transactions quickly.
And keep in mind that with a proper clearing account setup and automated syncing, reconciliation shifts from a multi-hour cleanup to a quick, routine check.
Closing thoughts: Integration between Stripe and QuickBooks
There are many apps for QuickBooks Online Stripe integrations available on the market today, and Synder is one of the leading ones.
The Synder app safely integrates with QuickBooks Online, syncing all your transactions automatically. But the true advantage comes from all the settings that customize your books and accounting records, allowing you to keep clear from accounting discrepancies and provide you with reliable financial reports.
For businesses processing significant transaction volumes through Stripe, the time savings alone justify the investment in a quality integration tool. More importantly, the improved accuracy and real-time visibility into your finances enable better business decisions and more confident financial management.
FAQ
What accounting software integrates with Stripe?
Stripe connects to accounting systems like QuickBooks Online, QuickBooks Desktop, Xero, Sage Intacct, NetSuite, and Zoho Books through third-party apps. Stripe doesn’t offer native accounting integrations.
Does Stripe integrate directly with QuickBooks Online?
No. Stripe has no native integration with QuickBooks Online. A third-party connector is required to sync sales, fees, invoices, and payouts between the two systems.
How do I record Stripe fees in QuickBooks Online?
Stripe fees should be recorded as expenses. Integration tools can automatically create fee transactions in QuickBooks, while manual entry requires downloading Stripe reports and posting expenses yourself.
Can I automatically sync Stripe invoices to QuickBooks?
Yes. With a tool like Synder, Stripe invoices sync to QuickBooks automatically, payments are applied to open invoices, and balances close without manual matching.
Is Stripe to QuickBooks integration secure?
Yes, when using reputable tools like Synder. Secure integrations use encrypted data transfer, limited Stripe permissions, and audited security controls like SOC 2 compliance.s is ideal for businesses that operate under models where they need to manage payments to multiple parties, like online marketplaces or crowdfunding platforms.