
Integrating Stripe with your website or an eCommerce platform provides your clients with an effortless and safe way to pay for the goods and services you sell, and is certainly advantageous to your business. Synder will help you auto-record all sales and expenses in your QuickBooks Online, categorize and reconcile all the synced data in one click giving you all the insights and allowing for efficient analytics and modeling of your business. Synder synchronizes Stripe transactions’ metadata so that you don’t miss a bit of information and get all the essential details reflected in your books.
If some customer, item, tax, or other transaction details are coded in the Stripe Metadata field, follow the steps listed in this guide to set up Smart rules so that Synder could transfer all the information to your QuickBooks automatically.
Overview:
- Set up Smart rules to extract transaction details from Stripe metadata
- 1) Sync Product and Service details from Stripe metadata with Smart rules
- 2) Sync Customer details from Stripe metadata with Smart rules
Note. Synder puts all information taken from the Stripe Metadata field into the Memo field in QuickBooks Online automatically. You need to set up a Smart rule in Synder to move the details needed to the corresponding field in QuickBooks (e.g. Tax, Customer, Product or Service, Class field, etc.).
Set up Smart rules to extract transaction details from Stripe metadata
By creating a rule, you can update any synchronized transaction adding missing data or correcting recorded data to make sure there is nothing you need to edit manually to have your books accurate and detailed. This provides you with each and every detailed reporting opportunity and the ability to make informed decisions for your business. Check out this detailed guide to learn more about How rules work in Synder.
Smart rules work on the basis of if-then conditions, so you can create rules and make Synder adapt to your needs. The process contains 2 phases:
- Synchronization of a transaction from Stripe to QuickBooks Online.
- Update of the created QuickBooks transaction based on the information inside of it, which happens almost instantly based on the conditions of the rule.
Below are examples of how to extract various transaction details from Stripe metadata and sync them to QuickBooks Online with the help of Smart rules. You can use the same principle to build any rule and adjust Synder to your specific needs.
1. Sync Product and Service details from Stripe metadata with Smart rules
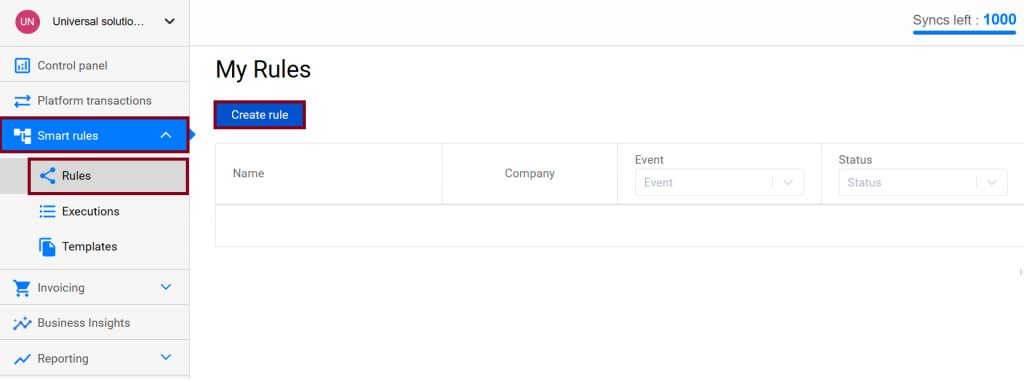
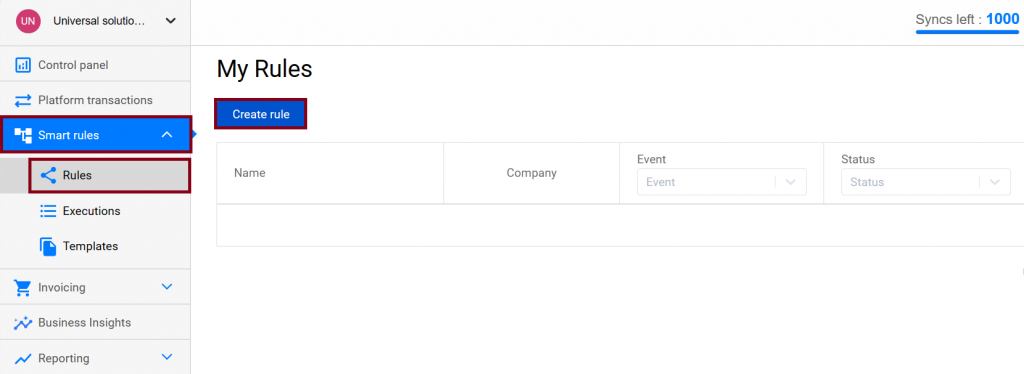
Step 1. Go to the Smart rules tab on the left menu → Rules → hit the Create rule button.
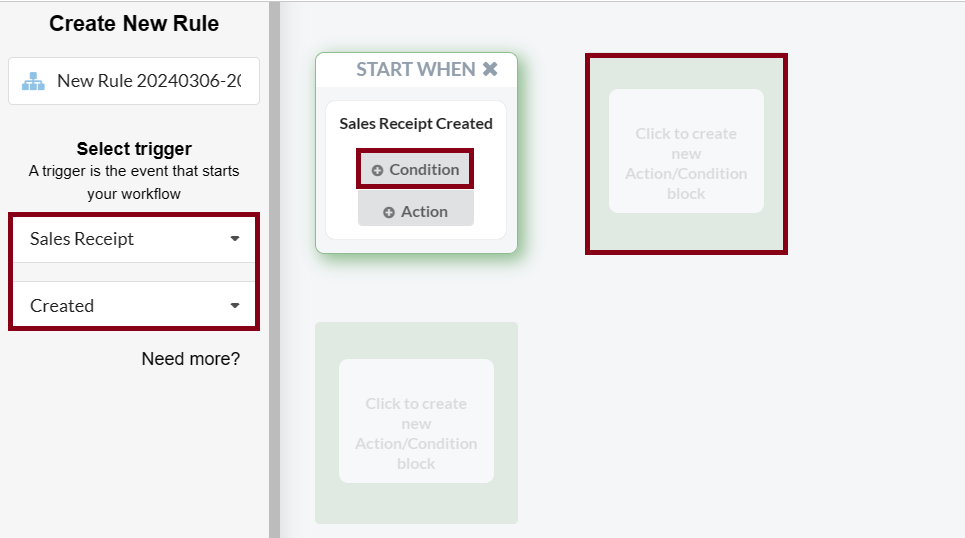
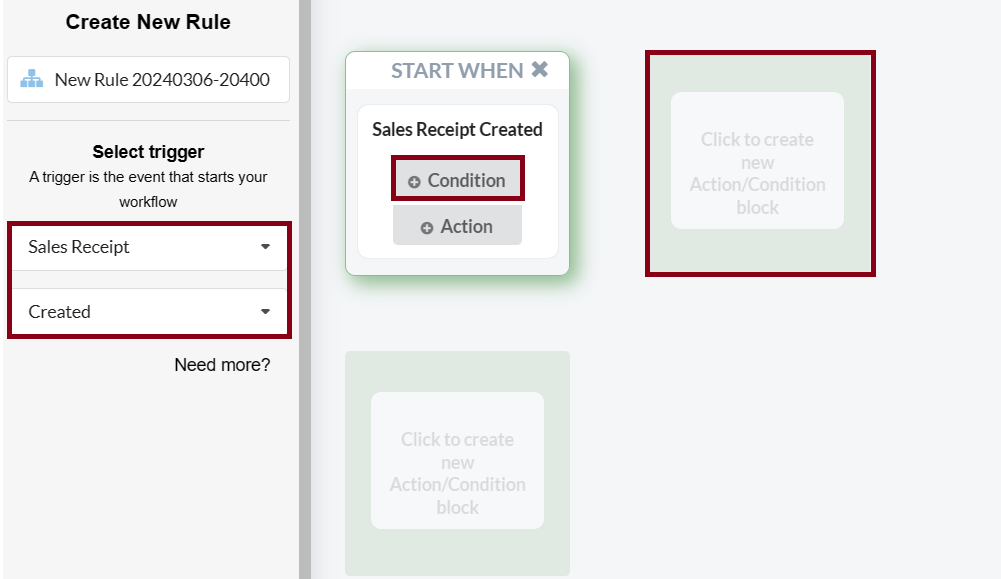
Step 2. As a trigger that starts the rule, select Sales Receipt* → Created → Condition* button. Once you sync a transaction via Synder, you will have both Expense and Sales Receipt/Invoice/Payment created in QuickBooks, and the created Sales Receipt will trigger a rule to work.
*Sales Receipt. During the synchronization, Synder can create different objects such as Sales Receipts, Invoices, Payments, Refund receipts etc. in your books, make sure you selected the one needed to trigger the rule.
*Condition means that you are going to specify additional conditions for the rule to be applied to specific Sales Receipts. You can select Action right away if you want the flow to be applied to each of the synchronized Sales Receipts.
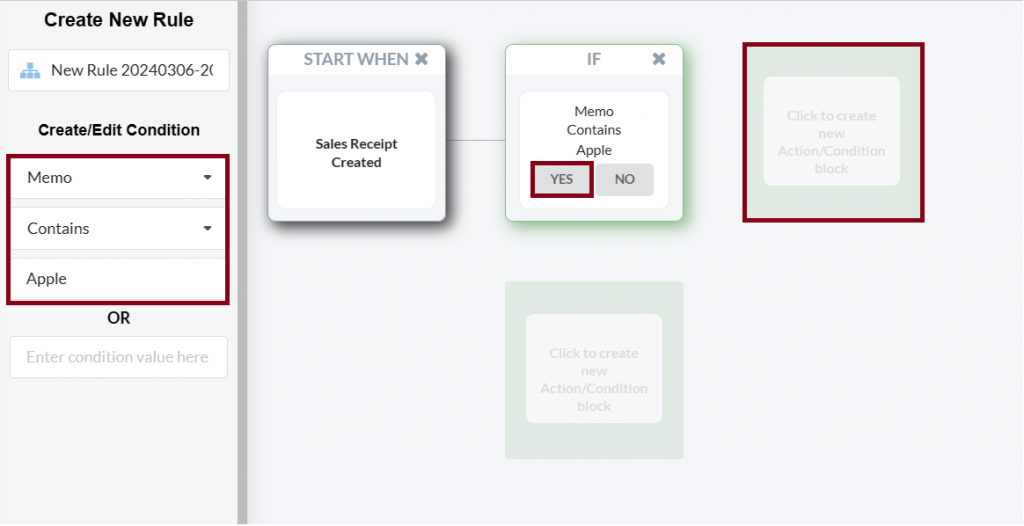
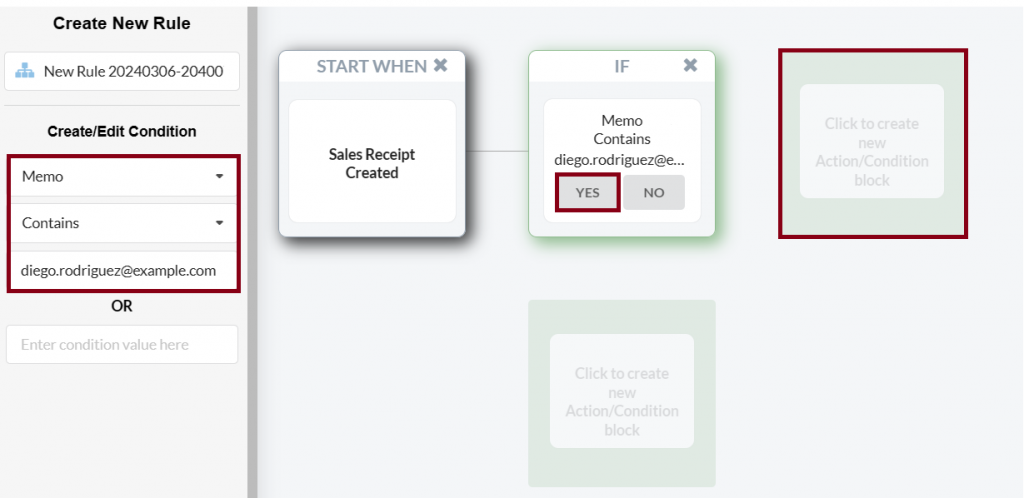
Step 3. Now we start to build our if-then algorithm. From the Select field dropdown select Memo → Contains → Name of the Product or Service (e.g. Apple) → click Yes. That means, if the Memo field of a transaction contains the value “Apple”, then the action described at the next step will be applied to the Sales Receipt.
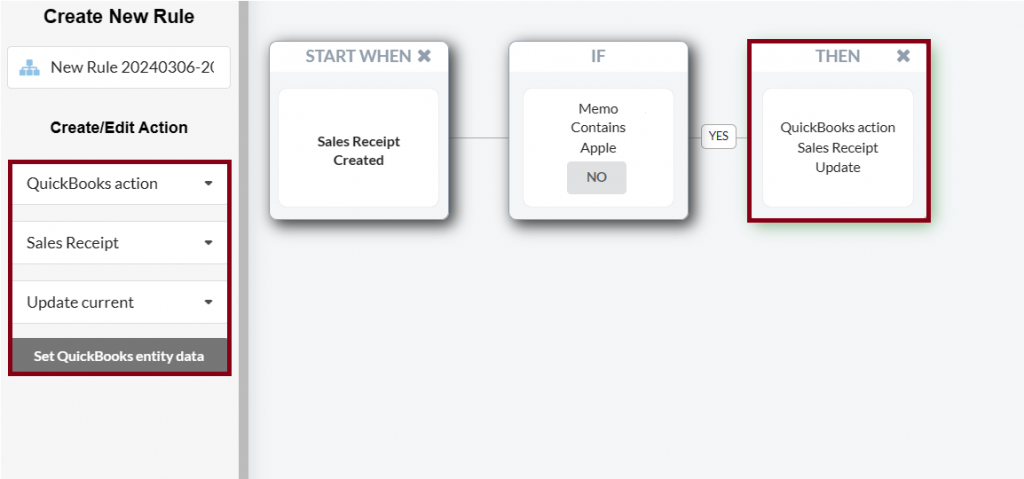
Step 4. You can continue adding conditions (if-boxes), but for our current rule, we select the Actions button. Select QuickBooks action to be applied to Sales Receipt → Update current* → Set QuickBooks entity data.
*Update Current – an option to update currently synchronized Sales Receipt which triggered the rule.
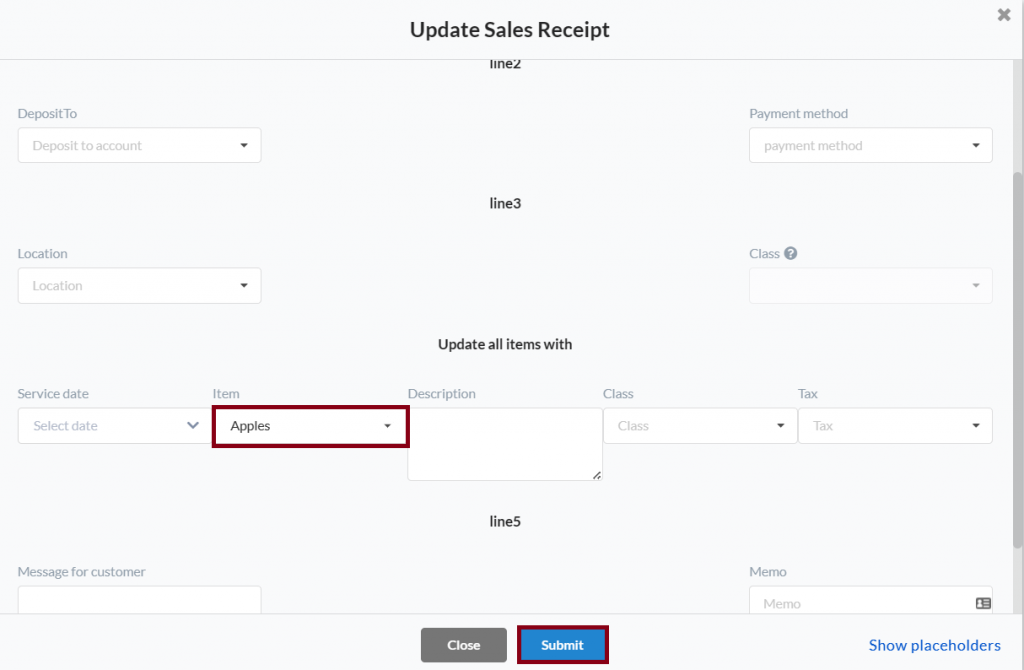
Step 5. Select the item from the dropdown with your QuickBooks Products and Services that will be associated with the Sales Receipt if it matches the previously set conditions. Click the Submit button → Save & Close rule.
Note. You can also modify other fields of the Sales Receipt and edit tax, customer, class, etc.
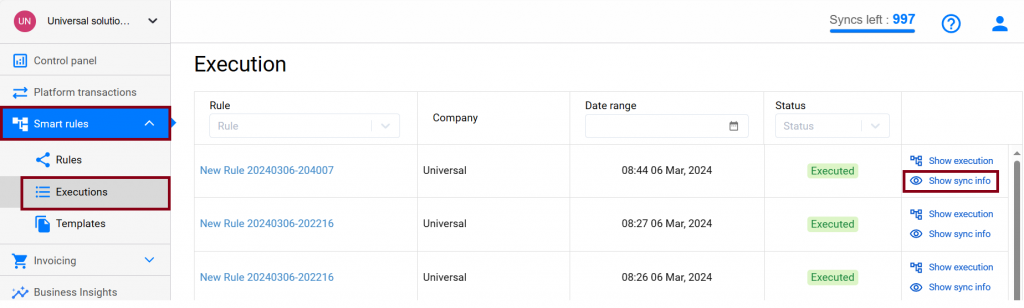
Once a transaction that is compliant with the selected criteria is synced you can go to Smart rules → Executions to check if the rule was triggered and applied or check the execution under the Synced transaction at once. Use the “Show object” link to open the log of the transaction updated by the rule.

Hit Show in QB to see the results on the QuickBooks side and check your P&L reports.

Congratulations, you did it! Enjoy the automatic categorization of synced data and precise Profit and Loss reports that will provide you with all the necessary info to plan and develop your business.
2. Sync Customer details from Stripe metadata with Smart rules
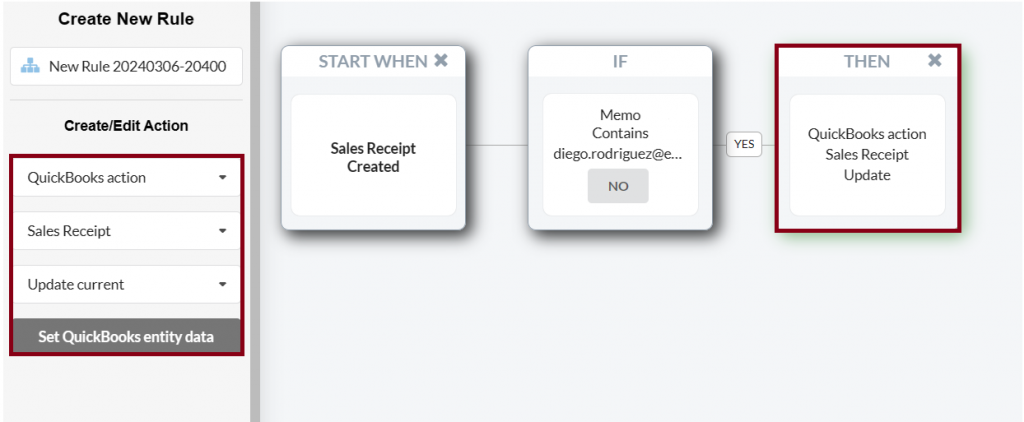
Step 1. Go to the Smart rules tab on the left menu → Rules → hit the Create rule button.
Step 2. As a trigger that starts the rule, select Sales Receipt* → Created → Condition* button. Once you sync a transaction via Synder, you will have both Expense and Sales Receipt/Invoice/Payment created in QuickBooks, and the created Sales Receipt will trigger a rule to work.
*Sales Receipt. During the synchronization, Synder can create different objects such as Sales Receipts, Invoices, Payments, Refund receipts etc. in your books, make sure you selected the one needed to trigger the rule.
*Condition means that you are going to specify additional conditions for the rule to be applied to specific Sales Receipts. You can select Action right away if you want the flow to be applied to each of the synchronized Sales Receipts.
Step 3. Now we start to build our if-then algorithm. From the Select field dropdown, select Memo → Contains → Customer’s info (e.g. email, shipping address, Name etc.) → click Yes. That means, if the Memo field of a transaction contains the value “[email protected]”, then the action described at the next step will be applied to the Sales Receipt.
Step 4. You can continue adding conditions (if-boxes), but for our current rule, we select the Actions button. Select QuickBooks action to be applied to Sales Receipt → Update current* → Set QuickBooks entity data.
*Update Current – an option to update currently synchronized Sales Receipt which triggered the rule.
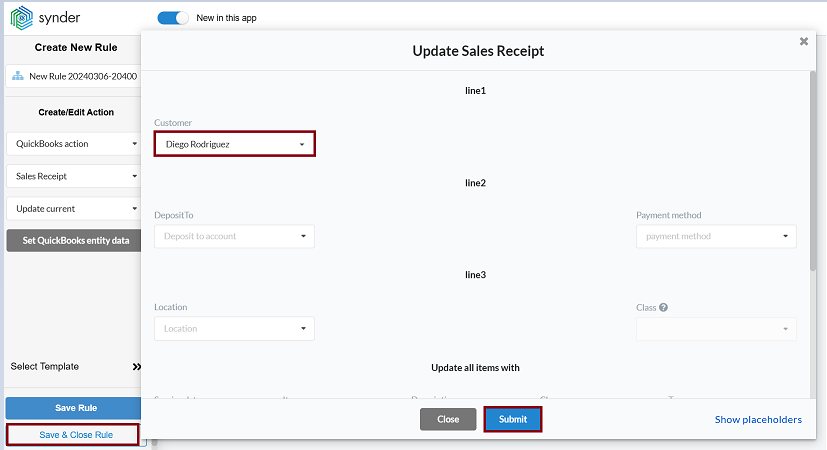
Step 5. Select the Customer needed from the dropdown with your QuickBooks Customer list that will be associated with the Sales Receipt if it matches the previously set conditions. You can also modify other fields of the Sales Receipt and edit item, tax, class, etc. Click the Submit button → Save & Close rule.
Once a transaction that is compliant with the selected criteria is synced, you can go to Smart rules → Executions to check if the rule was triggered and applied or check the execution under the Synced transaction at once. Use the “Show object” link to open the log of the transaction updated by the rule.
Hit Show in QB to see the results on the QuickBooks side and check your P&L reports.

Congratulations, you did it! Enjoy the automatic categorization of synced data and precise Profit and Loss reports that will provide you with all the necessary info to plan and develop your business.
Reach out to the Synder team via online support chat, phone, or email with any questions you have – we’re always happy to help you!