
Overview
After connecting your company and accounts, configure the Shopify – Xero integration settings. These settings determine how Synder records transactions, invoices, fees, expenses, and payouts in Xero.
The Shopify settings are organized into the following sections:
Plan availability:
- * Available from the Essential plan and higher
- ** Premium feature available only on Pro and Premium plans
How to Access Shopify Settings
To access your Shopify settings in Synder:
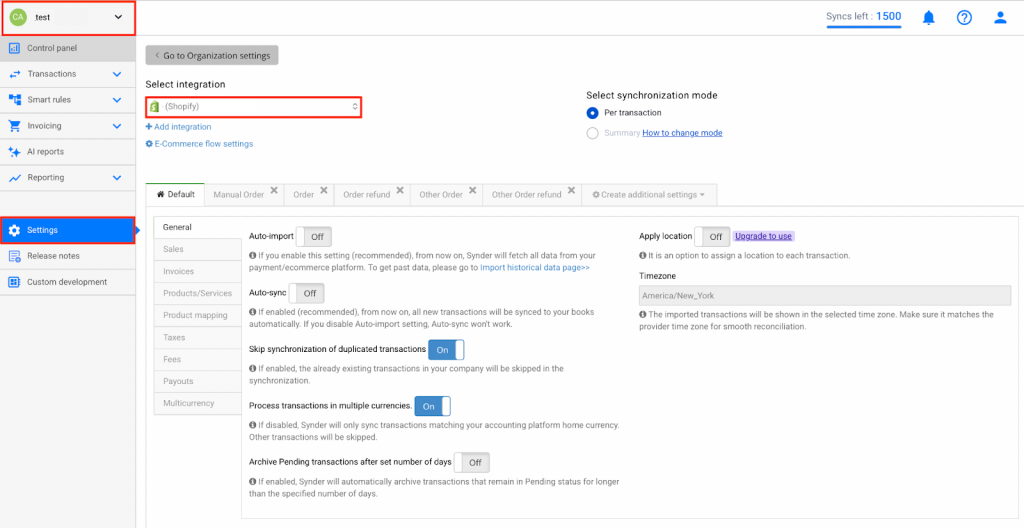
Option 1: From the main menu
- Select the appropriate organization from the top-left corner
- Click Settings in the left-hand menu
- Choose Shopify from the dropdown list
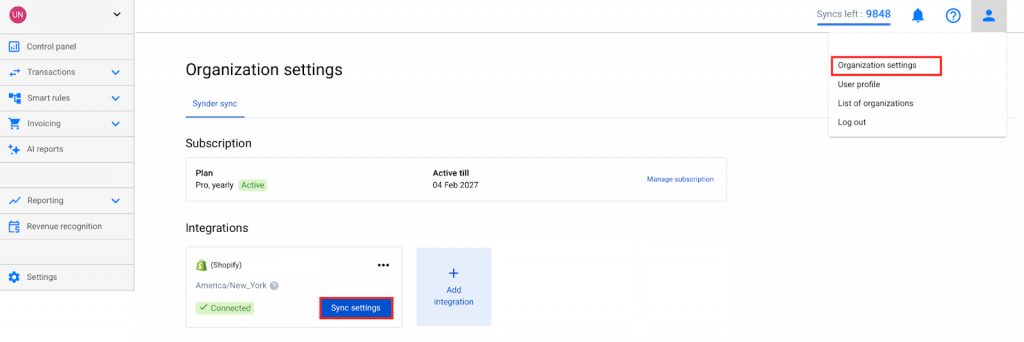
Option 2: From Organization Settings
- Click the person icon in the upper-right corner
- Select Organization settings
- Click Sync settings under Shopify
1. General settings
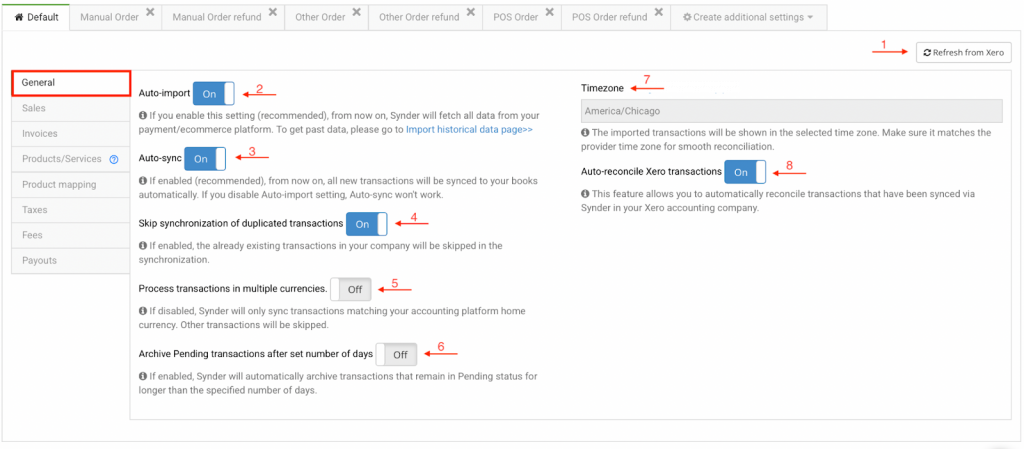
- Refresh from Xero – Manually refresh the Synder settings cache to apply changes made in Xero. Refer to How to Update Your Xero Settings.
- Auto-Import – Enables Synder to import transactions from Shopify automatically without affecting your sync balance or syncing them to Xero. Disable this setting to import transactions manually.
- Auto-Sync – Enables Synder to sync transactions automatically after import. Disable this setting to sync transactions manually from the Platform Transactions tab.
- Skip Synchronization for Duplicated Transactions – Prevents syncing of transactions that already exist in Xero with the same ID.
- Process Transactions in Multiple Currencies – Enables syncing of all transactions regardless of currency. Disable this setting to sync only transactions in your home currency.
- Automatically Archive Pending Transactions – Removes pending transactions that were never finalized on Shopify. To archive manually, go to the Platform Transactions tab, locate the transaction, click the three dots, and select Archive.
- Timezone – Displays your Shopify account timezone to align transaction dates between Shopify and Xero.
- Auto-reconcile Xero transactions – This feature automatically reconciles transactions synced via Synder in your Xero accounting company.
2. Sales
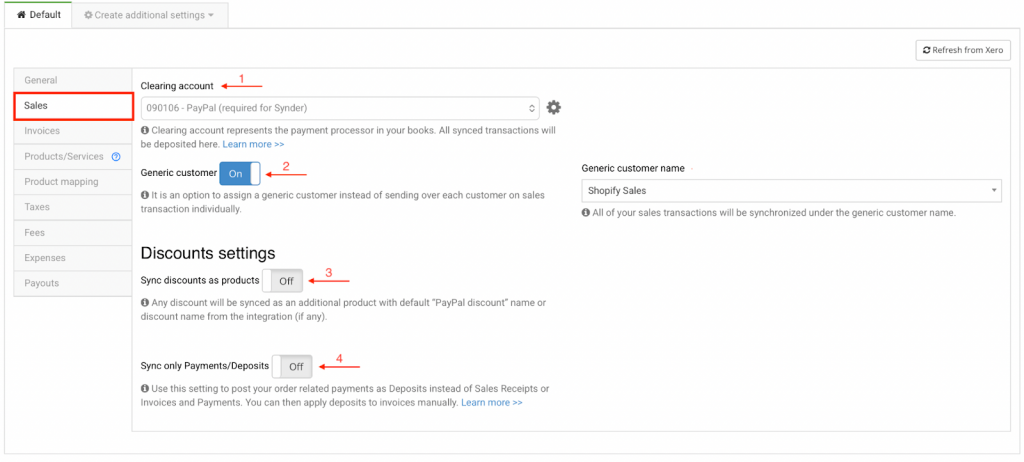
- Clearing Account – A buffer account where Xero sales receipts, refund receipts, and payments are deposited before transfer to main accounts.
- Apply Generic Customer – Assigns a single customer name to all transactions to maintain an organized customer list in Xero. Select or enter a default name, such as “Shopify Customer.”
- Sync Discounts as Products – Sync discounts as separate products, such as “Shopify Discount,” for detailed tracking in the Profit and Loss report.
- Sync Only Payments/Deposits – Record order-related payments as Receive Payments instead of Sales Receipts or Invoices and Payments. Apply the payments to invoices manually. Refer to Syncing Shopify Payments as Deposits/Overpayments.
3. Invoices
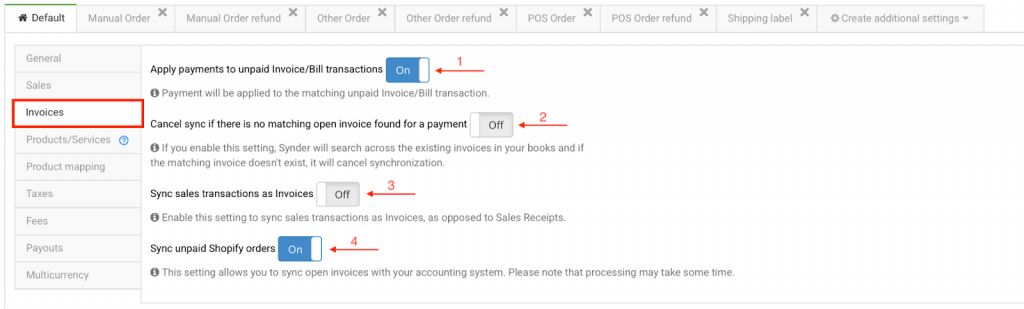
- Apply payments to unpaid Invoice/Bill transactions – When enabled, payments matching an unpaid invoice are applied automatically to close the invoice.
- Cancel sync if there is no matching open invoice found for a payment – Payments that do not match any open invoice will not sync, preventing incorrect entries.
- Sync sales transactions as invoices – Enable to sync sales transactions as Invoices instead of Sales Receipts.
- Sync unpaid Shopify orders – Enable to sync open invoices with the accounting system. Processing may take time.
4. Products and Services
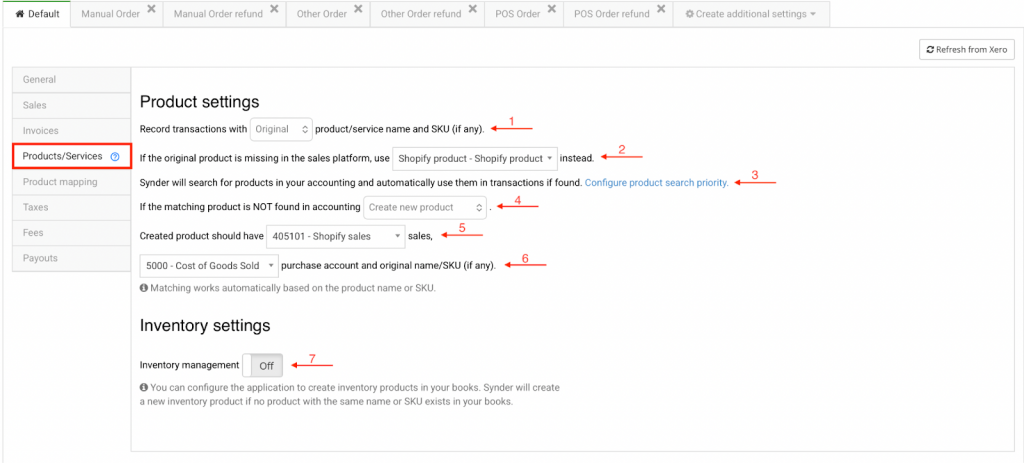
- Record transactions with Original/Common product/service name and SKU – Select whether Synder records transactions using the original product name or a common product name. Synder matches original names to existing products in your accounting software by name or SKU. If no match is found on the accounting software, Synder creates a new product. Common product names help standardize future transactions.
- If original product is missing – If the original product is missing on the sales platform, Synder uses the selected item or SKU.
- Configure product search priority – Set whether Synder searches by SKU or product name first when matching products between Shopify and Xero. Refer to Product Search Priority.
- If the matching product is not found* – If a product match does not exist in Xero, Synder can either create a new product or cancel the transaction sync.
- Assign income account – Select the income account to be used for this product.
- Assign expense account – Select the expense account to be used for this product.
- Inventory Management** – When enabled, Synder supports inventory products and records inventory transactions. Select the inventory asset account and the cost of goods sold (COGS) account. Refer to the inventory section for details.
Inventory
You can configure Synder to create inventory products in Xero. If a product with the same name or SKU does not exist, Synder will automatically create a new inventory product. Refer to Managing Products and Services with Synder – Per Transaction Sync.
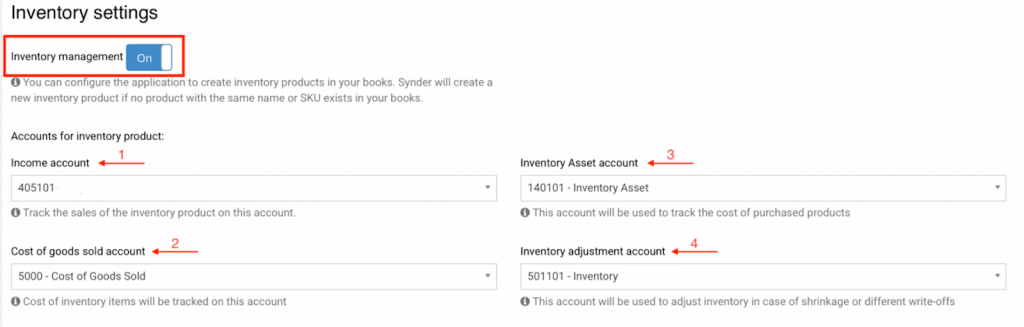
- Income Account – Select an income account to track sales for the inventory product.
- Cost of Goods Sold (COGS) Account – Select a COGS account to track costs for the inventory product.
- Inventory Asset Account – Select an inventory asset account to track the cost of purchased products.
- Inventory Adjustment Account – Select an inventory adjustment account to track shrinkage or other write-offs.
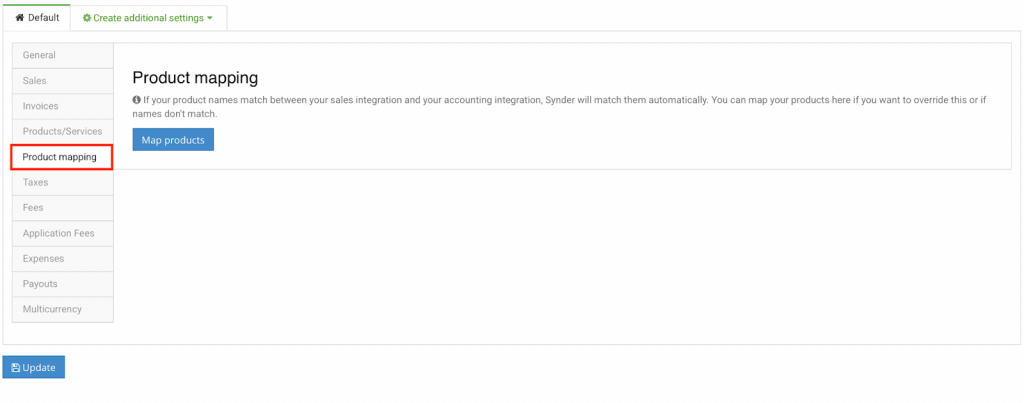
5. Product mapping *
Synder identifies existing products in your accounting company and applies them to transactions. If product names in your payment platform do not exactly match those in Xero, enter the payment platform product names in the right field to map them to the corresponding Xero product names in the left field. Refer to Product mapping feature.
6. Taxes tab settings
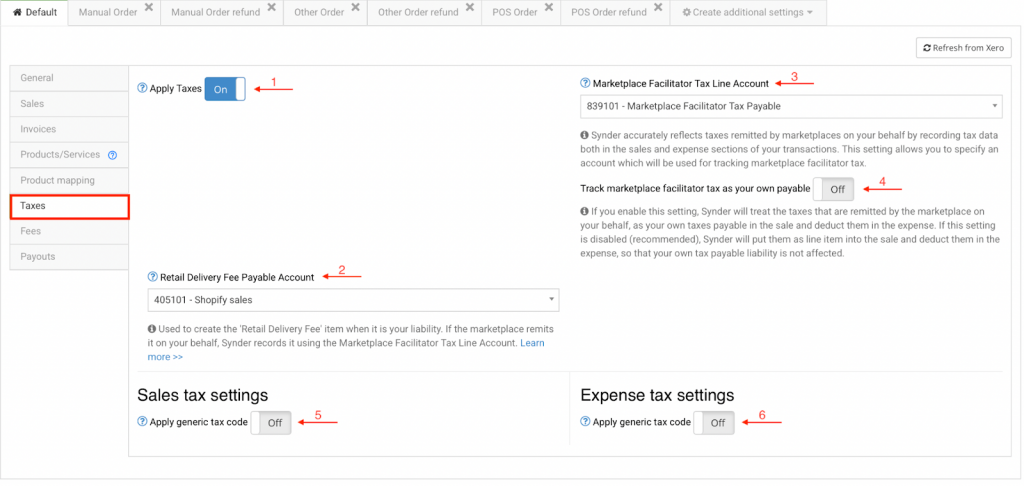
Synder transfers existing taxes to the corresponding Xero fields to ensure accurate tax reporting. If the payment processor does not apply tax, Synder does not transfer tax, and synced transactions do not include tax unless you enable features such as Apply generic tax. Refer to How sales tax works in Synder.
- Apply Taxes – Enable this setting to have Synder record taxes in the tax field for accurate reporting. Disable this setting to record taxes as a line item.
- Retail Delivery Fee Payable Account – Use this setting to create the “Retail Delivery Fee” item when it is a liability. If the marketplace remits the fee on your behalf, Synder records it using the Marketplace Facilitator Tax Line Account. Refer to Retail Delivery Fee.
- Marketplace Facilitator Tax Category – Synder records marketplace-remitted taxes in both the sales and expense sections of transactions. Use this setting to select the account for tracking marketplace facilitator tax. Refer to Marketplace Facilitator Tax.
- Track marketplace facilitator tax as your own payable – When enabled, Synder records marketplace-remitted taxes as tax payable on the sale and deducts them as an expense. When disabled, Synder records these taxes as a line item on the sale and deducts them as an expense without affecting tax payable. Refer to Marketplace Facilitator Tax.
- Sales tax settings – Apply generic tax code – When enabled, Synder applies the specified tax rate to all synced sales transactions. Separate tax rates can be selected for taxed and non-taxed transactions.
- Expense tax settings – Apply generic tax code – When enabled, Synder applies the specified tax rate to all synced expense transactions to ensure consistent tax recording.
7. Fees
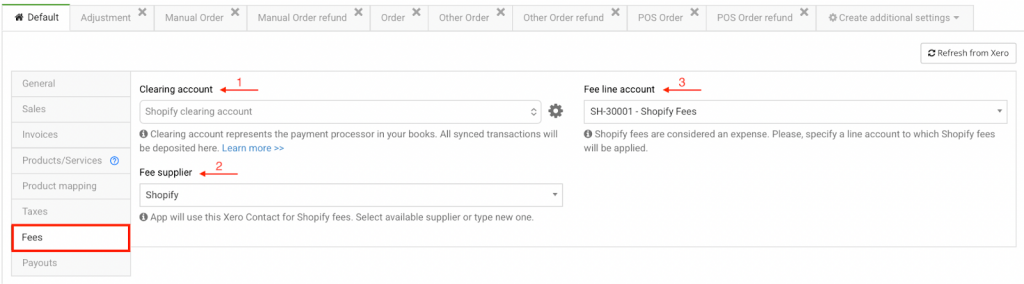
- Clearing Account – Select the clearing account where Shopify fees are recorded. Use the same account as the Sales clearing account to maintain consistency across related transactions.
- Fee Supplier – Select a Xero supplier to associate with Shopify fees, or enter a custom name, such as “Shopify.”
- Fee Line Account – Select the expense category to apply Shopify fees.
8. Payouts

The Payouts tab tracks Shopify payouts, which are bulk transfers from your payment processor to your bank (daily, weekly, monthly, etc.). Synder records these as transfers from the clearing account to the checking account. Syncing payouts with sales and expenses ensures accurate cash flow tracking and simplifies reconciliation.
- Process payouts – When enabled, Synder tracks Shopify payouts and creates transfers to the checking account. When disabled, payouts are not synced, and the clearing account is not cleared automatically.
- Transfer Funds To – Select Xero checking account for Shopify payout deposits.
9. Additional settings
Use the Create Additional Settings option to categorize transaction types. Synder only processes POS Order, POS Order Refund, Manual Order, Manual Order Refund, Other Order, and Other Order Refund transactions when you enable the corresponding settings. Make sure you enable or disable these settings on all tabs, not just the default tab.
See the relevant guides for details:
How to Sync Shopify POS Orders and POS Order Refunds,
How to Sync Shopify Manual Orders and Manual Order Refunds.
Reach out to Synder Team via online support chat or email with any questions you have – we are always happy to help you!