
With your company and accounts connected, you can start customizing the Stripe–Xero integration settings. Synder settings control how transactions, invoices, fees, expenses, and payouts are recorded in Xero automatically.
The Stripe settings are organized into the following sections:
- 2. Sales
- 3. Invoices
- 4. Products and Services
- 5. Product mapping
- 6. Taxes tab settings
- 7. Fees
- 8. Application Fees
- 9. Expenses
- 10. Payouts
Plan availability
Essential+ — Settings marked with this badge require an Essential plan or higher.
Pro/Premium — Settings marked with this badge are available on Pro and Premium plans only. View plan comparison →
How to Access Stripe Settings
To access your Stripe settings in Synder:
Option 1: From the main menu
- Select the appropriate organization from the top-left corner
- Click Settings in the left-hand menu
- Choose Stripe from the dropdown list
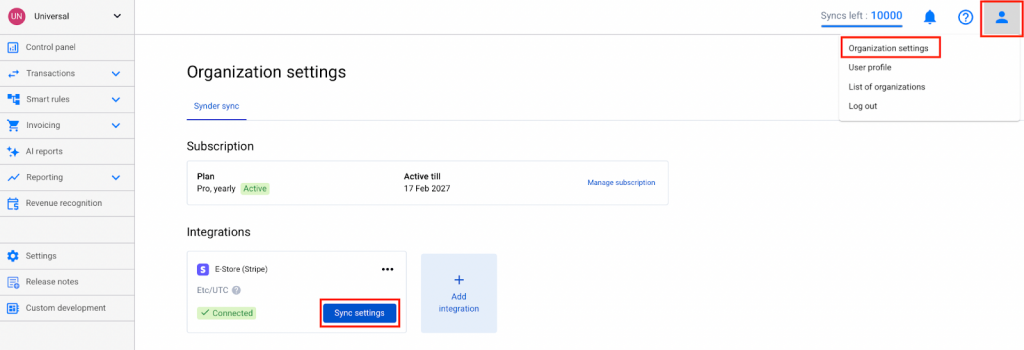
Option 2: From Organization Settings
- Click the person icon in the upper-right corner
- Select Organization settings
- Click Sync settings under Stripe
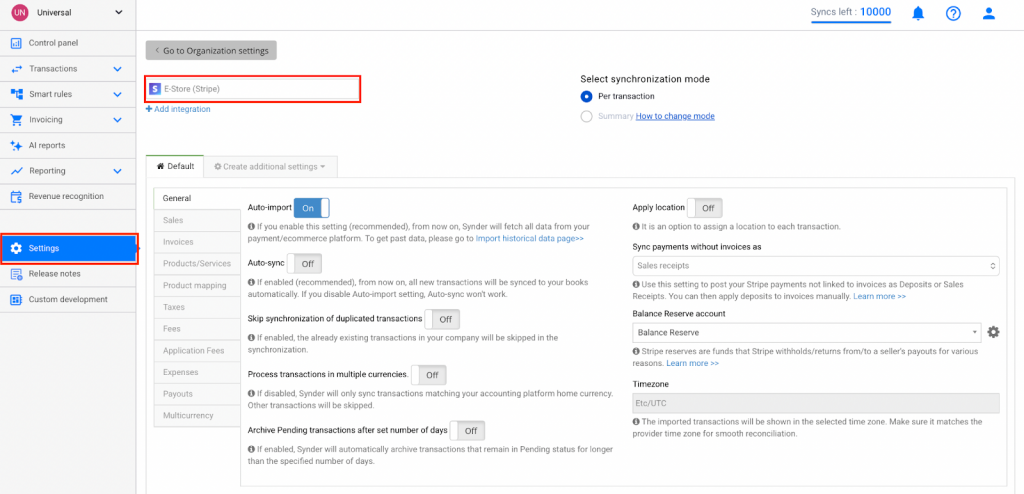
1. General settings

- To apply any changes you make in Xero, you’ll need to manually refresh the Synder settings cache. Learn more about How to Update Your Xero Settings.
- Auto-Import – When enabled, Synder automatically imports transactions from your Stripe integration without affecting your sync balance or syncing them to Xero. When OFF, import transactions manually.
- Auto-sync – When enabled, Synder automatically syncs transactions after import. When OFF, select transactions to sync manually.
- Skip synchronization for duplicated transactionsEssential+ – When enabled, transactions that already exist in Xero will be skipped, preventing duplicates.
- Process transactions in multiple currencies – When enabled, all transactions are synchronized, regardless of currency. When OFF, only transactions in your home currency are synced.
- Automatically Archive Pending Transactions – Automatically removes pending transactions that were never finalized on Stripe after a certain period of time, keeping your Synder dashboard clean. To manually archive a transaction, go to the Platform Transaction tab, locate the transaction, click the three dots next to it, and select Archive.
- Sync payments without invoices as Invoice+Payment or OverpaymentEssential+ – Payments without invoices can be synced as Invoice+Payment or Overpayment, allowing proper tracking and closing of invoices created later. For more details, see the guide Syncing Stripe Payments as Deposits/Overpayments in Synder.
- Balance reserve account – Select a liability account in Xero where Stripe reserves will be posted before being released in payouts.
- Timezone – Shows the timezone of your Stripe account to help match dates between Stripe and Xero.
- Auto-reconcile Xero transactions – this feature helps to automatically reconcile transactions that have been synced via Synder in your Xero accounting company.
2. Sales
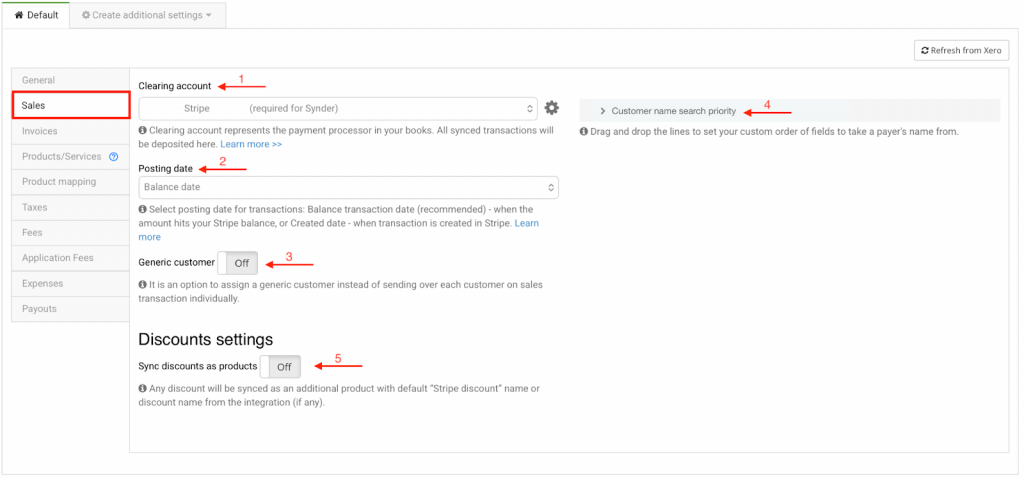
- Clearing account – A buffer account where Xero sales receipts, refund receipts, and payments are deposited by Synder, before it clears out by payouts from the integration.
- Posting date – Choose the source of the accounting document date: either the creation date or the balance date of the sales transaction. For more details, see the guide Stripe Posting Date Setting.
- Apply generic customerEssential+ – When ON, all transactions are assigned a generic customer name to keep your Xero customer list organized. Choose or enter a default name, such as “Stripe Customer,” to apply to all transactions.
- Customer Name Search PriorityEssential+ – Choose which field Synder checks first to get the customer name. If the name isn’t found, Synder moves to the next field in the priority list. See our guide for more details Customer Name search priority.
- Sync discounts as productsPro/Premium – Discounts can be synced as separate products, such as “Stripe Discount,” for detailed tracking.
3. Invoices
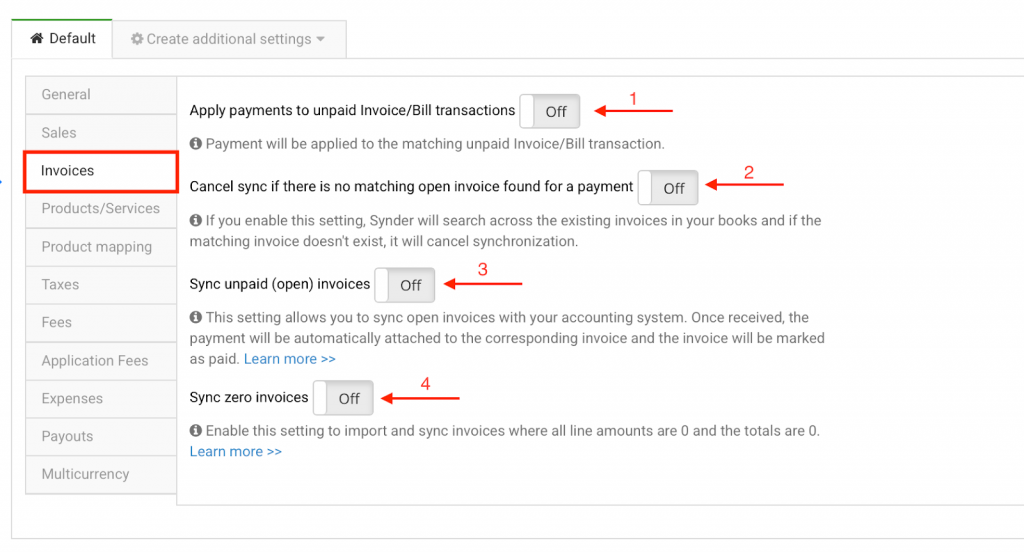
- Apply payments to unpaid Invoice/Bill transactionsEssential+ – When ON, payments that match an unpaid invoice are applied automatically, ensuring invoices are closed correctly.
- Cancel sync if there is no matching open invoice found for a paymentEssential+ – If a payment doesn’t match any open invoice, it won’t sync, preventing incorrect entries.
- Sync unpaid (open) invoicesEssential+ – When ON, open invoices can be synced with Xero. Incoming payments are automatically applied to the correct invoice and marked as paid if the “Apply payments to unpaid invoices” setting is enabled.
- Sync zero invoicesEssential+ – When enabled, invoices with zero line amounts or total amounts are imported and synced.
4. Products and Services
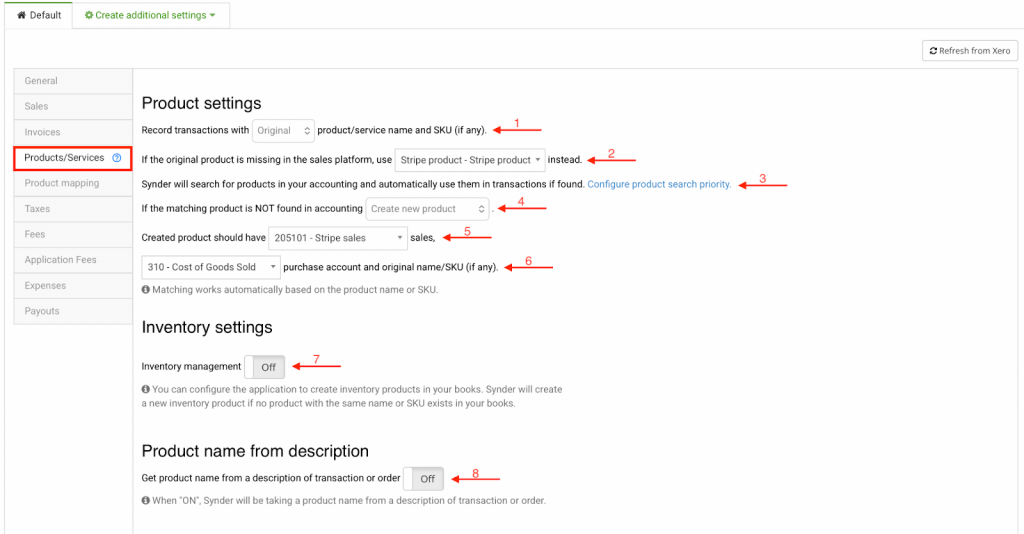
- Record transactions with Original/Common product/service name and SKU – Choose whether Synder records transactions using the original product name or a common product name. Original names are matched to existing products by name or SKU, or a new product is created if none exists. Common product names help standardize future transactions.
- If original product is missing – If the original product is missing in the sales platform, Synder will use the item or SKU.
- Configure product search priority – Allows you to define whether Synder searches by SKU or product name first when matching products between Stripe and Xero. See our guide for more details Product Search Priority
- If the matching product is not foundEssential+ – If the matching product doesn’t exist in Xero, Synder can either create a new product or cancel the transaction sync.
- Assign income account – Select the income account that will be used for this product.
- Assign expense account – Select the expense account that will be used for this product.
- Inventory ManagementPro/Premium – When enabled, Synder supports inventory products and posts inventory transactions. You must select the inventory asset account and cost of goods sold (COGS) account. See more details about the inventory below.
- Get product name from transaction or order description – When enabled, Synder pulls the product name from the transaction or order description, such as Stripe charge details, ensuring accurate product mapping.
You can configure Synder to create inventory products in Xero. If no product with the same name or SKU exists, Synder will create a new inventory product automatically. See our guide for more details Managing Products and Services with Synder – Per Transaction Sync.
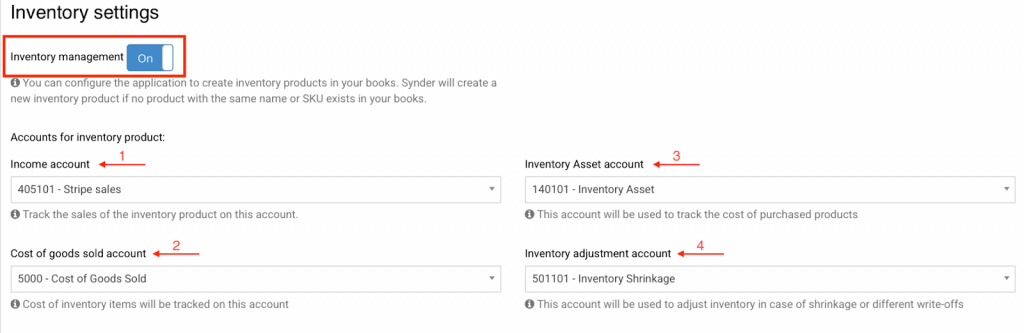
- Select an income account to track sales for the inventory product.
- Select a Cost of Goods Sold account to track the cost for the inventory product.
- Select an inventory Asset account to track the cost of purchased products.
- Select an inventory adjustment account to track shrinkage or different write-offs.
5. Product mapping
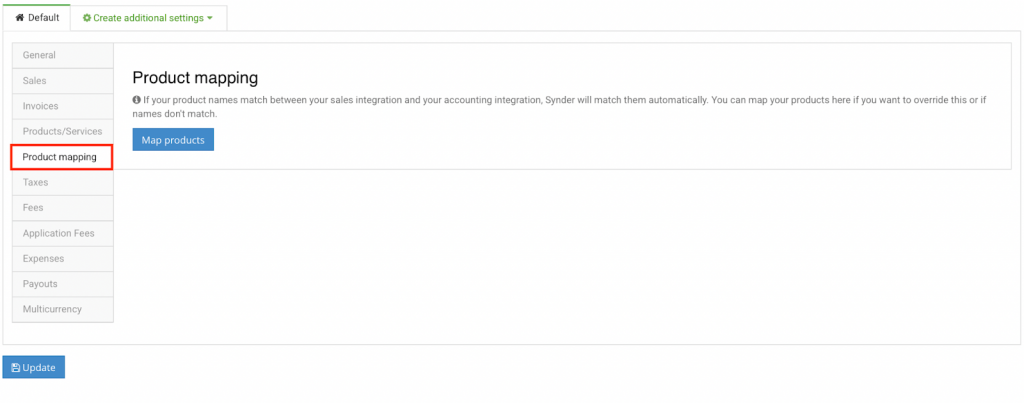
Synder is able to identify existing products in your accounting company and apply them to transactions. If product names in your payment system and accounting company don’t match 100%, fill in the product names from your payment platform in the right field to map them to product names from your Xero in the left field. Check out an additional guide about Product mapping feature.
6. Taxes tab settings
Synder transfers existing taxes into the appropriate Xero fields to ensure accurate tax reporting. If no tax is applied on the payment processor side (e.g., Stripe), there is nothing to transfer, and taxes will not be applied to synced transactions—except in cases where features like “Apply generic tax” are used.
Check out more about how sales tax works in Synder to understand how to use the fields shown in the photo below
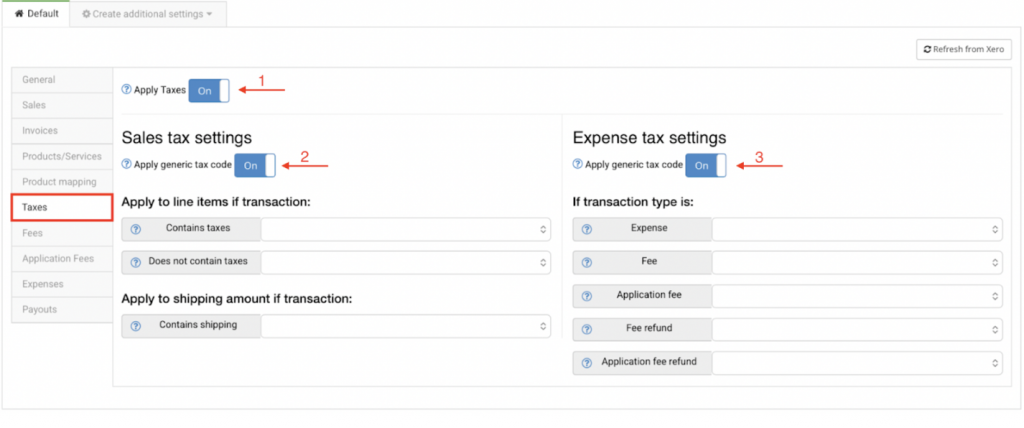
- Apply Taxes – When ON, Synder automatically finds the matching tax code in Xero and applies it to the transaction for accurate tax calculation and reporting.
- Sales tax settings – Apply generic tax code – When ON, Synder applies the tax rate specified in the settings to all synced sales transactions, including both taxable and non-taxable transactions.
- Expense tax settings – Apply generic tax code – When ON, Synder applies the specified tax rate to all synced expense transactions, ensuring consistent tax recording for expenses.
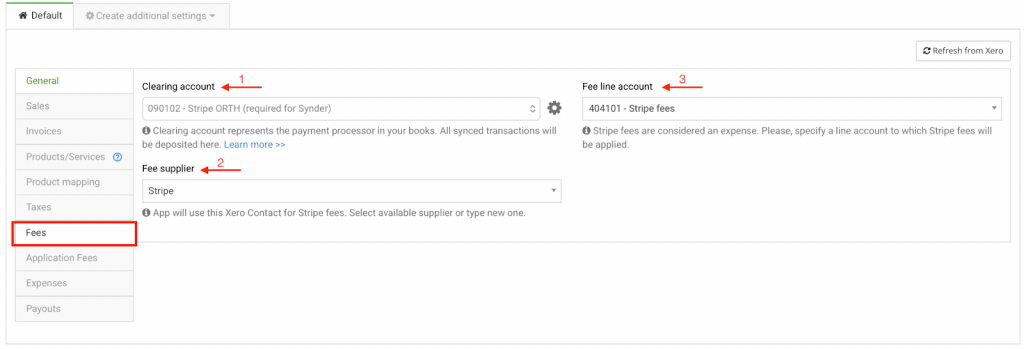
7. Fees
- Clearing Account – Select the clearing account where Stripe fees are recorded. Use the same account as the Sales clearing account to keep all related transactions consistent.
- Fee supplier – Select a Xero supplier to associate with your Stripe fees, or enter a custom name such as “Stripe.”
- Fee Line Account – Select the expense category to apply Stripe fees to.
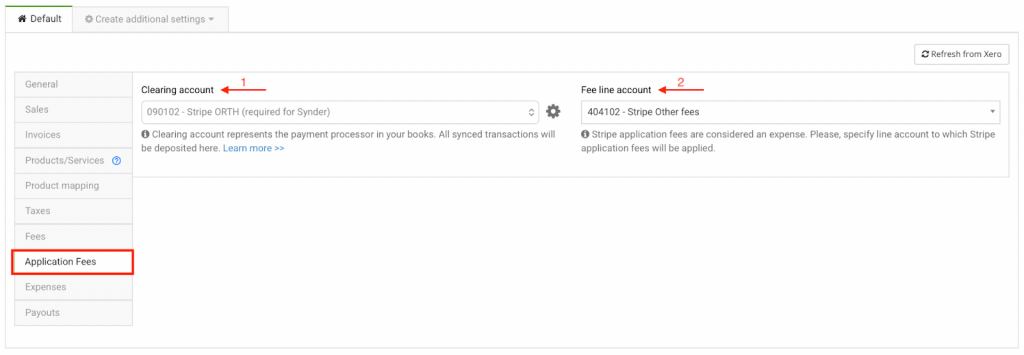
8. Application Fees
Application fees are expenses for your customers when they use a third-party app to pay on your platform. For example, if you process a $40 payment through Stripe and a third-party app charges a 0.5% fee ($0.20), and Stripe takes its fee (e.g., $1.46), the net amount is $38.34.
- Clearing account – Select the clearing account where application fees are recorded. Use the same account as the Sales clearing account to keep records consistent.
- Fee Line Account – Select the expense category to apply application fees to.
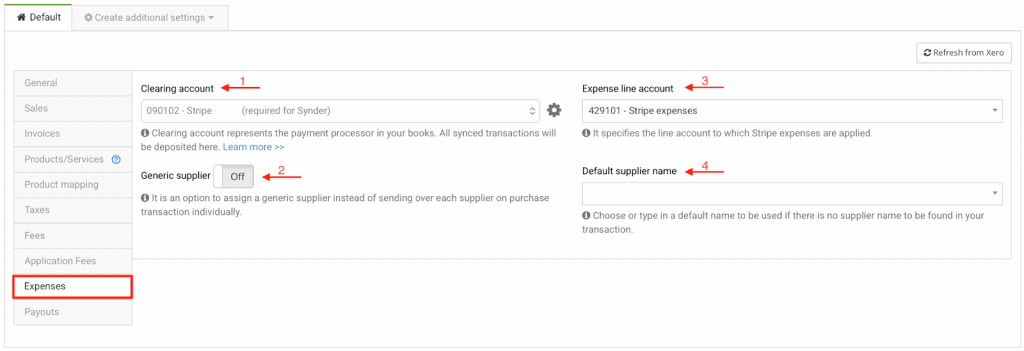
9. Expenses
- Clearing Account – Select the clearing account where Stripe expenses are recorded. Use the same account as the Sales clearing account to maintain consistency.
- Generic Supplier – When ON, Synder assigns a default vendor name to all Stripe transactions, replacing the names from Stripe. Choose an existing vendor or enter a custom name in the Generic Vendor dropdown.
- Expense Line Account – Select the Xero category to apply Stripe expenses for accurate tracking and reporting.
- Default Supplier Name – Select or enter a default vendor name to use when a Stripe transaction does not include a supplier name.
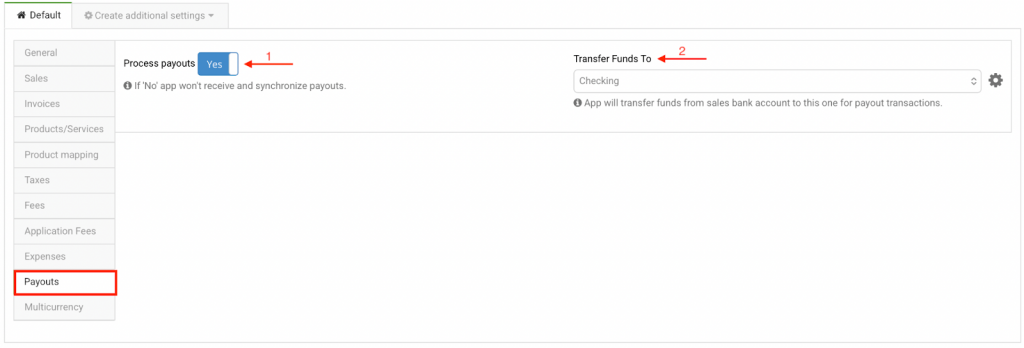
10. Payouts
This tab tracks Stripe payouts, which are bulk transfers from your payment processor to your bank (daily, weekly, monthly, etc.). Synder records these as bank transfers from the clearing account to your checking account. Syncing payouts along with sales and expenses helps mirror the actual cash flow and simplifies reconciliation.
- Process payouts – When ON, Synder tracks Stripe payouts and creates transfers to your checking account. When OFF, payouts are not synced, and the clearing account won’t be cleared automatically.
- Transfer Funds To – Select Xero checking account where the Stripe payouts are deposited.
Additional Settings

Use the “Create additional settings” option only if you want to categorize different types of transactions. Use this feature if you’re tracking some transaction types differently.
Reach out to Synder Team via online support chat or email with any questions you have – we are always happy to help you!