PayPal, a global online payment system, has extended its features beyond mere transactions. It now offers a user-friendly invoicing capability that helps professionals and businesses bill their clients with ease. Knowing how to send an invoice on PayPal is important for businesses. It adds professionalism and makes collecting payments easier. This article gives a clear guide on how to bill your clients so you won’t miss anything important.
Step-by-step guide to sending an invoice on PayPal
Creating and sending an invoice through PayPal is straightforward. Here’s a step-by-step guide to the PayPal invoicing process.
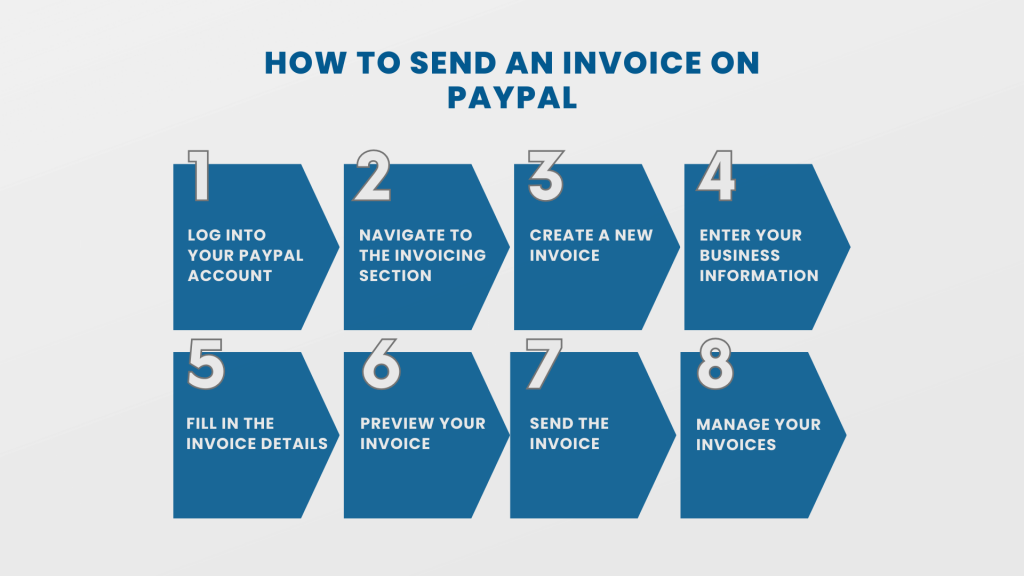
Step #1. Log into your PayPal account
Visit the PayPal website and log into your account using your credentials. Ensure that you have a Business account or upgrade your Personal account to access invoicing features.
Step #2. Navigate to the Invoicing section
After you log in, you can either select ‘More‘ at the top or find “Invoicing” in your account dashboard or sidebar.
The location of “Invoicing” may vary depending on your region and PayPal’s interface.
Step #3. Create a new invoice
Click on the ‘Create‘ or ‘Create Invoice‘ button. You’ll be taken to an invoice template where you can input all the necessary details.
Step #4. Enter your business information
If it’s your first time, add details like your business logo, address, and contact information. This will give your invoice a professional appearance.
Step #5. Fill in the invoice details
- Recipient’s email: Enter the email address of the person or business you’re billing.
- Item description: List the products or services you’re charging for, along with their prices, quantities, and any applicable taxes or discounts.
- Additional details: Add invoice number, payment terms and conditions, and any personal notes or messages you want to include.
Additional options (optional):
- Shipping: You can add shipping details and costs if you’re shipping a physical product.
- Discount: Apply any discounts if necessary.
- Attach files: Attach relevant files or documents, if needed.
Step #6. Preview your invoice
Before sending, always preview the invoice to ensure all details are correct and appear as you want them to. Click on the ‘Preview‘ option to view your invoice.
Step #7. Send the invoice
Once you’re satisfied with the invoice’s appearance and details, click on the ‘Send‘ button to send the link to the invoice. The invoice will be emailed directly to the recipient.
Customers pay directly through the link provided in the email.
Step #8. Manage your invoices
After sending, you can check the status of your invoices in the invoicing section. The status can be paid, pending, or overdue. You can also send reminders or manage disputes if necessary.
Keep in mind that the steps and options may differ slightly depending on your location and any changes to PayPal’s interface. Always refer to PayPal’s official documentation or help section if you face any difficulties.
Learn how to manage your PayPal invoices with ease with the help of Synder Sync.
Tips and best practices for sending invoices on PayPal
Personalize your invoices
Use your logo, business name, and branding colors (if applicable) to make your invoices look professional and instantly recognizable to your clients.
Be detailed and clear
Itemize the services or products provided, including descriptions and individual prices. The clearer your invoice, the less room there is for disputes or misunderstandings.
Set clear payment terms
Mention when the payment is due. If there are penalties for late payments or benefits for early payments, make sure to outline them.
Use invoice templates
If you often send similar invoices, utilize templates to save time. PayPal allows you to create and save multiple invoice templates.
Keep records
Always maintain a copy of the invoices you send. This can be useful for tax purposes, accounting, or in case of disputes.
Learn more about the IRS workflow.
Send reminders
If a client hasn’t paid by the due date, don’t hesitate to send them a polite reminder through PayPal. This can often nudge clients to settle unpaid invoices..
Be wary of fees
Be aware that PayPal charges a fee for receiving payments. Depending on the volume of your transactions and your location, these fees can add up. Consider these fees when setting prices or discuss with your client who pays transaction fees.
Stay safe
Only send invoices to known and trusted clients. Scammers might request invoices to exploit potential vulnerabilities. Always be cautious about suspicious requests, especially if they promise large payments for little to no work or ask for personal information (credit card and bank account details, etc.) outside of the invoicing platform.
Communicate outside of PayPal
While sending an invoice, it’s also good to communicate with your client through other means (like email or a phone call) to ensure they’re expecting the invoice and to prevent it from being overlooked.
Consider recurring invoices
If you have regular services or products that you provide to a client, consider setting up recurring invoices to automate the billing process.
Conclusion
Efficient invoicing is pivotal for maintaining cash flow and professionalism. Businesses can seamlessly integrate billing into their operations by learning how to send an invoice on PayPal. With the tips and insights provided above, you’re now equipped to make the most of PayPal’s invoicing capabilities.