
By using Smart Rules, you can automate applying a class to a product in QuickBooks and make sure there is nothing to edit manually. Synder will get your books accurate and detailed. Everything you need is to create & customize the Smart Rule once – and enjoy the results.
Let’s say you have different products in your payment gateway/e-commerce:
- ‘Green Tea’;
- ‘Coffee’;
- ‘Cookies’;
- ‘Cakes’.
And you want ‘Green Tea’ and ‘Coffee’ products to be applied to the specific Class ‘Drinks’ in QuickBooks, ‘Cookies’ and ‘Cakes’ to be applied to the Class ‘Food’, so that you can see details in Profit and Loss grouped properly. Continue reading to learn how to build the rule needed and automate the process.
*Rules work on the basis of ‘if-then’ conditions – so you can create flows and make Synder adapt to your needs. The process contains 2 phases:
- Synchronization of a transaction from the payment processor or e-commerce channel to your accounting system.
- Update of the created QuickBooks transaction based on the information inside of it, which happens almost instantly based on the conditions of the rule.
Overview:
Set up classes in QuickBooks
First, make sure that class tracking in QuickBooks Online is enabled and is working per line (row) as QuickBooks provides 2 modes of class tracking (per transactions and per line). If class tracking is disabled, please, check out how to enable classes in QuickBooks.
Once classes are enabled, please create a needed set of classes in your QuickBooks first, then you will be able to use them in Synder. Follow these steps to create classes in QuickBooks:
- Go to QuickBooks ‘Settings’ ⚙ and then ‘All Lists’.
- Select ‘Classes’.
- Select ‘New’. Give this class a name.
- Select ‘Save’.
- Repeat steps 3 and 4 to create all the classes needed.
Building a rule in Synder to classify items
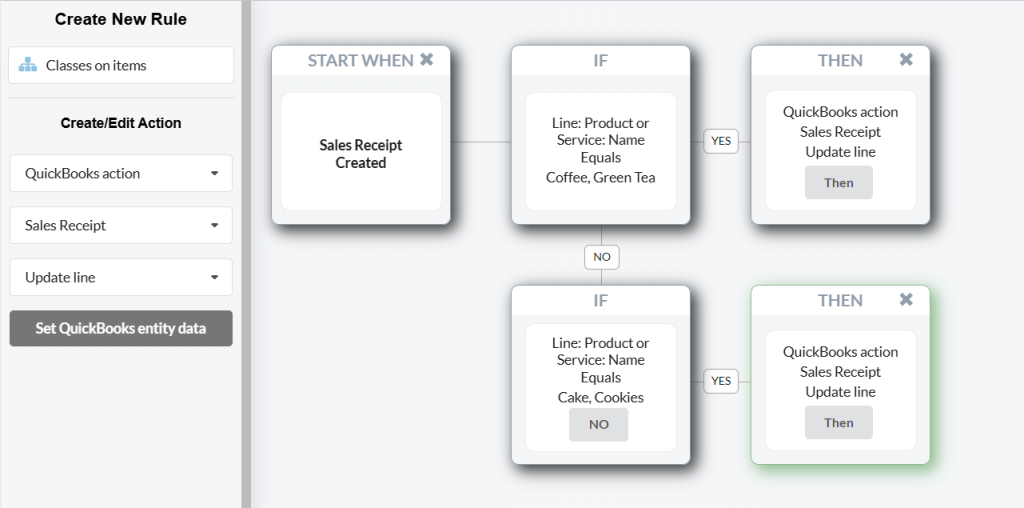
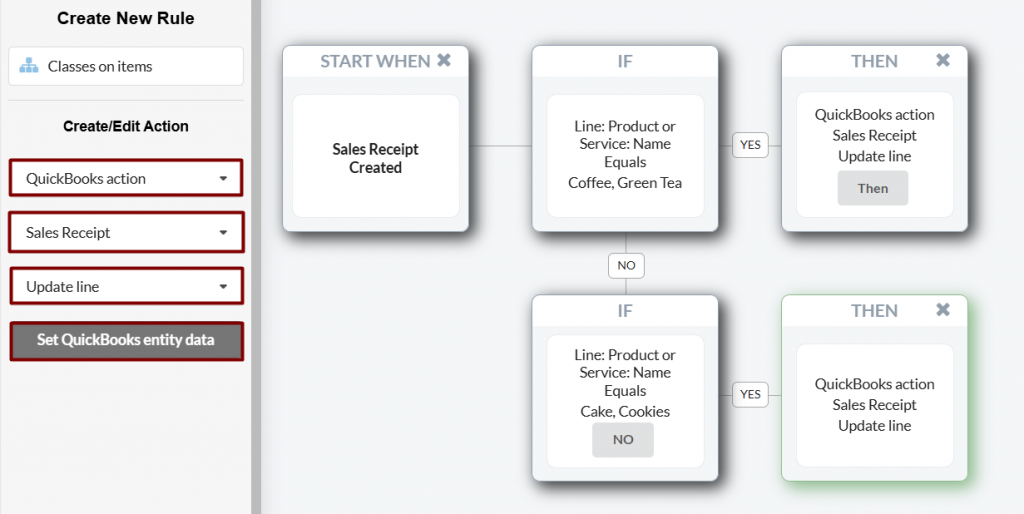
And now, let’s create a rule in Synder to classify sales, it should look as on the screenshot below:
Follow the instructions below to build such a rule step by step:
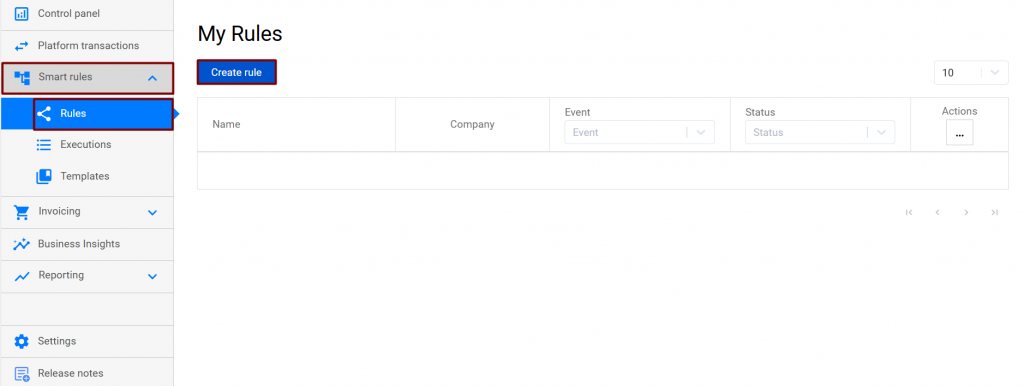
- Go to the ‘Smart Rules’ Tab → ‘Rules’ → ‘Create rule’.
- Optionally name the rule the way you would like.
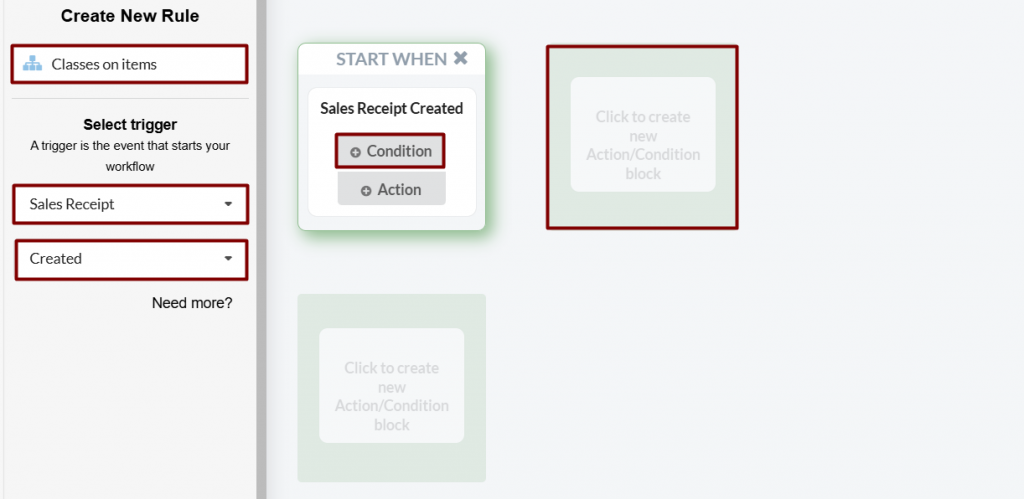
- Choose the “trigger” that starts your rule: Sales Receipt→ Created. It means that each time Synder creates a Sales Receipt in your QuickBooks, this Rule will be automatically implemented.
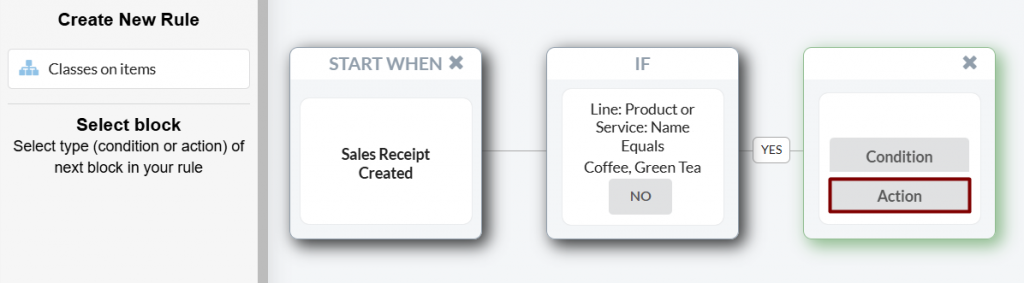
- Click “Condition” to set the future conditions for the rule and click the nearest box.
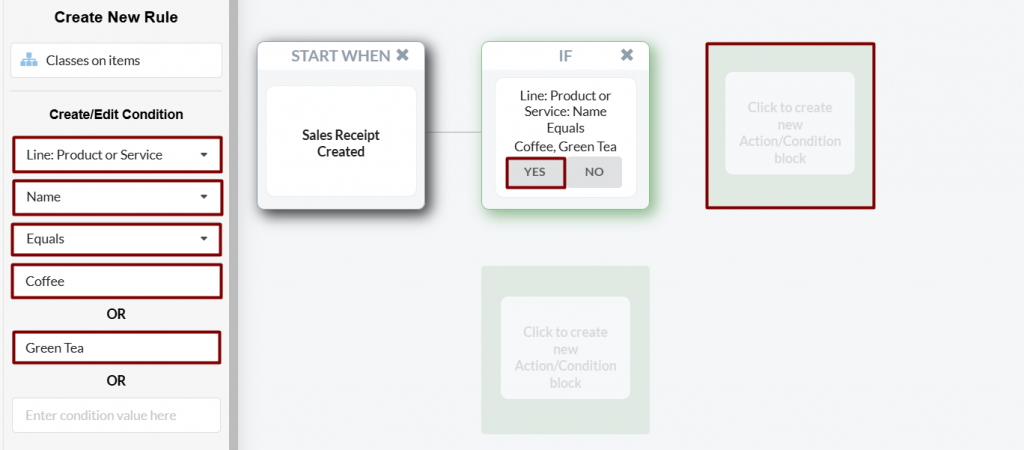
- On the left, select if Line: Product/Service → Name → Equals → ‘Green Tea’ or ‘Coffee’. This means that whenever a product/service name is ‘Green Tea’ or ‘Coffee’, Synder will perform the action you set next. Note: Names must be exactly the same if you select the Equals option.
- Click “YES” and then click the nearest box.
- Select Action.
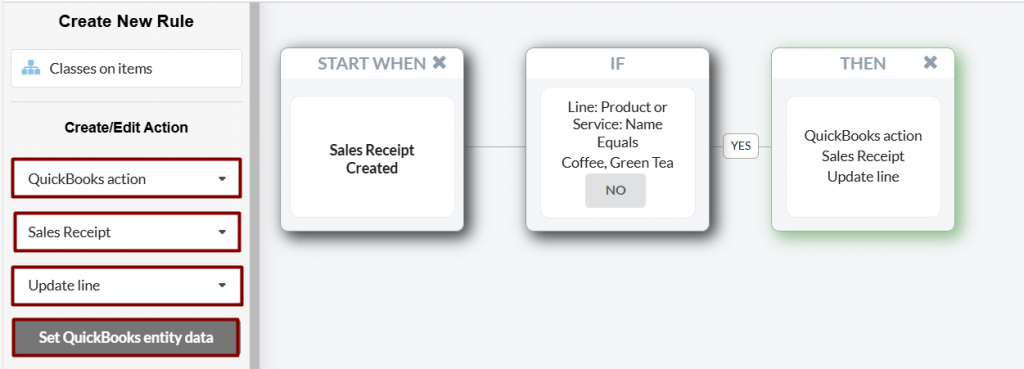
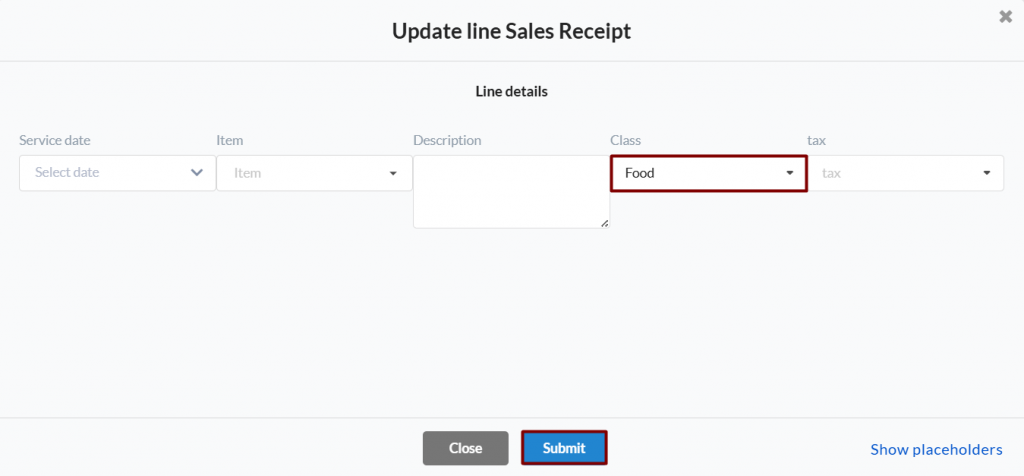
- Set: QuickBooks action → Sales Receipt → Update line → Set QuickBooks entity data. This will tell Synder that it should update a particular line of the Sales Receipt (with Coffee or Green Tea) that has triggered the rule.
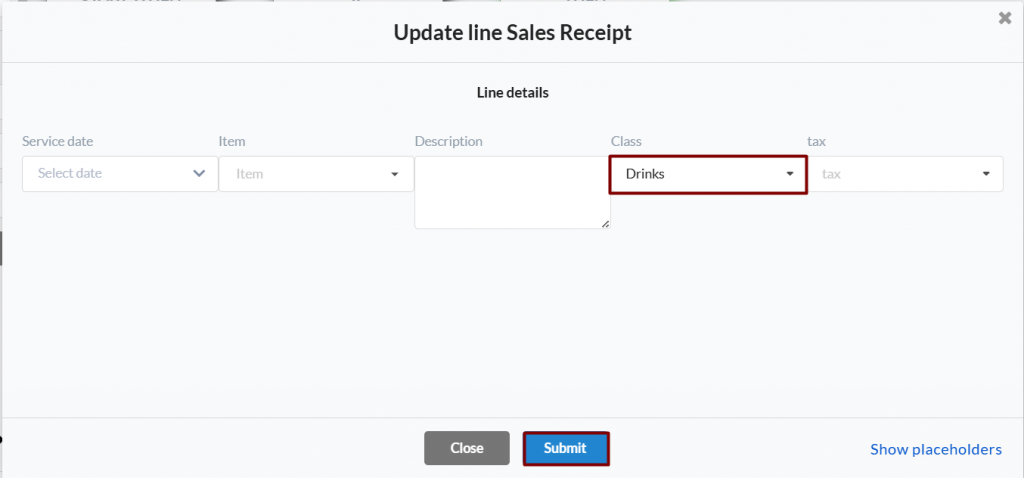
- In the QuickBooks Entity data popup, select the “Drinks” class and click Submit.
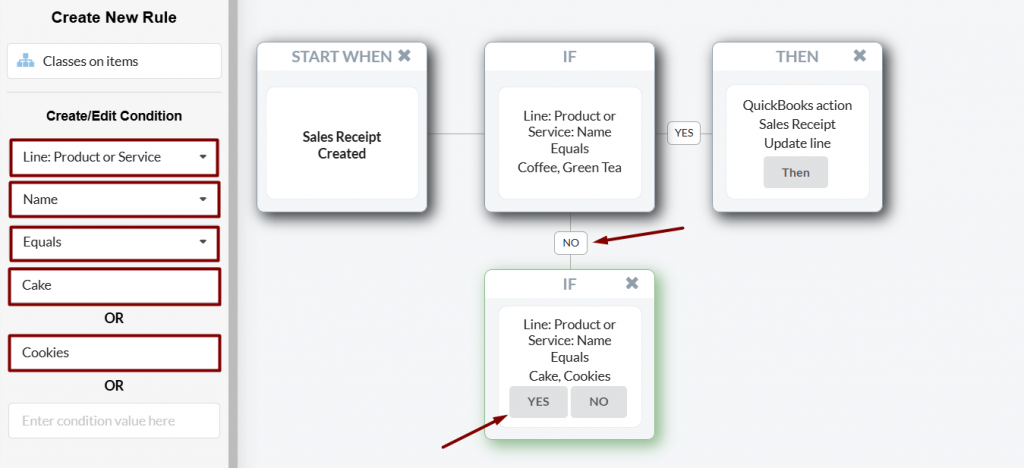
- Get back to the “If” block and go with the “NO” Condition block of the rule to set the class for remaining products right the same way.
Select: if Product/Service → Name → Equals → ‘Cookies’ or ‘Cakes’ and press “YES”.
- Finally, choose the action: QuickBooks action → Sales Receipt → Update line → Set QuickBooks Online entity data. This will tell Synder that it should update a particular line of the Sales Receipt (with Cake or Cookies items) that has triggered the rule.
- In the Set QuickBooks entity data, select the “Food” class this time.
- Click on “Save & Close Rule”.
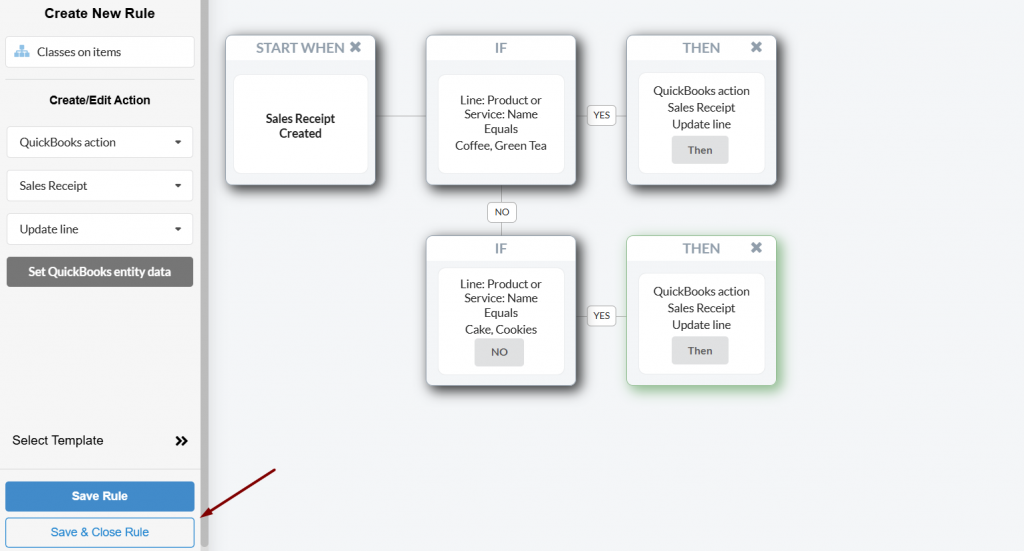
Congrats, you have finished the setup for classification of your sales per item! Now anytime Synder records data into your QuickBooks, it will check the lines and assign classes automatically based on the conditions you just set.
Classified transactions and details Profit and Loss in QuickBooks
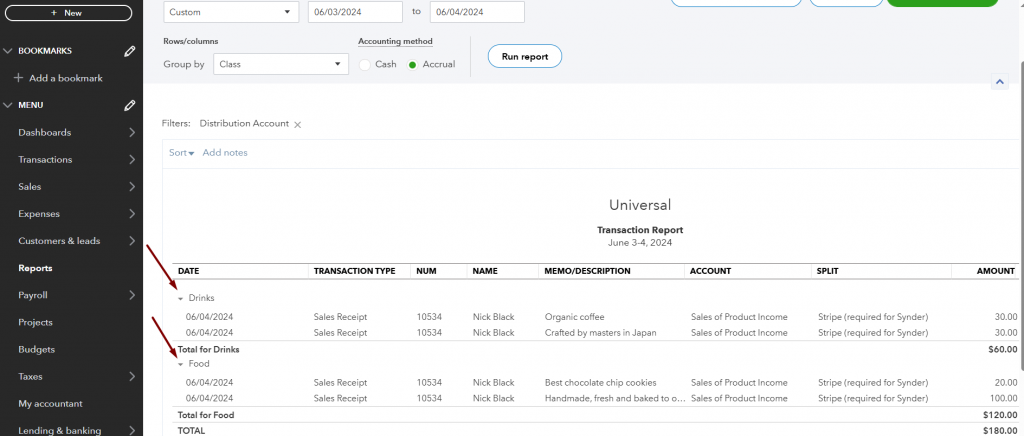
Open the synced transaction in QuickBooks directly to see the result or go to the ‘Platform transactions’ tab in Synder → find this Sales Receipt with the ‘Synced’ status → press ‘Explain’ → ‘Show in QB’ to open it via direct link.

If you go to the ‘Reports’ Tab on your QuickBooks Online – you will see that each product was assigned to the correct Class you specified in the Smart Rule. Have your Profit and Loss and other reports as detailed as needed automatically with Synder.
You can disable any rule you no longer use at any time, and then enable it again when you need it. There’s also the option to edit and delete. Also, learn how to apply classes to income transactions automatically, as well as how to apply classes to expenses automatically.
Reach out to the Synder team via online support chat, phone, or email with any questions you have – we’re always happy to help you!