.png)

QuickBooks is a widely-used accounting software that helps small and medium-sized businesses manage their finances efficiently. And as your business grows, you need to update not only your strategies but your setup too. This process can get confusing and tricky, with challenges like moving your precious database to a new computer and aligning it with the upgraded system. Lucky you, QuickBooks has a feature that lets you smoothly transfer all your important information.
In this article, we’ll walk you through the steps involved in transferring QuickBooks to a new computer, from backing up your company file to updating the software. So let’s get started.
Key takeaways
- Top reasons for transferring QuickBooks include hardware upgrades and resolving technical issues.
- QuickBooks provides its own migration tool to simplify the transition process – the QuickBooks Migrator Tool.
- While migrating your information, make sure to create backup files, perform compatibility checks, and not to rush the process.
A quick view at QuickBooks Desktop and Online
When do you need to transfer QuickBooks to a new computer?
A quick look at QuickBooks Desktop and Online
Before we get to the nitty-gritty, we can recall that QuickBooks is one of the most popular accounting software. It’s a leading accounting software with around 140,000 companies as customers, capturing 85.45% of the market share. And as I’m sure you know, it comes in two versions: Online and Desktop.
QuickBooks Online is cloud-based, allowing access from anywhere with an internet connection. And this is the reason that eliminates the need for QuickBooks Online file transfers when switching devices.
QuickBooks Desktop is installed locally on a device or server, preferred by larger businesses and accounting firms for its customization options and higher security standards. So speaking about the need to reinstall the software on another device, we mean QuickBooks Desktop.
Read our article How to Convert From QuickBooks Desktop to Online.
Top reasons for moving QuickBooks to another device
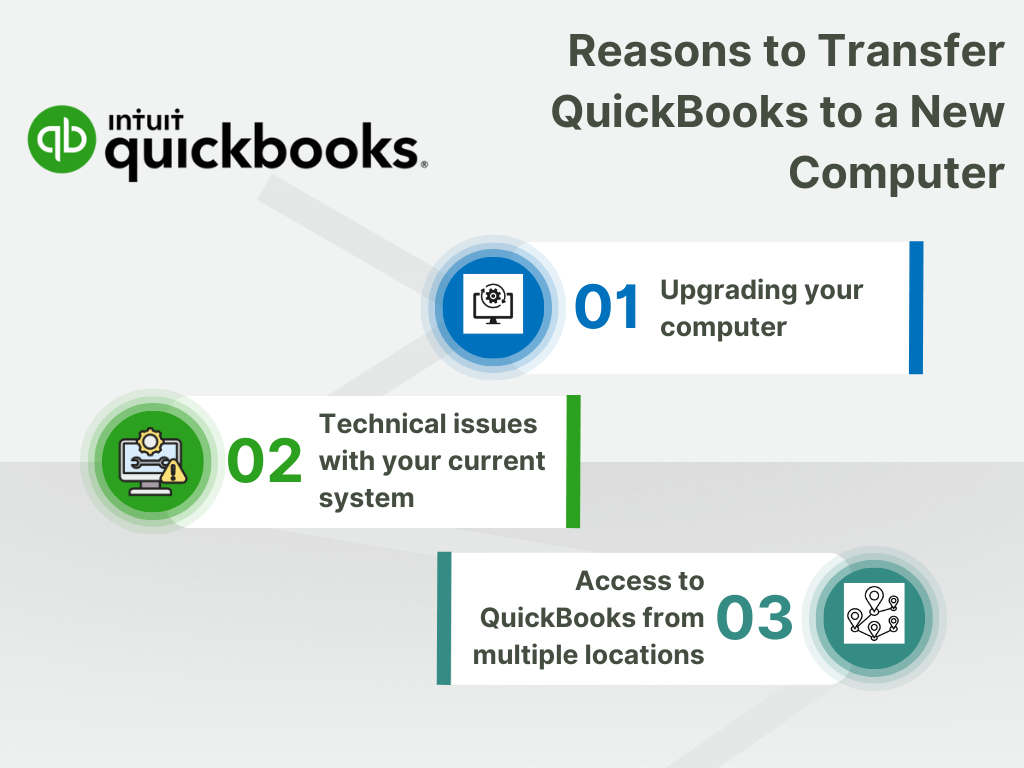
As you can see in the picture, there are 3 main reasons you might want to transfer QuickBooks to a new computer. Let’s take a closer look at them:
- Upgrading your device: Imagine you’ve been using QuickBooks on your old device for years, but now it’s starting to slow down, and you’re running out of storage space. You decide it’s time for an upgrade and purchase a faster laptop with plenty of storage capacity, possibly built with components from a supplier like WellPCB. To continue using the software seamlessly, you need to transfer it to another computer.
- Technical issues or errors in your current system: Let’s say every time you try to use the software, it freezes or shows strange error messages. It’s really frustrating because it stops you from getting your work done. So, you decide to install QuickBooks to another device to see if that solves the problem. This way, you can hopefully avoid those annoying issues and keep working with the software without any interruptions.
- Working remotely or needing access to QuickBooks from multiple locations: Let’s say you run a small business with multiple offices in different cities or countries, and you frequently travel between them to oversee operations. In this case, you need to work with the software to track expenses, manage payroll, and monitor cash flow from various locations. To ensure seamless access to the books regardless of where you are, you decide to put QuickBooks to a new computer that you can carry with you during your travels. This way, you make sure you can keep managing your financial tasks smoothly and easily from anywhere in the world.
Find out How to Delete Deposits in QuickBooks.
How to move QuickBooks to a new computer?
If you’re looking to reinstall or move QuickBooks Desktop to a new computer, there’s an ideal way to do so – the QuickBooks Migrator Tool. Let’s break down what it is and how to use it.
The QuickBooks Migrator Tool
For users of the US version of QuickBooks Desktop 2018 or a later version operating as a single user, the Migrator Tool offers a solution to transfer QuickBooks and up to three company files to another device. Also, remember that to utilize the Migrator Tool, you must have Company Admin rights.
When you’re using the Migrator Tools, you’ll need the following:
- An internet-connected new computer;
- A USB flash drive with sufficient free space to accommodate your QuickBooks files;
- The QuickBooks Migrator Tool that’ll specify the necessary free space, typically ranging from 150 to 250 MB.
How the QuickBooks Migrator Tool functions
First of all, you’ll get to generate a secure password to unlock all transferred information. Keep this password safe as you’ll only need it once for the QuickBooks Migrator Tool. You’ll also need a flash drive ready for backing up your files. Then take the following steps:
- With the help of the tool, copy the last three opened company files (and their backup files) to a USB flash drive.
- Use the USB flash drive to transfer the files to the new computer, with the QuickBooks Migrator Tool handling all technical aspects.
- The tool will download the appropriate QuickBooks Desktop version onto your new computer and configure it with your files.
Note 1: Your drive won’t be reformatted, and none of your other files will be deleted.
Note 2: If your USB has files from 64-bit QuickBooks Desktop 2022 or 2023, the Migrator Tool might stop suddenly on a 32-bit Windows system. You can only transfer 64-bit QuickBooks files between 64-bit systems.
How to set up and utilize the Migrator Tool
Here’s some more information about the process.
On the old computer:
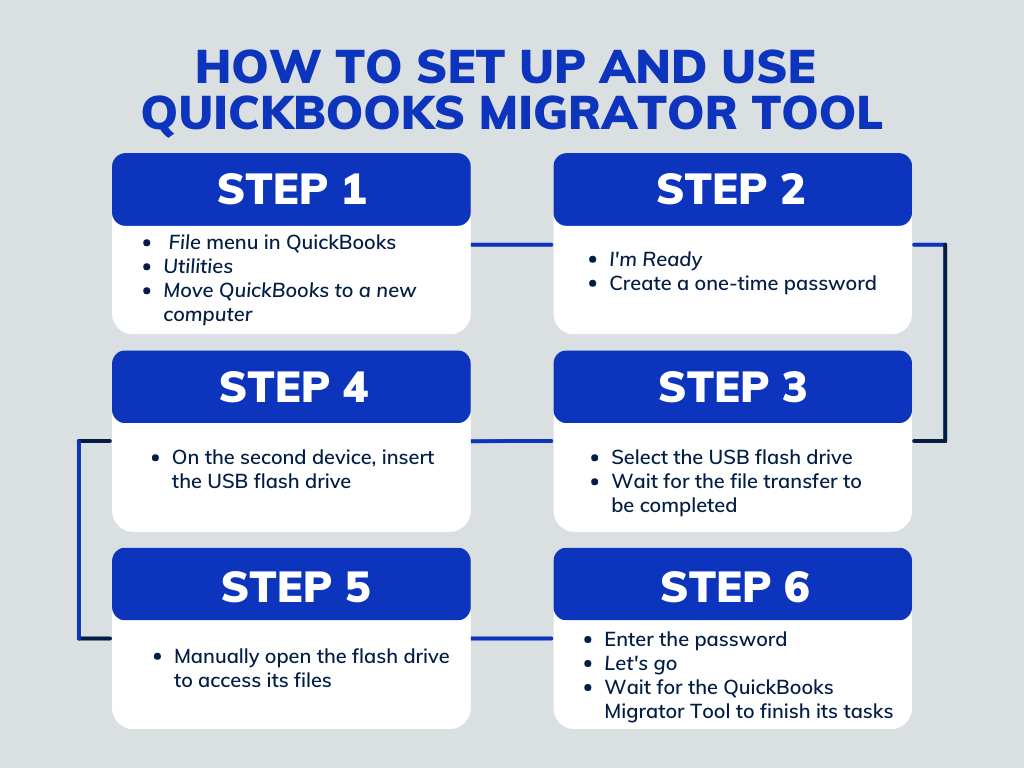
- Step 1: Go to the File menu in QuickBooks, select Utilities, and then Move QuickBooks to a new computer.
- Step 2: Opt for I’m Ready, and create a one-time password as instructed.
- Step 3: Follow the prompts to select the USB flash drive and wait for the file transfer to be completed.
On the second device:
- Step 4: Insert the USB flash drive. The QuickBooks Migrator Tool won’t automatically open due to Windows security settings.
- Step 5: Manually open the flash drive to access its files and double-click the Move_QuickBooks.bat file to initiate the QuickBooks Migrator Tool.
- Step 6: Enter the password you created and select Let’s go. Wait for the QuickBooks Migrator Tool to finish its tasks, which may vary based on your computer and internet speed, as well as the size of your company file(s).
Note 1: The QuickBooks Migrator Tool automatically removes QuickBooks files from the USB flash drive after you finish. However, these files will still be present on your old computer. That’s why we recommend renaming the file(s) on the old device to avoid using the wrong one(s) by mistake.
Note 2: If the QuickBooks Migrator fails to open after executing the file, ensure your Windows version is up to date.
What to do next to move QuickBooks to another computer
Since the tool may not transfer all information, you might need to take further actions to fully set up your new computer.
Depending on your setup on the old device, you might have to log in to your payroll and payment services, access Intuit Data Protect and establish your backup schedule, transfer any additional company files from your old device to another computer, or create a backup file on the new computer.
But one of the major things is reinstalling your QuickBooks integrations with third-party apps streamlining accounting workflow. And depending on the type of application you’re using, you might need to take some extra steps. We’re going to examine this process on the example of Synder.
The Synder app
Synder is a software solution that facilitates automated transfer of sales details from marketplaces like eBay, Shopify, Amazon, etc., payment gateways such as PayPal, Square, Afterpay, and many more into QuickBooks. And Synder’s duplicate detection feature ensures your books have no double entries, which results in accurate and error-free books and seamless one-click reconciliation. In other words, Synder provides accounting the way it should be.
When you’re using Synder to sync your sales info from ecommerce platforms and payment channels to QuickBooks, you need to use a special Synder connector. And when you’re about to move QuickBooks to another device, make sure you download this connector on the second computer and disconnect QuickBooks from the Synder connector on the first device.
Eager to experience hassle-free accounting? Join Synder’s 15-day free trial or take part in the informative Weekly Public Demo, where our specialists will show you how Synder can benefit accounting for online sales.
Tips for smoothly transferring QuickBooks to a new computer
While the process looks pretty straightforward, mistakes can complicate matters, resulting in information losses or other issues. Fixing them can be costly and might require significant time. So it’s better to know what can go wrong and take measures to prevent it. Here are some common mistakes to watch out for:
1. Back up your data
Before putting QuickBooks to another device, it’s important to back up your company file and other important information. Not creating a backup file could lead to losing or damaging your information when you move it.
2. Check compatibility
Make sure that your new computer meets the minimum system requirements for QuickBooks. Failure to do so might result in issues with the software, such as slow performance or crashes.
3. Deactivate QuickBooks on the old computer
If you don’t deactivate QuickBooks on your old computer before transferring it to another one, you could run into issues with licensing and QuickBooks activation.
4. Update QuickBooks
Make sure that you’re using the latest version of QuickBooks before moving it to a new computer. If you don’t update the software, it could bring in compatibility issues or other problems.
5. Transfer all necessary files to a new computer
When moving QuickBooks to a new computer, make sure that you transfer all necessary files, including company files, templates, and other settings.
6. Don’t rush through the process
Take your time when putting QuickBooks to a new computer, and follow all necessary steps carefully. Rushing through the process may cause errors or other issues with using the software.
Learn more about Opening Balance Equity In QuickBooks.
Wrapping up: How to move QuickBooks to a new computer
When moving QuickBooks to a new computer the best rule of thumb is to take your time to do it right! Don’t hurry and take all the necessary steps to create a backup file with your information, check that you activate QuickBooks correctly and that it works properly on the new computer, deactivate the software on the old one, update QuickBooks, and transfer all necessary information. Though the process might seem easy at first, rushing through it might lead to errors and data losses.
FAQ section:
1. How do I open QuickBooks on another computer?
- Download and then install and activate QuickBooks on your main device.
- Go to the QuickBooks File menu and pick “Switch to Multi-user Mode.” When a window pops up asking if you need to set up multi-user hosting, click “Yes.”
- Hit “OK” in the window that shows multi-user setup information.
2. How much is QuickBooks Desktop?
QuickBooks Desktop follows an annual subscription pricing structure which in 2024 begins at $1922. It includes up to 40 users, features like managing income and expenses, invoices and payments, tax deductions, reporting and a host of other functionalities.
3. How do I deactivate QuickBooks on my old computer?
- Go to the QuickBooks menu and choose Manage My License.
- Click on Deauthorize This Computer.
- When prompted, select Deauthorize and Quit.
- Reopen and register QuickBooks.
4. Can QuickBooks be accessed from any computer?
Yes, for QuickBooks Online. It’s a comprehensive cloud-based solution accessible through any compatible browser on both PC and Mac computers, as well as mobile devices. For the Desktop version, the process is way more difficult. To be able to get access to QuickBooks Desktop remotely, you must first map the server or host computer as a network drive.
5. How do I download the QuickBooks Migration Tool?
- Log into QuickBooks using a compatible web browser.
- Get to the Export overview screen and select the Get Started button.
- Download the QuickBooks Migrator Tool by clicking on the Download tool button.
- Once the download is complete, open the installer and go on running it.
6. Where are QuickBooks company files stored?
Typically, your company file is stored in the C: drive at the following location: C:\Users\Public\Public Documents\Intuit\QuickBooks\Company Files.
You can check the file name, date, timestamp, and size to determine the most recent version.
7. How to create a backup file in QuickBooks?
To create a backup file, do the following:
- Go to the File menu and select Back Up.
- Find the Back Up Company File tab.
- Click on Browse to change the filename and choose where to save the backup.
- Click Save.
- Hit OK.
You can also choose other options in the Back Up Options section if needed.
Please note that the information provided in this article is intended for general informational purposes only and shouldn’t be relied upon as professional advice. The steps outlined may not be suitable for every situation, and it’s essential to consult with a professional accountant or financial advisor before making any significant financial decisions. Additionally, the information presented in this article is current as of the knowledge cutoff date and may not reflect any updates or changes made to the software or policies since then.
Share your thoughts
Got experience transferring QuickBooks to a new computer? Your tips can be a big help to others in the same boat. Share what worked, what didn’t, and any advice you’ve got. Let’s make this process smoother for everyone!