You get $1,000 in Shopify, but only $970 gets to your bank account. Why? You can’t match Shopify payments with QuickBooks Online since there is always a difference between sales and actual deposits in your account due to deductions in commissions, payments for returns, taxes, etc.
The reconciliation process consists of matching each payment from Shopify with its corresponding bank deposit while taking into account all deductions made. It’s key for anyone who owns a business or manages books or finances, no matter whether you’re a bookkeeper, controller, accounting specialist, or an accounting agency dealing with ecommerce bookkeeping. In this article, you’ll learn why these figures don’t coincide by default, what role the clearing account plays in reconciling your Shopify payments, how to perform this process in QuickBooks Online, and what other aspects usually go beyond online tutorials.
TL;DR
- Payouts are never equal to sales: Shopify subtracts costs, returns, and taxes from revenue, resulting in the amount in your bank account always being less than the sales amount.
- The clearing account is your key: it will store your sales revenue until it’s deposited, and then be zero after the reconciliation process.
- Your costs and returns require an appropriate place: the proper allocation of deductions to the corresponding accounts ensures your revenue accuracy.
- Sales tax is your liability, not revenue: Any tax collected must be recorded on your balance sheet, and not in your profit and loss.
- Automation saves your time and effort: With dedicated tools, automatic synchronization takes minutes to complete daily reconciliation.
Why Shopify payments never match your bank deposits
One main reason for the disparity lies in the assumption that Shopify sales and Shopify deposits have to be identical numbers, which is rarely the case. Shopify does not send every purchase you make to your bank on a daily basis, but processes all transactions in one batch after making deductions for their services, and sends you one payout sometime later.
Where the gap comes from
In other words, the money you receive consists of your sales from one business day minus refunds, fees, and taxes, and sometimes even accounting for chargebacks. So if QuickBooks shows individual sales and your bank – just one lump sum that includes them all, they will differ by default until you take all the in-between subtractions into account.
The scale factor is yet another issue since reconciling manually is both prone to errors and inefficient as volume grows. At a few orders per day, the price that is paid for being wrong grows. This is especially true now that online retail commerce revenues continue growing each year. The number of transactions behind the average store grows as well. It all comes down to understanding why the numbers do not match up.
The impact of timing on widening small discrepancies
Timing complicates things further. For example, if a refund is made today, it will appear on a transaction that takes place after a few more days, meaning both the initial transaction and the one used to reverse it could fall in different periods for accounting purposes. When multiplied by many orders, this small discrepancy becomes much larger.
In discussions with our ecommerce clients, reconciliation and manual data entry have always come up as the top two pain points associated with transferring data from Shopify to QuickBooks, far ahead of concerns related to any fees or tax considerations.
Check out the article about how to import Shopify sales into QuickBooks Online.
How the Shopify clearing account works in QuickBooks Online
A clearing account is a type of account that acts as a placeholder. The money flows to this account after the activity in Shopify gets posted, and then flows out when the actual payment is received by the bank. A clearing account helps to match all transactions with Shopify individually against one bulk payment without duplicating income.
The process can be described as follows:
- Recording the sale: the total sales value is entered on the clearing account on Shopify. This leads to an increase in balance, which will show how much Shopify owes for the sale.
- Processing the payout: the payout amount after deducting all applicable deductions and refunds is entered from the clearing account to the checking account once Shopify transfers this amount.
- Recording the bank deposit: the bank deposit is recorded in QuickBooks.
| Zero balance in the clearing account is what matters. You need to match each payout statement from Shopify against a bank deposit, which clears the clearing account. In case of the balance left, it indicates some issue with bookkeeping such as an unposted fee, stranded refund, or unmatched payout. |
Keep one clearing account per payment gateway
Most stores do not operate only via Shopify Payments. Each gateway, like PayPal, Shop Pay Installments, Klarna, and others, processes the funds individually according to its terms. The ideal scenario would be having a separate clearing account for each gateway, which means that the Shopify Payments account gets cleared with Shopify Payments payments, the PayPal account with PayPal payments, etc. Mixing them in one account is how reconciliations start going off track and why a balance you expected to clear to zero never quite gets there.
Setting up your chart of accounts before you reconcile
Without the proper account structure, reconciliation does not work properly since all transactions, sales, taxes, fees, and refunds become lost in the wrong accounts. Before you do any import or matching, make sure you set up your accounts properly, since this is an important step to ensure everything goes well further down the road, and having an appropriate Shopify chart of accounts makes the process predictable.
At a minimum, these accounts should be available in QuickBooks Online in most of the shops:
- Shopify sales income account for tracking sales revenue
- Shopify fees expense account for expenses that go along with the transactions and which may get hidden in the sales account
- Sales tax payable account for collecting taxes that must remain a liability
- Shopify clearing account for pending transactions before the money reaches the bank
- Refunds & returns account for refund transactions
This separation is not a waste of time. If you do not record Shopify charges as expenses, then your income will be higher than the amount that has been deposited in your account. This is because any amount that you do not record eventually adds up to make a difference in the books after some time. It is important to keep the refunds and sales separate since this is how one understands their returns.
How to reconcile Shopify payments in QuickBooks Online, step by step
This is essentially what everyone is looking for – the exact steps to get your Shopify payouts matched with QuickBooks. Workflow is important in the correct sequence, since posting transactions before matching will prevent double posting of revenues, which is probably the most frequent mistake.

The step-by-step guide below shows how to do it both manually and using an integration tool:
- First, record the sales activities. Connect your Shopify account to your QuickBooks account to ensure that all the sales activities, fees, and refunds are recorded under your clearing and income accounts. If you connect using a connector or Shopify application, then the transactions will be recorded under either “App transactions” or “Integration transactions.”
- Confirm transactions. Unconfirmed transactions will not appear in your reports until confirmation. Ensure that customers, products, and accounts are correct before confirming the records. Confirmed transactions are reflected under “categorized”.
- Retrieve finance summary from Shopify. You can access this by navigating to Shopify > Analytics > Reports > Finance summary for the desired period. This report highlights your gross sales, discounts, returns, net sales, taxes, and gift card activities, among others.
- Ensure the amount paid out matches the bank deposit. The money that gets deposited in the account will either reflect as a deposit or transfer. Match against the amount that has been cleared by sales, then add a new line item for Shopify fees for the amount of the deposit.
- Ensure that the clearing account is zeroed out. After matching the amounts, the balance in the clearing account must be zero. If it’s not, this means there’s either a fee, refund, or payout that hasn’t been matched.
- Perform a bank reconciliation, then reconcile the P&L. You’ll need to perform a reconciliation of your checking account each month, then confirm that your Shopify revenue matches net sales on the Shopify financial report.
Learn about how to effectively set up your Shopify QuickBooks integration.
A brief note on fees and adjustments. Because Shopify reports net pay, there will be no match between the amount deposited into your bank account via Shopify and the gross sale reported in the finance summary. The calculation itself, gross sales minus fees and adjustments, resulting in the net payout, is part of the reconciliation process, commonly achieved via journal entries. In a single reconciling step, we can bring the two figures into agreement.
This would be roughly the workflow followed by Healthy Meals Direct, a meal preparation service based in Long Island that uses Shopify, PayPal, and QuickBooks Online. The time required for manual reconciliation every day was three to four hours due to unallocated sales tax and scattered data. After connecting their apps, the process became a much shorter half-hour to an hour each day, cutting down monthly manual work by more than 70 hours. Fees from both Shopify and PayPal were automatically allocated and accounted for.
Proper handling of Shopify fees, refunds, and sales tax
Three deductions are always subtracted from the payout made by Shopify before making it available for you. These include transaction fees, payments that you might have refunded to buyers, and the taxes collected by you on behalf of your clients. Aligning Shopify payouts with your accounting practices in QuickBooks requires that each deduction should be recorded individually.
Mapping Shopify fees
Fees should be mapped out first since they’re consistent across the board. Shopify applies transaction fees and payment processing fees with each payout. However, in some cases, they might not be easy to distinguish in an export statement. Hence, you need to map them to a Shopify fees expense account. Failure to do so will inflate your revenue figures.
Recording refunds as contra-revenue
The same rule applies to refunds since you have to record them separately under a refunds and returns account. This way, your sales and refund figures are visible. The key takeaway here is that refunds don’t necessarily take place in the same month as the initial sale. This is why keeping refunds separate is more accurate.
Sales tax as a balance-sheet liability
Sales tax tends to be the one that often gets wrong. It cannot be treated as income since it is owed to the tax authorities and needs to be recorded in sales tax payable, and not in the profit and loss account. Sales tax collected appears in the Shopify finance summary, however, on your P&L statement it must be missing as it goes into liabilities.
This applies more to multi-state sellers where tax breakdown per jurisdiction is typically what gets neglected during manual reconciliation. Proper categorization of Shopify expenses, treating them as expenses, refunds as contra revenue, and tax collected as sales tax liability is what makes the difference between reconciled and non-reconciled books. And a good question here is if everything should be done manually.
Read more about Shopify sales tax.
Three ways to reconcile Shopify in QuickBooks Online
There is not just one solution to the problem; there are actually three, and which one is the right one will depend on your order volume, number of payment gateways you use, and available time spent on accounting. So here’s what you should know about them.
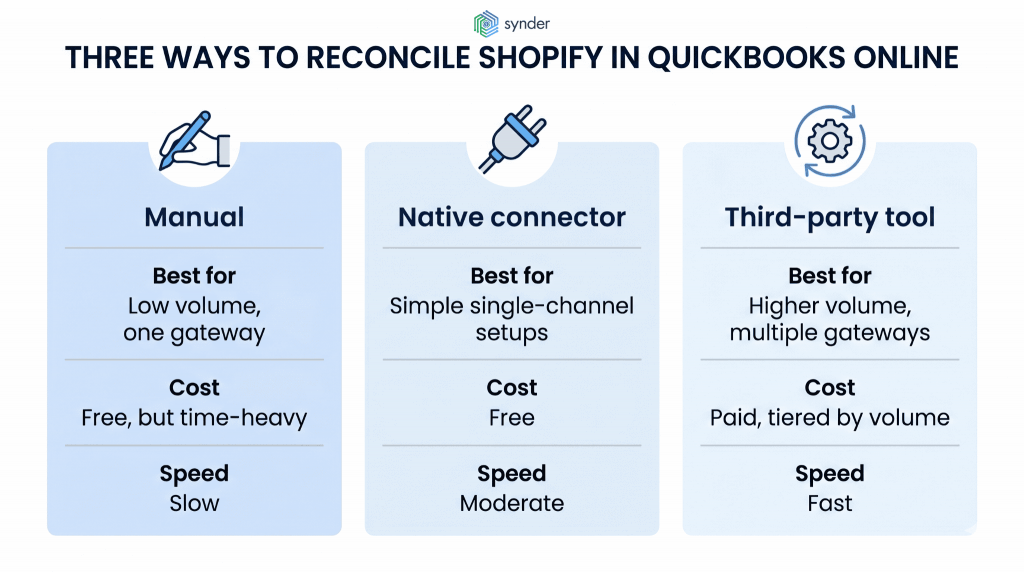
Manual reconciliation
In this case, you do all the recording in Shopify yourself, manually map all fees, refunds, taxes, and link every payout to deposits through a clearing account. It is free to do except for your own effort, allowing for complete control over all entries made. Unfortunately, it becomes inefficient when done in high volumes, as every payout will have to be analyzed separately.
The native Shopify Connector
Intuit’s Shopify Connector automatically imports the transaction data into QuickBooks, where you verify and validate the data before posting it. This application is absolutely free and easy to use in simple scenarios. But as soon as you need to deal with multiple gateways, business-to-business invoices, or tax calculations, you will see that the preconfigured mapping does not provide all necessary functionality, and anyway you will have to make additional journal entries manually every month.
Third-party integration tools
Third-party tools link QuickBooks and Shopify and cover the shortcomings of the native application. For instance, Synder connects an ecommerce platform and accounting system and performs automatic categorization and mapping of transactions.
In particular, it synchronizes transactions and payments made using 30+ ecommerce and payment gateways, such as Shopify, PayPal, and Stripe, into QuickBooks Online, QuickBooks Desktop, Xero, NetSuite, Sage Intacct, Intuit Enterprise Suite, and Puzzle using a clearing account so records align with payouts and mapping taxes to your sales tax payable account.
It has two synchronization methods: Per Transaction creates an individual record for every single transaction, refund, and fee, while Summary Sync consolidates the information about activities into a single entry per chosen period or payout.
A practical example
Rad, a Colorado-based maker of recovery and self-care tools, and sells thousands of items every month through Shopify, Amazon, and others. It imports all its transactions from the sales channels to QuickBooks Online. Rad’s team would use 40+ hours per month for data import and reconciliation, leading to inaccurate reporting and incomplete bookkeeping on QuickBooks without automation. Synder helped them eliminate the manual process completely, saving 40+ hours and over $2,000 in bookkeeper services monthly, while automatically importing 150,000+ transactions.
As Meghan S., Operations Manager at RadRoller, said:
Of all the apps that I use to help make QuickBooks more functional, Synder is the one I have the least complaints about. Before Synder, when our bookkeeper had to do it manually, it was taking between 5-10 hours a week of importing data, adding data, changing forms and sheets. With over 150k records now processed automatically, it’s been a huge savings of both time and money.
Meghan S., Operations Manager at Rad
| Ready to stop wasting hours on manual reconciliation? See how Synder automates Shopify–QuickBooks workflows and keeps your books accurate at scale. Join a demo to watch it in action and get your questions answered. |
Comparison of the three methods
The following table provides a summary comparison of the three techniques to help you decide which will work best for your store.
| Factor | Manual | Native connector | Third-party tool |
| Cost | Free, but time-heavy | Free | Paid, tiered by volume |
| Best for | Low volume, one gateway | Simple single-channel setups | Higher volume, multiple gateways |
| Fee and refund mapping | By hand, easy to miss | Basic defaults | Categorized automatically |
| Sales tax handling | Manual journal entries | Often needs adjustments | Mapped to liability automatically |
| Multi-gateway support | Tedious | Limited | Separate clearing per processor |
| Time per close | Slow, scales with volume | Moderate | Fast once configured |
How to choose the right approach
Some things to consider when choosing an accounting solution for your business:
- Start with volume. Five transactions a day can be tracked manually, but hundreds or even thousands a month make automation cost-effective.
- Count your gateways. One payment processor is connector-friendly. When paired with Shopify and another gateway like PayPal or Stripe, third-party integration between Shopify and QuickBooks becomes invaluable for mapping everything precisely.
- Decide how many details you need. If you want to track transactions at the item level or get precise figures on COGS, choose per-transaction sync. Otherwise, summary-based grouping is more suitable for keeping the books straightforward and organized.
- Weigh tax complexity. Selling across multiple states or handling B2B invoices complicates taxes enough for automated tax mapping tools to become a necessity.
- Test before you commit. Not all users agree that the higher-priced plans are worthwhile or that setup is easy if they are not very tech-savvy. Make sure that the solution meets your needs with a free trial first.
Final thoughts on reconciling Shopify payments in QuickBooks Online
In terms of reconciling payments from Shopify in QuickBooks Online, there’s one thing that matters above all others: the deposit is not the sale. Recognize the reality that fees, refunds, taxes, and timing lie between gross sales and deposits, and the rest falls into place. Deposit sales into the clearing account, allocate fees and refunds to their appropriate accounts, account for taxes received as a liability, then pair the payment with its deposit to verify the clearing account balances at zero.
Ultimately, whether to do reconciliation manually or automate it comes down to volume and how much error you’re willing to tolerate. A solo merchant with one gateway may find the monthly task simple enough to handle manually, but even a modestly growing company using Shopify in tandem with PayPal or another gateway eventually reaches a point where the cost of manual matching exceeds the cost of automated reconciliation software. Regardless, the standards are the same, and a successful reconciliation ensures accuracy throughout all reports generated based upon it.
FAQ
Which QuickBooks works with Shopify?
QuickBooks Online integrates with Shopify, both through Intuit’s native Shopify Connector app and through third-party tools. QuickBooks Desktop has more limited options. Most ecommerce sellers use QuickBooks Online because it supports app-based syncing, bank feed matching, and the clearing-account workflows that Shopify reconciliation depends on.
How do I allocate my Shopify payout in QuickBooks?
A Shopify payout is a net figure, so allocate it by splitting it into its parts: sales revenue goes into revenue, fees are entered into the fees expense account, and refunds into the returns account, while the payout amount moves from the clearing account to checking.
How often should I reconcile Shopify in QuickBooks Online?
For most stores, reconcile the bank account monthly and review Shopify payouts against deposits as they post. Higher-volume sellers benefit from a daily or weekly check so discrepancies appear early, while automation makes near-continuous matching practical without adding manual hours.
Why doesn’t my Shopify clearing account return to zero?
A non-zero clearing account almost always means something is unrecorded: a fee that wasn’t booked, a refund stranded on a different payout, a pending or multi-currency transaction, or a payout you haven’t matched yet. Work backward from the Shopify payout report to find the missing piece, then post the adjustment so the account clears.