
When it comes to online businesses, there’s no denying that Shopify is one of the most popular ecommerce platforms used today. It’s available globally and allows business owners to track their cash flow providing Stripe as a payment gateway.
This feature is available because Shopify and Stripe entered into a partnership to offer users the ability to make Shopify payments powered by Stripe. Business owners can then use a wide range of reporting features on Shopify to extract data for their accounting software.
In this article, we’re going to focus on Shopify as one of the most demanded online platforms for ecommerce business, the way merchants can receive Shopify payments and in particular, how to take advantage of the Shopify Stripe integration.
Contents:
2. Creating a Shopify seller account
3. Different ways of receiving Shopify payments
- Shopify Payments gateway
- Third-party payment gateways
- Alternative methods for accepting Shopify payments
- Manual methods for receiving Shopify payments
- Gift cards and store credit
- Custom solutions for receiving Shopify payments
4. Brief overview of Stripe as a payment gateway
5. Step-by-step guide on adding Stripe to Shopify
A glimpse of Shopify
Shopify is a platform that enables individuals and businesses to create their online stores where they can sell their products or services. It provides all the necessary tools and features to set up and manage an online store without requiring extensive technical knowledge.
With Shopify, users can easily build their website, customize its design, add products, set up payment and shipping options, manage inventory, and handle customer orders. The platform offers a user-friendly interface and a wide range of themes and templates to create a visually appealing and functional online store.
Shopify provides a secure and reliable infrastructure for handling transactions and customer data. It supports multiple payment gateways, allowing customers to make purchases using various methods such as credit cards, PayPal, and more. The platform also integrates with popular shipping carriers, simplifying the shipping process for sellers.
In addition to the core features, Shopify offers various extensions and integrations through its extensive app store. These apps allow users to add additional functionality to their stores, such as marketing tools, analytics, customer support features, and more.
Shopify provides comprehensive customer support, including 24/7 assistance through email, live chat, and phone. They also offer extensive documentation, tutorials, and a community forum to help users learn and navigate the platform.
Overall, Shopify is a popular choice for individuals and businesses looking to establish a professional and successful online presence. It offers a robust set of features, scalability, and flexibility, making it suitable for both small-scale entrepreneurs and larger enterprises.
Check out our guides on the best products to sell on Shopify and Shopify dropshipping 2023.
Creating a Shopify seller account
Before you set up your Shopify store and add various gateways to receive Shopify payments, you need to create a Shopify seller account. To do that, follow these steps:
Step #1. Visit the website: Go to www.shopify.com in your web browser.
Step #2. Sign up: On the Shopify homepage, click on the “Get Started” button.
Step #3. Enter your email address: Insert your email address in the field provided, then click on the “Start free trial” button.
Step #4. Create a password: Enter a secure password for your Shopify account.
Step #5. Enter your store details: Fill in the required information, including your store name, desired website URL, and a brief description of your business.
Step #6. Provide additional details: You’ll be asked a few more questions about your business, such as your current revenue and whether you’re already selling products.
Step #7. Confirm your store details: Review the information you provided and make any necessary changes.
Step #8. Choose a Shopify plan: Select the pricing plan that suits your needs. Shopify offers different plans with various features and pricing options. You can start with a free trial or choose a paid plan right away.
Step #9. Enter your billing information: Provide your billing details, including your address and payment information.
Step #10. Customize your store: Once your account is created, you’ll be directed to your Shopify admin panel. Here, you can customize your store’s appearance, set up products, configure payment and shipping settings, and manage various aspects of your online business.
Step #11. Add products: Click on the “Products” tab in your admin panel to add and manage your products. You can upload product images, provide descriptions, set prices, and organize them into categories.
Step #12. Configure payment and shipping settings: Access the “Settings” tab in your admin panel to set up your preferred payment gateways, shipping methods, and other essential configurations.
Step #13. Customize your theme: Choose a theme or customize the appearance of your store to reflect your brand. You can select from a wide range of pre-designed themes or create a custom design using Shopify’s theme editor.
Step #14. Launch your store: Once you have customized your store, added products, and configured your settings, you are ready to launch your Shopify store. You can start promoting your products and attracting customers to your online store.
Remember to familiarize yourself with Shopify’s features, resources, and support options to make the most out of your seller account. Shopify provides comprehensive documentation, tutorials, and a dedicated support team to assist you in setting up and growing your online business.
Different ways of receiving Shopify payments
On Shopify, there are several ways to accept payments from your customers. Here are some of the most common options available for receiving Shopify payments:
Shopify Payments gateway
Shopify has its own integrated payment gateway called Shopify Payments. It enables you to accept credit card payments directly on your store without needing a third-party payment processor. To set up Shopify Payments, you’ll have to provide your business information and banking details.
Third-party payment gateways
Shopify integrates with numerous third-party payment gateways worldwide. Some popular options include PayPal, Stripe, Authorize.Net, 2Checkout, and many more. You can choose a payment gateway based on your location, business requirements, and supported payment methods.
Alternative methods for accepting Shopify payments
In addition to traditional credit card payments, Shopify supports various alternative payment methods to cater to diverse customer preferences. These methods include digital wallets like Apple Pay and Google Pay, buy now, pay later options such as Klarna and Afterpay, and cryptocurrency payments using Coinbase Commerce or BitPay.
Manual methods for receiving Shopify payments
If you want to accept offline or manual payment methods, Shopify allows you to offer options like bank transfers, cash on delivery (COD), or payment by check. You can provide instructions for customers to complete these payments outside of the online store.
Gift cards and store credit
Shopify allows you to offer gift cards and store credit to your customers. This feature enables them to purchase gift cards for others or use store credit to make purchases within your store.
Custom solutions for receiving Shopify payments
If you have unique payment requirements, you can develop custom payment solutions using Shopify’s API. This gives you the flexibility to integrate specialized or region-specific payment methods that aren’t natively supported.
Read more about ways to receive payments on Shopify.
By offering multiple payment options, you can provide a seamless checkout experience for your customers and increase the chances of completing sales on your Shopify store.
Brief overview of Stripe as a payment gateway
Stripe is a popular payment gateway that enables businesses to accept online payments securely and seamlessly. As a payment gateway, Stripe acts as an intermediary between the customer, the business, and the financial institutions involved in the transaction. Here’s how Stripe functions as a payment gateway:
Payment acceptance
Stripe allows businesses to accept a wide range of payment methods, including credit cards (Visa, Mastercard, American Express, Discover, etc.), debit cards, digital wallets (Apple Pay, Google Pay), and bank transfers. Customers can enter their payment details securely on the business’s website or mobile app.
Transaction processing
When a customer makes a payment, Stripe securely collects and encrypts the payment information, such as card details or bank account information. It then verifies and authorizes the transaction with the relevant financial institutions, ensuring the availability of funds and confirming the payment’s legitimacy.
Security measures
Stripe prioritizes security and compliance with industry standards. It implements advanced security measures, including data encryption, tokenization (replacing sensitive card data with a unique identifier), and adhering to Payment Card Industry Data Security Standard (PCI DSS) requirements. This helps protect customer payment data and minimizes the risk of data breaches.
Seamless checkout experience
Stripe offers customizable checkout forms and provides businesses with the ability to embed payment forms directly into their websites or mobile apps. This streamlined checkout experience enhances customer convenience and reduces cart abandonment rates.
Subscription and recurring billing
Stripe supports businesses that offer subscription-based services by providing tools to manage recurring payments. It enables businesses to set up subscription plans, handle billing cycles, automate payment collection, and manage subscription changes (upgrades, downgrades, cancellations) easily.
International payments
Stripe supports payments in multiple currencies, allowing businesses to accept payments globally. It handles currency conversions and can deposit funds into the business’s account in their preferred currency.
Reporting and analytics
Stripe provides businesses with access to detailed reporting and analytics, offering insights into payment activity, transaction history, and sales performance. This data helps businesses track revenue, understand customer behavior, and make data-driven decisions to optimize their payment processes.
Developer-friendly APIs
Stripe offers robust APIs that allow businesses to integrate payment functionality directly into their websites, mobile apps, or other software systems. This flexibility enables customization and seamless integration with existing platforms or workflows.
Check out how Stripe integrates with Synder, a cutting edge accounting software which enables online businesses to automate routine procedures of syncing sales data from your payment gateways and ecommerce platforms into the accounting software – with no double entries or errors. Sign up for a 15-day free trial or book a seat at a webinar to learn more about Synder’s numerous benefits to online businesses.
In short, Stripe’s user-friendly interface, extensive features, and developer-friendly approach have made it a popular choice for businesses of all sizes. It simplifies the payment process, enhances security, and provides businesses with the tools and insights they need to manage their online transactions effectively.
There are some other advantages of Stripe. It uses cloud-based infrastructure, and because everything is in the cloud, users benefit from its scalability and reliability. In addition, the service is secure and well-known for having strong measures in place to prevent fraud and abuse. Stripe also makes it easier for business users to run reports to manage their finances.
Step-by-step guide on adding Stripe to Shopify
Both Shopify and Stripe are well-known among the online community. Nonetheless, while both Stripe and PayPal are credit card processing platforms, there are key differences that you should investigate before getting started. If you’re a business owner and want to accept Stripe payments through Shopify and add Stripe to your platform, the following information contains the details you need to know beforehand:
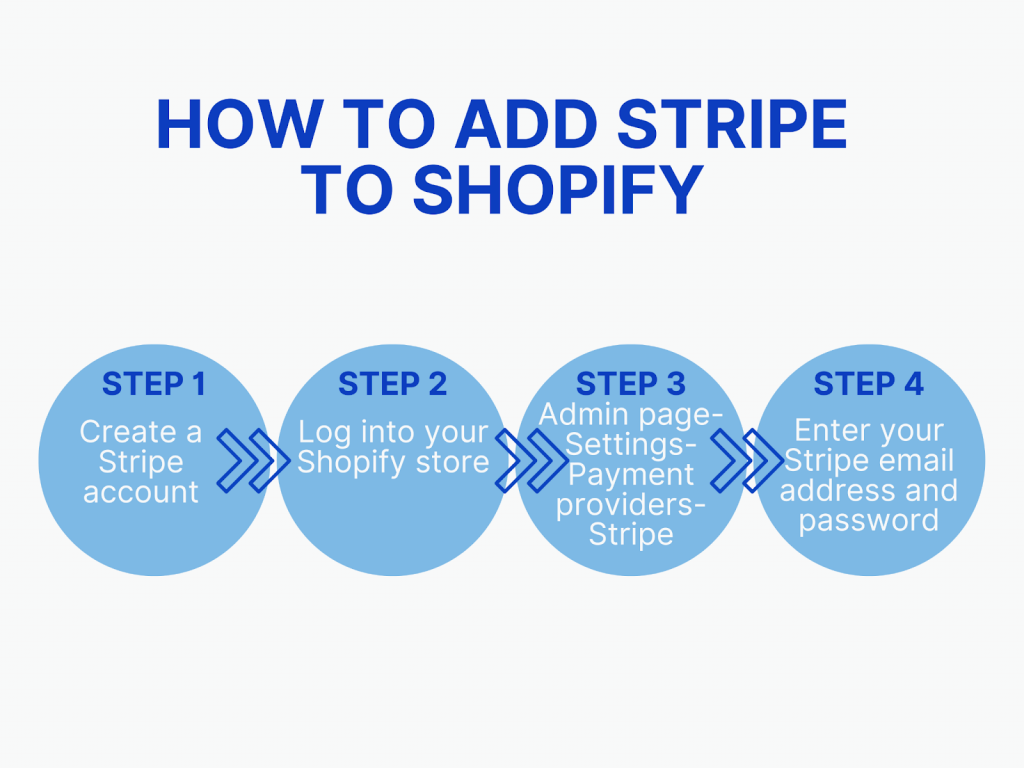
Step 1. Before you can add Stripe to your Shopify platform, you need to create a Stripe account. While doing this, make sure to check out some of Stripe’s security features.
Step 2. Once you’ve got a Stripe account in place, log into your Shopify store. In most cases, you’ll have the option to accept Shopify payments that are powered via Stripe. However, in some countries, users are only allowed to add Stripe as a second option. Based on the kind of account you have, you may not be able to link your Stripe account to the platform in any way. If this happens, you’ll need to create another Shopify account.
Step 3. Navigate to the Shopify admin page. Click the ‘Settings’ button at the bottom of the screen. You’ll see a link that says ‘payment providers.’ Once you click the link, a window will appear asking you to select from a list of third-party payment providers. Select ‘Stripe’ from the drop-down menu of options.
Step 4. Enter your Stripe email address and password. If they’re correct, you should have no problems. All you need to do is click the ‘Activate’ button and you can begin to accept credit card payments through Stripe.
By following the steps mentioned above, you can easily link your Stripe account to Shopify and start receiving payments from customers worldwide. Both platforms have taken the necessary measures to make connecting their processes easier for all users.
Summary: Taking advantage of the Stripe Shopify integration
If you’re familiar with the Shopify app, you know that the app updates its appearance and functionality from time to time. However, Stripe’s payment processing will continue to work as it always has, so you don’t need to worry about your account when there are Shopify updates.
The integration of Stripe and Shopify makes it easier and simpler for users to manage their financial transactions, reporting, and invoicing without having to forfeit the benefits that made them turn to Shopify in the first place. If you happen to be a new Stripe user, you can rest assured that the entire process will work seamlessly for you.