
- What data does Per-Transaction Sync post?
- Getting Started with the Setup
- How to check that Per-Transaction Sync is working correctly
- Changing the mode
- Per-Transaction Sync with QuickBooks
- Per-Transaction Sync with Xero
Per-Transaction Sync is a Synder mode that records each financial event — sales, refunds, fees, and payments — as a separate entry in your accounting platform. This gives you maximum detail and full transaction-level visibility, which is ideal for accurate reporting and reconciliation.
This guide explains how Per-Transaction Sync works and how to set it up correctly, so you can confidently manage and review your financial data.
Use this guide if:
- You use Per-Transaction Sync and need detailed, transaction-level records in your accounting platform.
- You want to review individual transactions, ensure accuracy, and perform order-level reconciliation.
- You rely on transaction-based reporting and need full visibility into each financial event.
- You work with complex tax setups, including VAT/GST reporting or multiple tax rates per order.
- You handle partial refunds, frequent adjustments, or other scenarios that require precise tracking.
Don’t use this guide if:
- You are using Summary Sync.
- You need aggregated or summarized data instead of individual records.
What data does Per-Transaction Sync post?
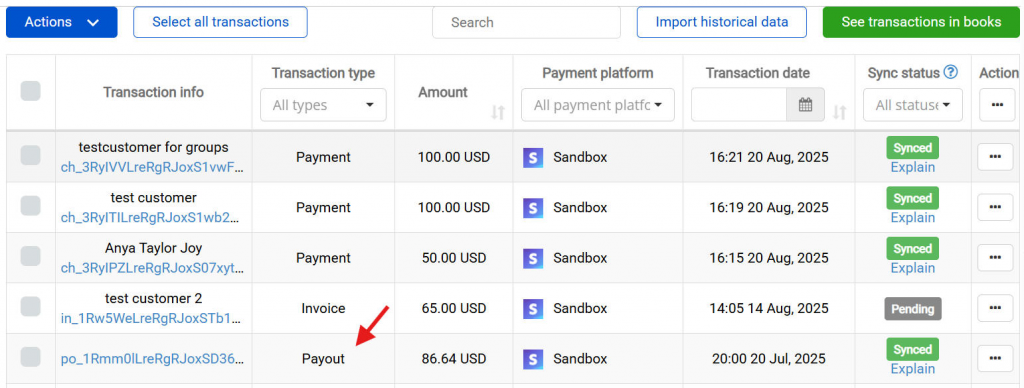
Each financial event syncs as an individual entry:
- Invoice
- Payment
- Refunds
- Expenses
- Transfers
- Deposits
For the full list of supported transaction types per integration, see Transaction types supported by Synder.
Getting started with the setup
Step 1: Connect your platforms and choose the sync mode
Per-Transaction Sync becomes available once your platforms are connected.
- Open your Synder organization.
- Connect your sales/payment platforms.
- Connect your accounting platform.
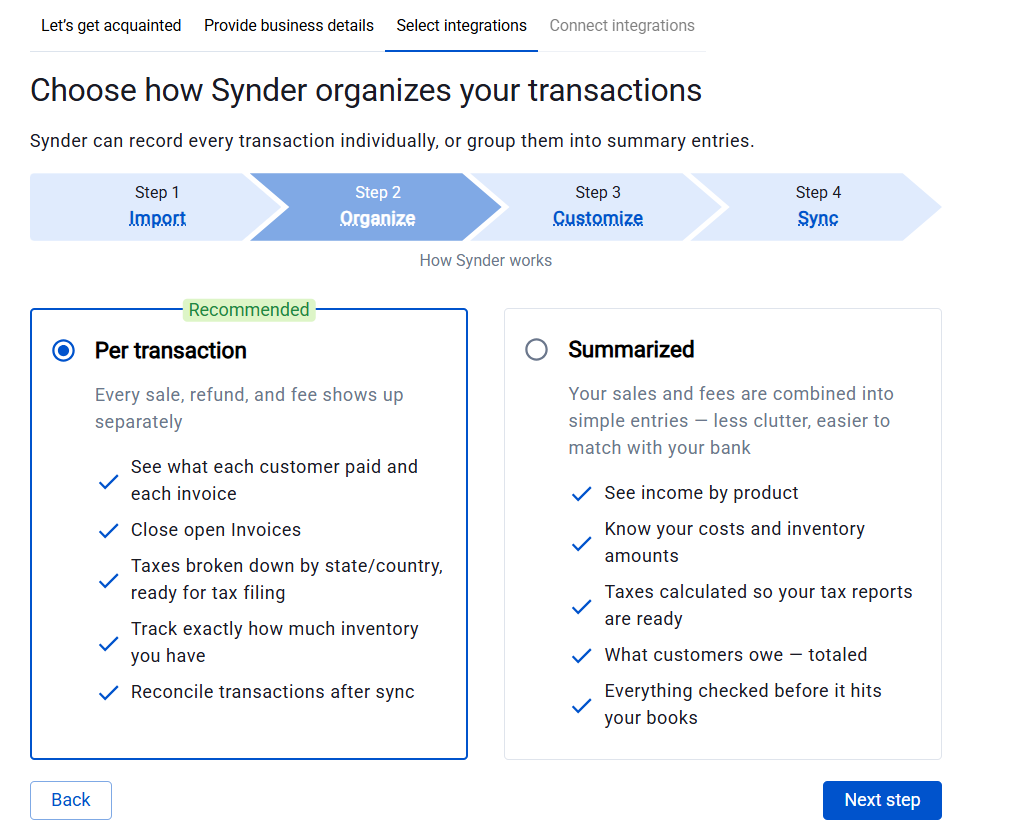
When you first create your Synder account and connect integrations, you will be asked to choose a sync mode. Since this guide focuses on Per-Transaction Sync, select that mode in your settings.
During onboarding, you can also choose which integrations to connect. You can either:
- Select them during onboarding, or
- Add them later inside your Synder organization.
For step-by-step instructions on connecting platforms, refer to the guides below.
Accounting platforms:
Integration platforms:
- Stripe
- Amazon
- Shopify
- PayPal
- Squarespace
- Faire
- ShipStation
- Affirm
- Brex
- Clover
- BigCommerce
- WooCommerce
- Etsy
- Authorize.Net
- eBay
- Square
Integration setup during onboarding
When you connect an integration, you can configure basic settings right away, such as:
- Payout settings
- Clearing account
- Sales income account
- Fees account
- Expense account
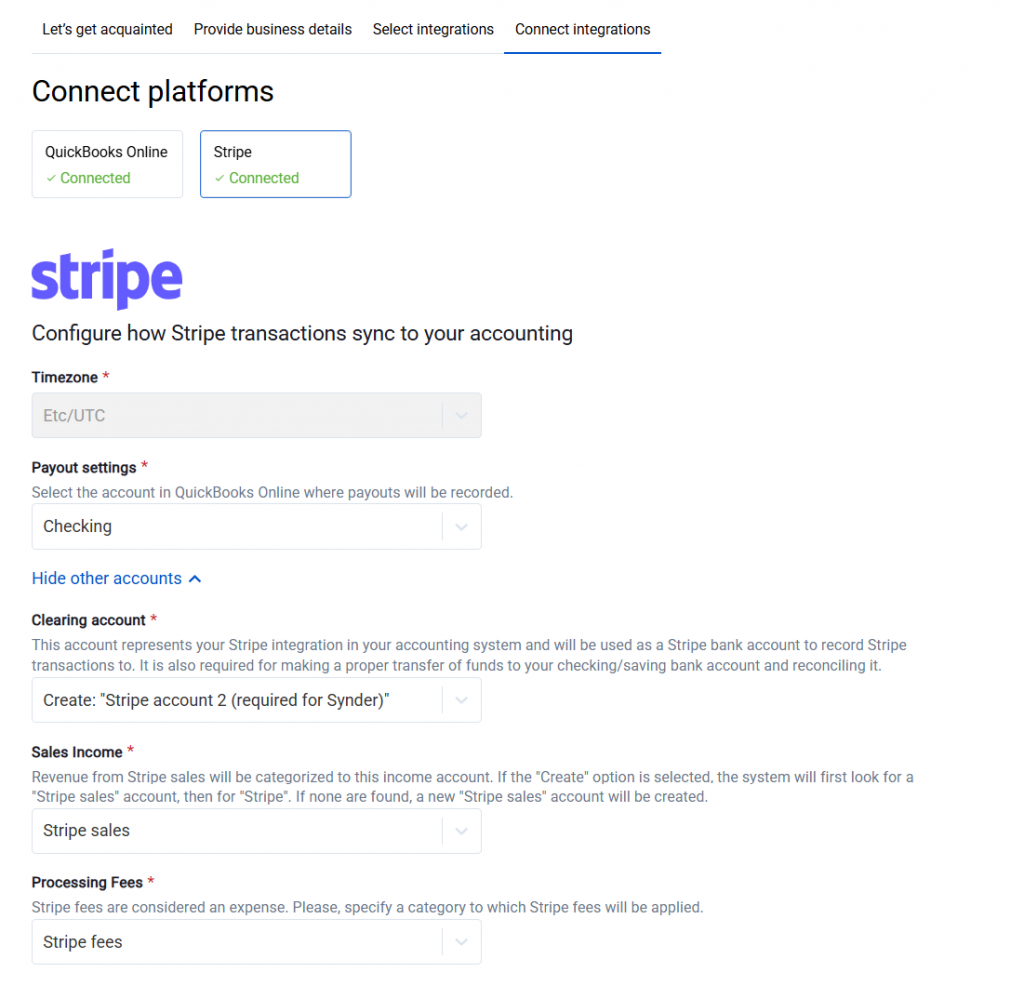
If everything looks correct, click “Continue with these settings.” You can change these settings any time after onboarding.
At this stage, Synder lets you import up to two months of historical data to test the system.
You will see two options:
- Import to Synder
- Sync to Books
We recommend starting with Import to Synder for your first import.
Here’s the difference:
- Import to Synder → Transactions are imported into Synder only (not pushed to your accounting system).
- Sync to Books → Transactions are imported and immediately synced to your accounting platform.
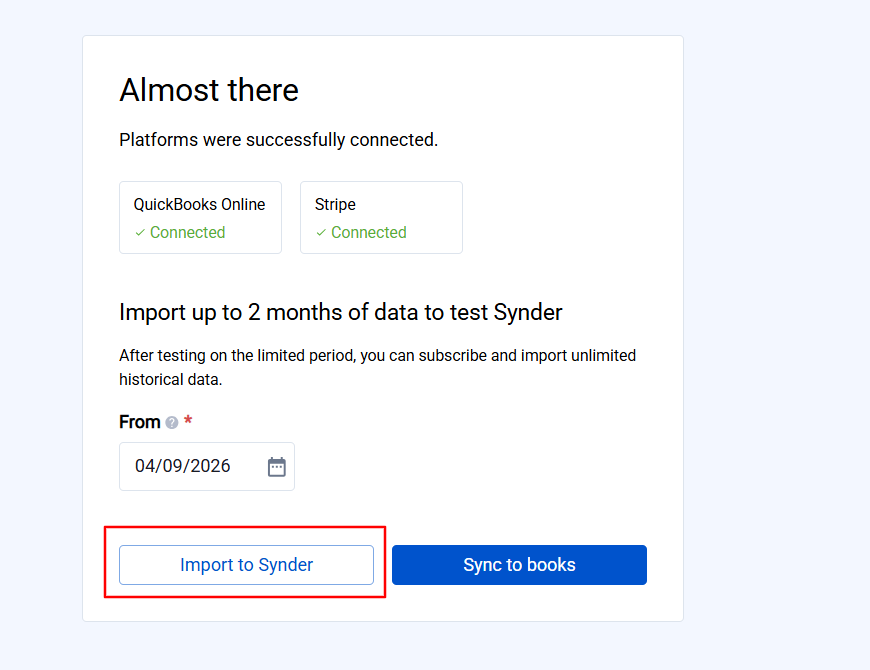
Starting with Import to Synder lets you safely review transactions before sending them to your books — especially important during testing.
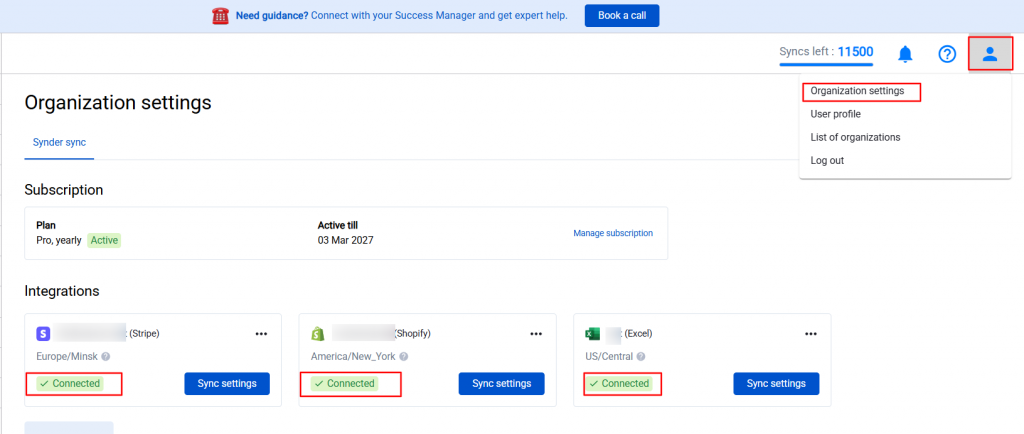
How to verify connections
Inside your Synder organization:
- Click the User icon (top right corner).
- Open Organization Settings.
- Check your integrations.
All connected platforms should show the status “Connected.”
Step 2: Import historical data
You can import transactions during onboarding or any time afterward.
- Open Platform Transactions from the left-hand menu.
- Click Import historical data.
- Choose the start date.
- Run the import.


Wait until transactions appear in the list.
Note: we recommend importing transactions into Synder first, so you can review them before syncing to your accounting system. With Import to Synder, transactions appear with the “Ready to sync” status — they are prepared but not yet pushed to your books.
You can also enable Auto Sync to send transactions to your accounting platform automatically once they are imported.
If you have questions about Auto Sync behavior, account mapping, or other settings, or if you want a quick setup checklist for Per-Transaction mode, see this guide.
Step 3: Test syncing a small set of transactions
Before syncing a large volume of data, run a quick test:
- Open Platform Transactions.
- Select a small number of transactions.
- Click Sync.
- Check your accounting platform.
Make sure the results match your accounting expectations. If they do, sync the rest — either individually or in bulk.
Step 4: Adjust settings (if needed)
Synder syncs transactions accurately and reflects all details in your accounting system. If you are not satisfied with how transactions appear in your books, you can:
- Contact Synder Support, or
- Reach out to your Customer Success Manager (CSM), depending on your plan.
They will help you review and adjust your settings quickly.
To learn more about available settings and customization, see these guides:
Platform-specific guides:
- TikTok (QuickBooks)
- Amazon settings for QuickBooks Online
- Amazon settings for Xero
- Shopify settings for QuickBooks Online
- Shopify settings for Xero
- PayPal settings for QuickBooks Online
- PayPal settings for Xero
- Stripe settings for QuickBooks Online
- Stripe settings for Xero
- Square settings
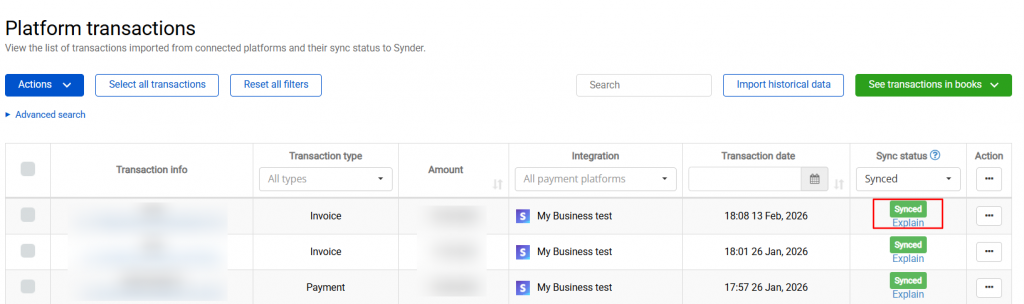
How to check that Per-Transaction Sync is working correctly
Use this checklist:
- Transactions appear in the Transactions tab in Synder.
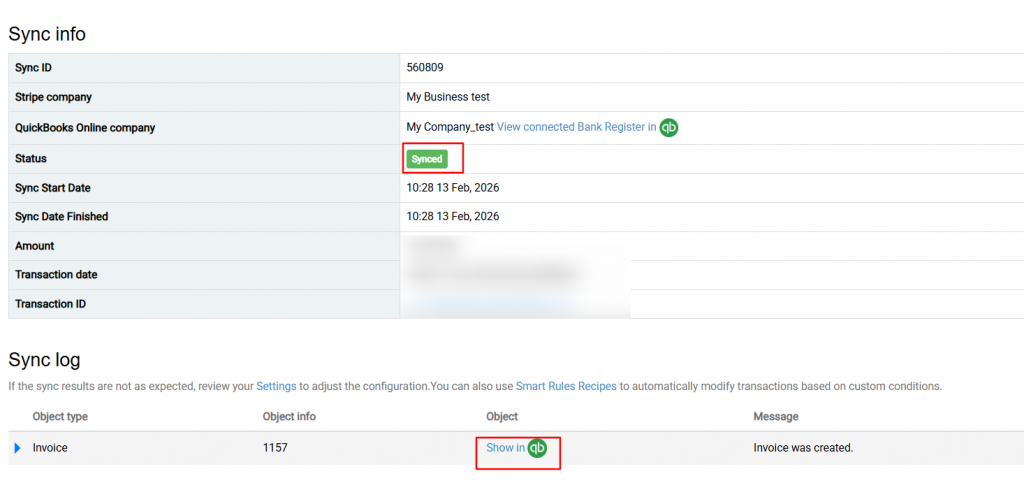
- After clicking Sync, the transaction status changes to Synced.
- Transactions appear in your accounting system.
- Data is posted to the clearing account.
Reconciliation
Reconciliation is one of the most important parts of working with Synder. It makes sure all synced data matches your actual financial activity and prevents discrepancies.
Synder also automates a significant part of this process, which reduces manual work and improves accuracy.
For full details, see our reconciliation guides.
Changing the mode
If you want to switch to Summary Sync, you must create a new organization. The change applies only to future data. For more details, see how to switch sync modes.
Important to understand:
- Changing the sync mode does not update or transform past data.
- All previously synced transactions stay unchanged in the original organization.
- You will start syncing new data only in the new organization.
What happens to your subscription?
If you already have a paid subscription on your Per-Transaction organization, you don’t need to worry about losing it. Contact Synder Support, and the team will help you transfer your subscription to the new organization.
What to do next
Once your new organization is set up and your subscription is transferred, you can archive the old organization to keep your workspace clean.
To archive an organization:
- Click the profile icon in the upper-right corner of Synder → List of organizations.
- Click the three-dot menu next to the desired organization → Archive.
For more details, see Archive or delete organizations in Synder.
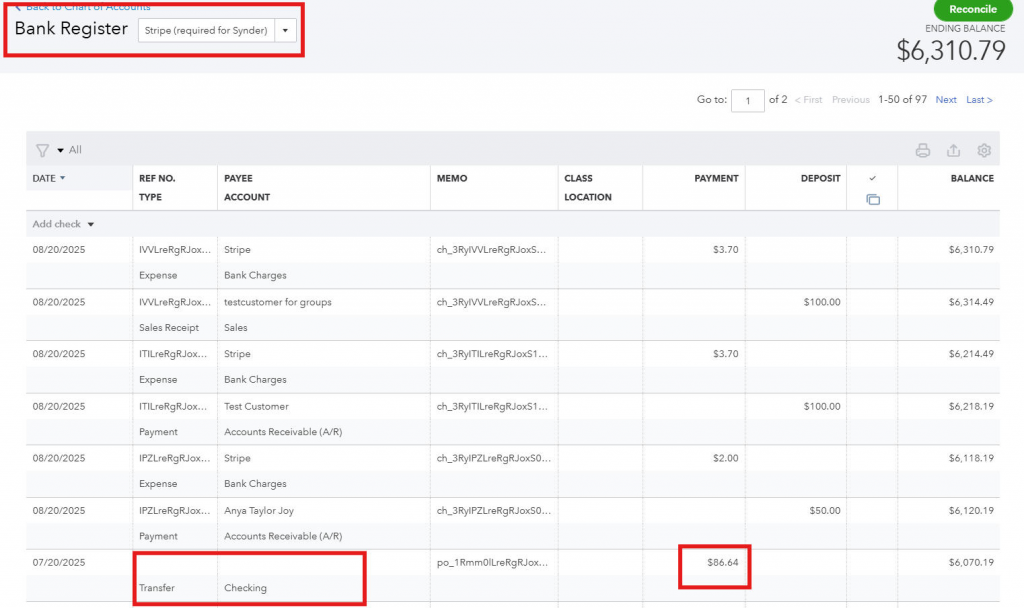
Per-Transaction Sync with QuickBooks
Flow overview
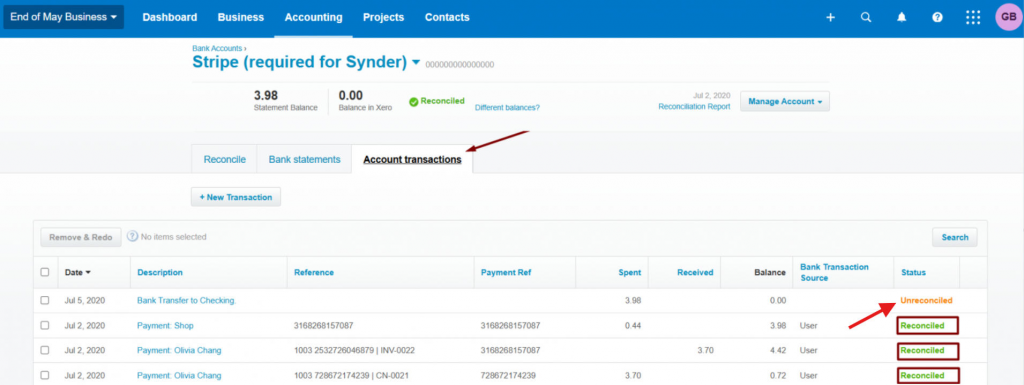
Clearing account
Synder posts all transactions into a dedicated clearing account (for example, “Stripe (required for Synder)”). This represents the balance of your payment platform.
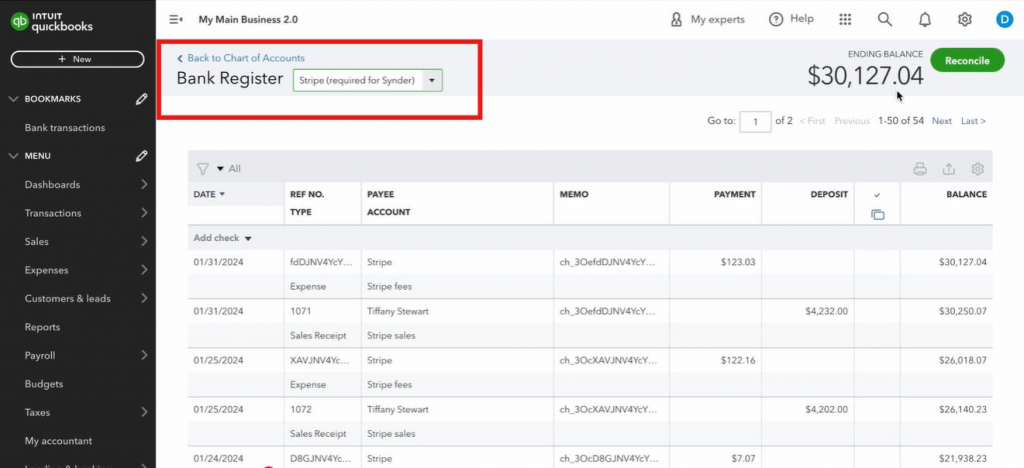
Checking account
This is your real bank account in QuickBooks.

Payout synchronization
When a payout occurs, Synder transfers the amount from the clearing account to the checking account automatically. This decreases the clearing balance (reflecting the reduced integration balance) and increases the checking balance (reflecting the received deposit).
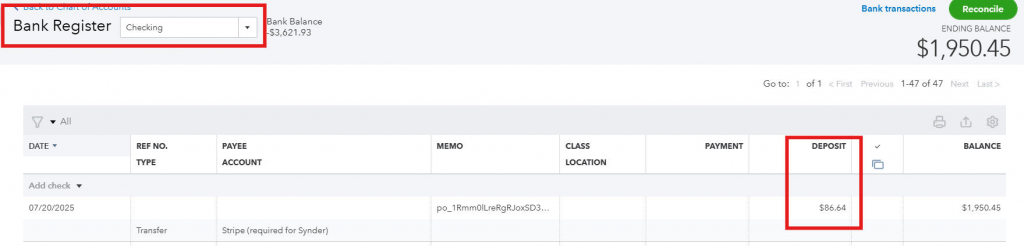
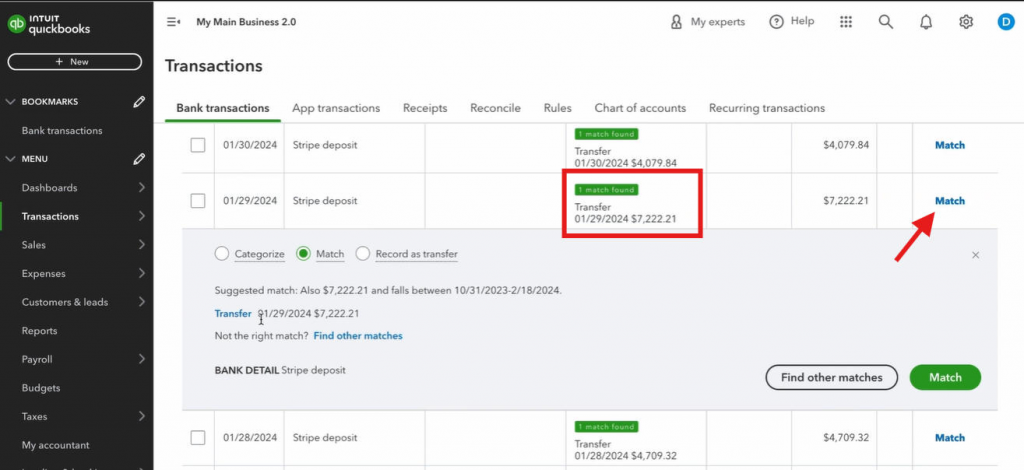
Bank feed matching
QuickBooks automatically matches these transfers with actual bank deposits. You only need to confirm the match.
Requirements for smooth reconciliation
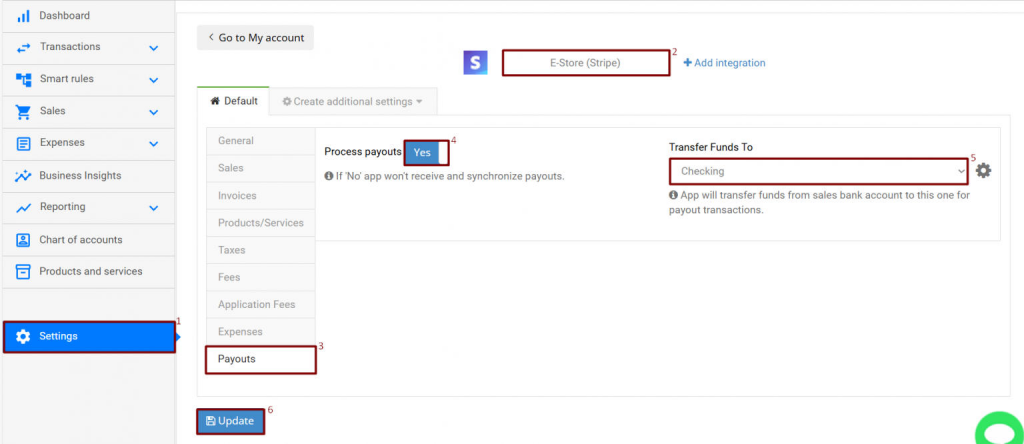
- Bank account must be connected to QuickBooks.
- Payouts must be enabled in Synder settings.
- The correct bank account must be selected.
- All transactions must be successfully synced.
When everything is configured correctly, reconciliation becomes seamless.
Per-Transaction Sync with Xero
The logic is similar to QuickBooks: transactions go into a clearing account, and payouts are transferred to the checking account.
Reconciliation process
- Connect your bank account, or import a bank statement.
- Open the Checking Account Bank Feed.
- Confirm the suggested matches.
- Click OK to reconcile.
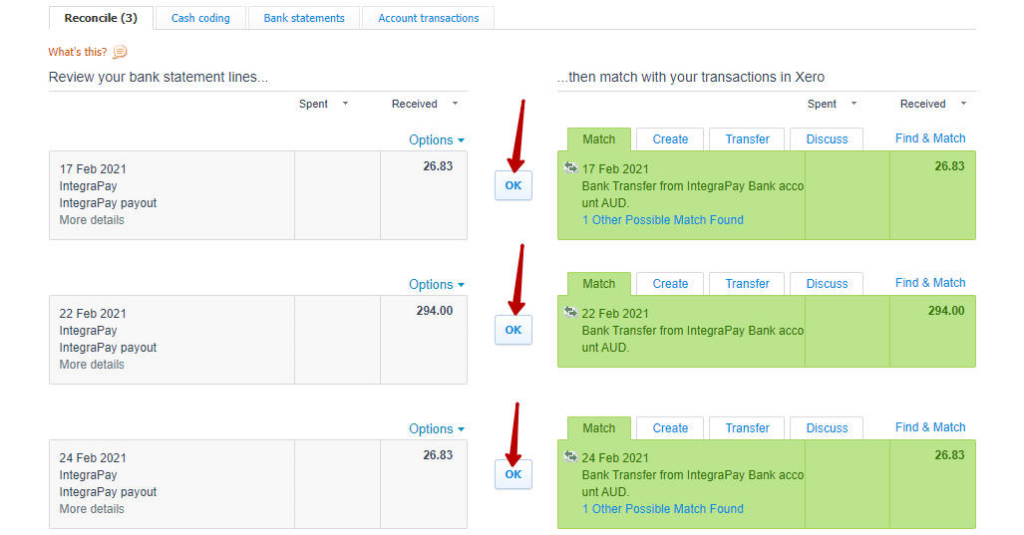
If no match is highlighted, use Find & Match and locate the transfer Synder created.
Important notes for Xero
- Do NOT use Create in bank feeds — it may duplicate data.
- The clearing account balance should reflect the actual platform balance.
- It should return close to zero after payouts.
Limitations:
- Payouts and overpayments cannot be rolled back via Synder. They must be deleted manually in Xero.
- Transactions are unreconciled by default unless auto-reconciliation is enabled.
Auto-reconciliation in Xero
Synder can automatically reconcile transactions in the clearing account.
To enable it:
- Go to Integration Settings → General tab.
- Enable Auto-reconcile Xero transactions.
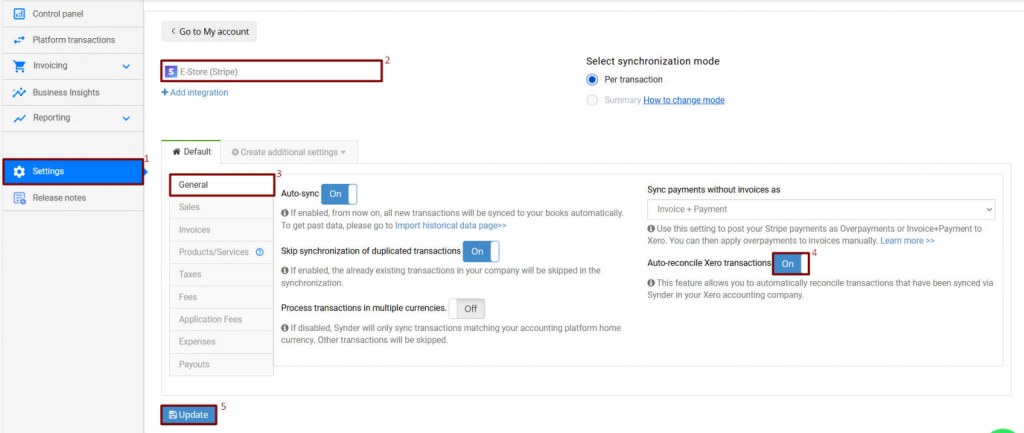
Note: this feature does NOT apply to bank transfers (payouts) — they must be reconciled manually.
For more information, see Automatic Xero bank reconciliation.
Reach out to the Synder team via online support chat or email with any questions — we’re always happy to help.