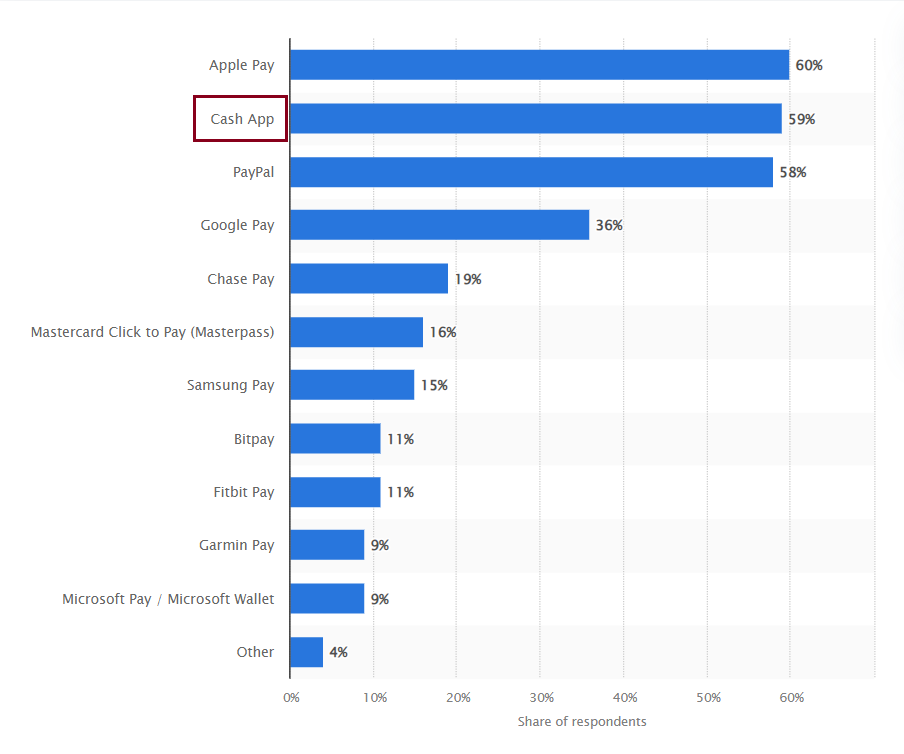
Today, Square Cash App is one of the most popular payment methods in the US, only second to Apple Pay. As a business, you can’t miss out on this opportunity to expand your customer reach, offering a convenient and secure option to pay on the go from wherever customers are, using their mobile phones.
Let’s look at Cash App and how you can leverage it as a business in more detail.
If Square is a payment gateway for your sales channels, you might wonder how to analyze data from all sources in one place and get actionable insights about your products and customers to boost revenue growth.
Get a bird’s-eye view of all the relevant data to create optimal business strategies and maximize your profits – Join Synder’s 15-day free trial or learn more about it during our weekly public demo.
Contents:
- Why would you want to use Cash App as a business?
- Cash App for Business features
- How to create a business account?
2. Cash App Pay – how to accept payments
- Multiple ways to receive Cash App payments
- Setting it up for Square Online sites
- Setting it up for Square POS
- Setting it up for Online Checkout
- Setting it up for Invoices
3. Cash App payment integrations – getting paid outside the Square ecosystem
4. Managing a multichannel business ecosystem
Key takeaways
- Cash App – ranked second only to Apple Pay in the US – allows businesses to tap into its vast user base for convenient and secure payments via mobile phones, making it an essential tool to maximize revenue potential and broaden customer reach.
- Businesses can enjoy a streamlined checkout experience and efficient cash flow management by leveraging the convenience, low transaction fees, and instant deposit Cash App provides for in-person and online transactions, enhancing financial flexibility.
- While Cash App is seamlessly integrated within the Square ecosystem, businesses can still accept payments outside of it through third-party platforms like Stripe, Shopify, WooCommerce, and BigCommerce, expanding their payment options and reaching customers across various sales channels.
What is Cash App?
Cash App is a mobile payment service with Square, Inc. (Block, Inc., as of 2021) behind. Cash App has become increasingly popular for its simplicity and convenience in sending, receiving, and requesting money. Users can link their bank accounts or debit/credit cards to the app, facilitating quick and secure transfers between individuals or businesses.
Cash App offers individual users a convenient tool for splitting bills with friends, paying for goods and services, and even investing in stocks and Bitcoin.
For businesses, Cash App comes with payment processing solutions, allowing them to easily accept customer payments, in-person or online, in multiple ways. Additionally, it features invoicing, direct deposits, business loans through Square’s ecosystem, and more, making it a fully-fledged finance management tool for sole proprietors and smaller businesses.
Here, we’ll be focusing on the business side of Cash App.
Why would you want to use Cash App as a business?
And we’ll start with a logical question. As a business, why might you want to consider Cash App? Well, we have a couple of pretty viable reasons to share.
Let’s break them down.
Tremendous customer reach
Cash App boasts a tremendous customer reach, being one of the most popular payment methods in the US. Based on the freshest 2024 stats by Statista, it’s only second to Apple Pay. It has recently crossed the 50 million active users mark and keeps growing, which makes it an essential platform for businesses looking to tap into a broad customer base and maximize their revenue potential.
Convenience
Cash App offers a convenient way to accept payments from customers using smartphones. It opens a pool of opportunities for businesses that operate in mobile or remote settings, such as food trucks, pop-up shops, or service providers who visit clients at their locations. With Cash App, customers can instantly pay a business using their mobile devices, eliminating the need for cash or card terminals and streamlining the checkout process for both parties.
Low transaction fees
Cash App charges lower transaction fees than many traditional payment processors, making it an attractive option for smaller businesses looking to save on processing costs.
There are no monthly fees. Cash App automatically deducts a 2.75% processing fee on each payment you receive to your Cash App for Business account. This way, you can easily budget for payment processing expenses.
This cost-effectiveness allows small businesses to maximize profits and allocate resources more efficiently, contributing to overall financial stability and growth.
Related:
How Much Does Square Charge in Fees: A Quick Guide to Square Fees
Instant deposits
Businesses can receive instant deposits into their bank account for a small fee. This Cash App feature can be especially useful for those who need access to funds quickly, such as during busy periods or when managing cash flow. This way, Cash App helps businesses maintain liquidity and respond promptly to operational needs, enhancing financial flexibility.
Integration with the Square ecosystem
If you’re already using other Square’s products and services as a business, integrating Cash App into your operation is a no-brainer.
Cash App is a part of it, so it smoothly integrates with Square’s point-of-sale systems, inventory management tools, and other business software, providing a comprehensive solution for managing payments and finances. This integration enhances operational efficiency and accuracy, as you can centralize payment processing and financial data, simplify administrative tasks, and reduce the risk of errors.
Business features
Besides payment processing, Cash App offers other features businesses might fancy, like invoicing, payroll processing, and even business loans through Square’s lending service. For smaller ventures and entrepreneurs, it can become a basis for building a fully-fledged business management system, as it also integrates with accounting, CRMs, and some other business tools one might find helpful.
Cash App for Business features
As we’ve just discussed the business features of Cash App, I suggest we take a closer look at them.
It’s important to note that even if you already have a personal Cash App account, you cannot use it for business purposes. To access the business features, you should sign up for Cash App for Business – a part of Cash App specifically designed for businesses. We will go over how to do this shortly.
Cash App for Business provides unique functionality that differs from what you receive as an individual user. The business features aim to simplify receiving payments and managing your finances. And without further ado, let’s get to them.
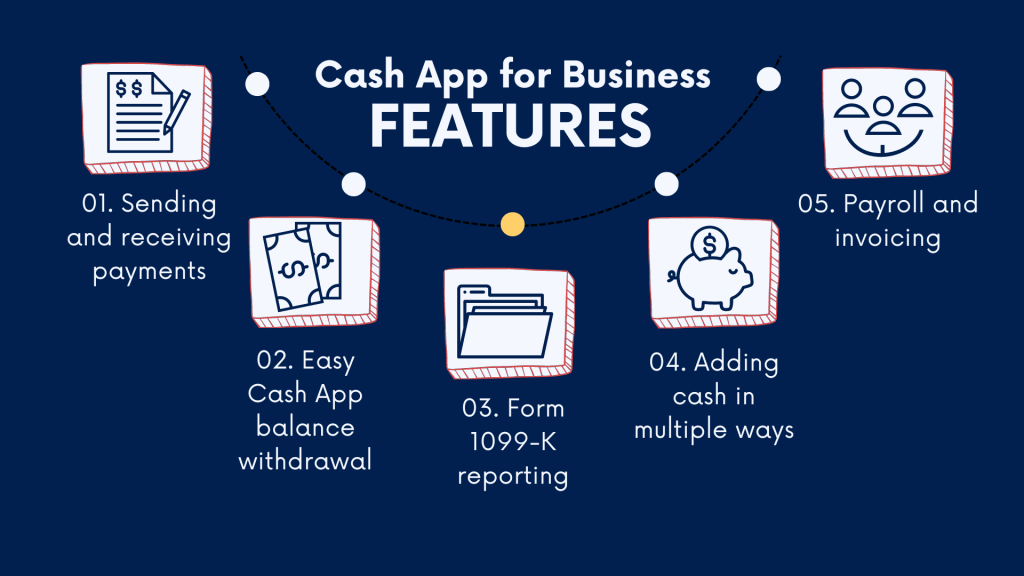
#1 – Sending and receiving payments
With Cash App for Business, you can send and receive payments for goods or services quickly and securely. You can accept customer payments or pay your vendors using Cash App, reducing administrative hassle and improving cash flow management.
#2 – Withdrawal of Cash App balance
Businesses can easily withdraw their Cash App balance to their linked bank account, providing flexibility in accessing funds and managing cash reserves. This way, you can use your Cash App balance for various expenses and investments and maintain liquidity.
#3 – Form 1099-K reporting
Cash App for Business automatically generates and provides a Form 1099-K to businesses upon reaching a certain payment threshold, helping you to report and comply with tax regulations. The thresholds may differ from state to state, but Cash App typically follows the nuances and calculates your thresholds.
#4 – Adding cash
Cash App for Business offers multiple options for adding funds to the account, including ACH transfers, paper money deposits, checks, or recurring deposits. This flexibility allows businesses to conveniently fund their Cash App accounts and have the necessary funds to support their operations and growth.
#5 – Payroll and invoicing
As Cash App is a part of the Square ecosystem, you can use Square’s business solutions, such as Square Payroll or Invoicing, to pay your employees or allow customers to pay invoices with Cash App. (I need to make a remark here that there are voices not recommending Cash App as a means of paying your employees, as it may cause some hassle in calculating payroll taxes. However, for a small business with a few employees it still can be a somewhat viable solution, especially in combination with Square Payroll). You will have to enable Cash App as a payment method, and you’re good to go. These integrations let you expand your Cash App core business toolset and keep your operation backed by a single solution.
It’s still worth mentioning that Cash App, as a business solution, suits mostly smaller businesses and entrepreneurs or businesses at the start. With growth, you might want to reconsider your choice, as it might lack some critical aspects. But at that point, you can switch to Square business solutions, leaving Cash App as a payment method to provide your customers.
How to create a business account?
Before you create a business account at Cash App, you might want to check whether you qualify for it.
So, what businesses can utilize this solution?
Currently, Cash App for Business supports smaller businesses, such as sole proprietors, single-member Limited Liability Companies (LLCs), and nonprofit corporations. So, if your business is one of those, you can set up a business account to manage your finances and accept payments. Otherwise, alternatives like the Square POS, previously mentioned, may be better suited to your needs for processing sales and managing earnings.
Creating a Cash App for Business account is pretty much straightforward and requires several steps that we’re going to break down.
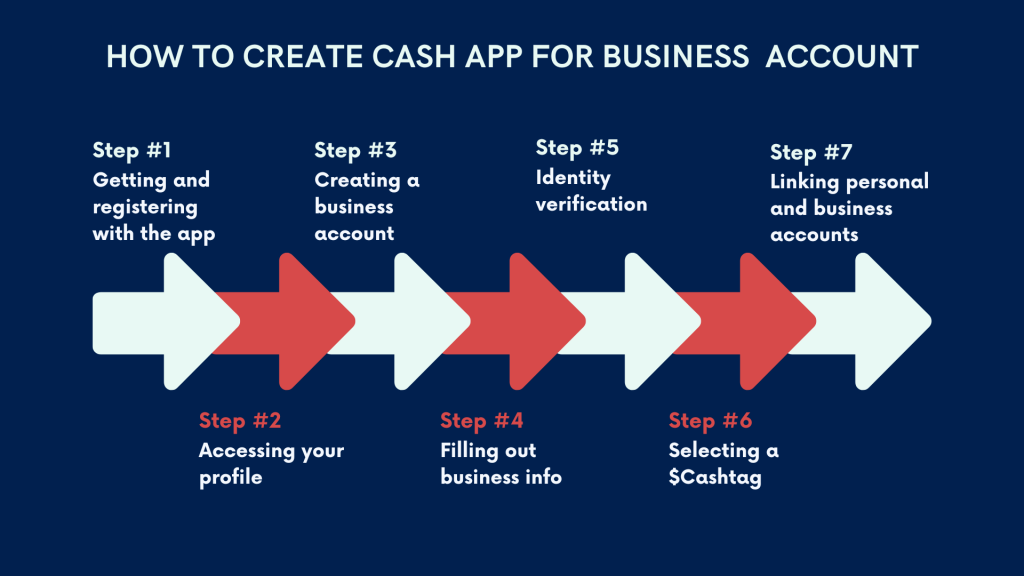
- Step #1 – Getting and registering with the app
Provided you start from scratch, you might want to download Cash App from Google Play or Apple App Store, depending on your mobile device’s operating system, and sign up for the service. It’s necessary to mention that you first sign up for a personal account. - Step #2 – Accessing your profile
The next step (and if you already have a personal account with Cash App, this will be your first step)is to go to your account profile and navigate to profile settings. - Step #3 – Creating a business account
From there, you might want to scroll to the bottom of the profile page and select the option to Create a business account. This move will initiate setting up your business account within the Cash App platform. - Step #4 – Filling out business info
You’ll be prompted to fill out information about your business to verify its identity. This may include details such as your business name, address, and type of business. - Step #5 – Identity verification
Cash App may require you to verify your identity and the identity of your business as part of the account setup process by providing additional documentation or information to confirm your identity and the legitimacy of your business. - Step #6 – Selecting a $Cashtag
Once your business account is set up, you’ll choose a $Cashtag for your business. $Cashtag is a unique identifier that makes it easy for customers to send payments to your business account. It usually contains your business name. - Step #7 – Linking personal and business accounts
Your personal and business accounts will be linked to the same email and phone number, allowing you to manage both accounts together, simplifying account management and ensuring a smooth experience for you.
As you can see, nothing super hard so far. Still, remember that even though you link your personal and business accounts, you need to distinguish between your personal and business finances.
Done with that, you can start accepting payments from your customers. And we’ll look at how you can do it right away.
Cash App Pay – how to accept payments
Cash App Pay is a feature that helps businesses accept customer payments through the Cash App platform. In a nutshell, it’s a digital wallet that individual users and companies can use as a convenient way to manage and transact funds.
From a business perspective, Cash App Pay is responsible for payment processing, enabling businesses to receive customer payments through multiple channels, whether they purchase in person, online, or through invoicing. So again, integrating Cash App Pay into their payment infrastructure helps businesses offer customers a convenient way to purchase using their smartphones.
Multiple ways to receive Cash App payments
Since we mentioned that Cash App Pay allows for multiple ways of receiving payments, I suggest discussing this aspect in a bit more detail.
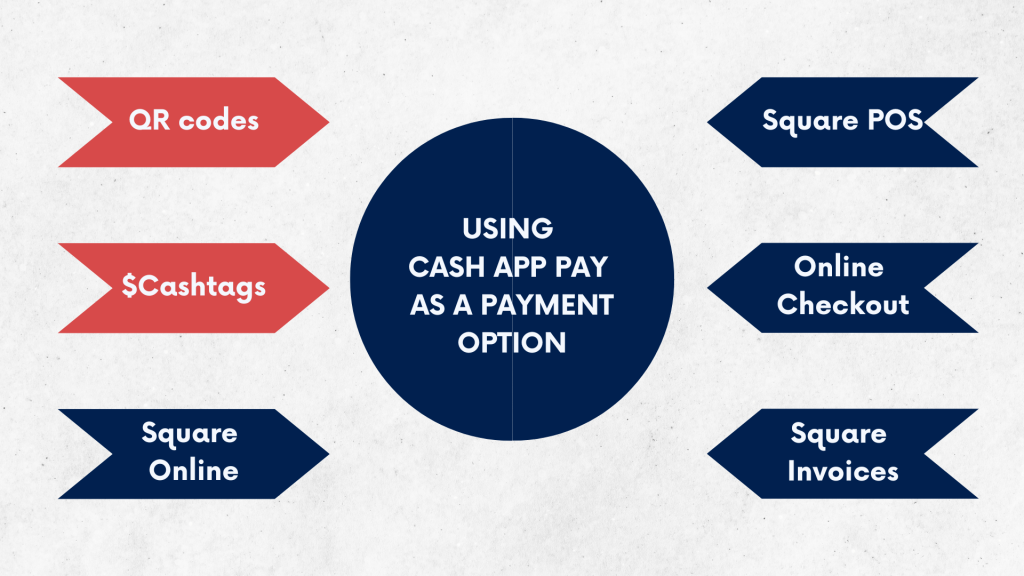
So, there are various channels within the Square (Cash App included) ecosystem through which customers can interact with a business (in terms of payments), where Cash App Pay can be a payment method.
Speaking purely of Cash App, they are QR codes and $Cashtags. Adding here Square services, we can name Square Online sites, Invoicing, POS, and Online Checkout.
Let’s look at each real quick.
QR codes
QR codes are the primary means of getting paid on Cash App. Cash App Pay generates QR codes that customers can scan to initiate payments. They can be displayed at a physical location or embedded in marketing materials. You can also generate one when a customer is about to pay for a service received to be scanned from your device’s screen (that’s how you might not need a card reader on you).
This way, QR codes provide a frictionless payment experience for customers and ways simplify payment collection for businesses.
$Cashtags
In the Cash App world, each business has a unique $Cashtags (you get it upon registering with the service) that customers can use to send payments directly to the business’s Cash App account. This method eliminates the hassle of traditional payment methods like cash or checks, being a convenient way for customers to make payments through Cash App.
Businesses can incorporate $Cashtags into various aspects of their engagement with customers, including invoicing, email communications, social media promotions, website checkout pages, and marketing materials.
Square Online sites
Now, to the Square services.
So, Square Online is an ecommerce platform provided by Square where you can create and manage your online store to sell products and services. You can customize your online store, manage inventory, accept payments, and track sales and customer data. Square Online offers various features and tools to help you establish an online presence and reach customers beyond a physical location.
Having a Square Online store, you can add Cash App as a payment method to allow customers to pay you in this convenient way.
Point of Sale (POS)
Cash App Pay extends its functionality to physical retail locations, integrating with Square’s Point of Sale systems. Businesses can accept payments in-store using Cash App Pay, providing customers with a secure and efficient checkout experience.
Just to be on the same page, Square POS is a system that helps businesses process customer payments in-store. It includes hardware like card readers and software run on tablets or smartphones. It allows for accepting various payment methods, including credit cards, debit cards, and contactless payments like Apple Pay and Google Pay. Additionally, Square POS provides features for managing inventory, tracking sales, generating reports, and processing refunds.
Online Checkout
Square Online Checkout is a feature provided by Square that allows one to accept payments through websites or online stores. It enables customers to add items to their cart, enter payment and shipping details, and complete their purchases seamlessly.
It allows you to customize the checkout experience to match your branding and accept a bunch of various payment methods. If you’re using this service, you can add Cash App Pay as one of those.
Square Invoices
Square Invoices enables businesses to create and send branded invoices electronically. Customers receive the invoices via email and can pay securely online using various payment methods.
Businesses can select Cash App Pay as a payment option when creating invoices through the Square Dashboard and the Square Invoices app, providing customers the flexibility to pay using Cash App.
Since we’re talking about using Cash App Pay as a payment method within several Square services, wouldn’t it be nice to know how to enable it there? I think it would.
Setting it up for Square Online sites
Integrating Cash App Pay as a payment method on your Square Online site takes you several easy steps.
- Start by logging into your Square Online Dashboard. From the Overview page, navigate to Settings.
- In the Settings menu, locate the Checkout or Shared Settings section. Click on it to access the checkout settings for your Square Online site.
- Within the Checkout settings, you should find an option labeled Cash App. Toggle on the Accept Cash App option to enable Cash App Pay as a payment method for your Square Online site.
- After enabling the Cash App Pay option, save your changes. Look for a save or update button at the bottom of the page and click on it to apply the changes to your Square Online settings.
Setting it up for Square POS
As mentioned, Cash App Pay is natively integrated within the Square ecosystem, which eliminates the need for businesses to undergo extensive setup processes; instead, they simply need to activate Cash App Pay within their Square POS app settings.
To accept Cash App Pay on your POS app:
- Once the customer’s cart is ready for checkout, tap Charge $X.XX.
- Choose Cash App Pay as the preferred payment method.
- A QR code will appear on your device’s screen. Present the screen to the customer so they can scan the QR code using their mobile device and fulfill the payment.
- Upon successful transaction processing, the sale is finalized, and the payment is completed.
Setting it up for Online Checkout
Here’s how you can add Cash App Pay as a payment method to Square Online Checkout:
- You might want to log in to your Square Online Dashboard using your credentials.
- Once logged in, locate the Online Checkout section in the menu. Click on it to access the settings for your Square Online Checkout.
- Within the Online Checkout settings, go to the Payment Methods tab. Here, you’ll find options related to the payment methods accepted in your store.
- Scroll down to the Digital wallets section, which includes payment methods such as Apple Pay and Google Pay. Toggle on the option for Cash App Pay to enable it as a payment method for your Square Online Checkout.
Setting it up for Invoices
You can integrate Cash App as a payment option into your Square Invoices through either your dashboard or the Invoices App, following the steps below.
Using Square Dashboard
- On your Square Dashboard, head to the Payments section and select Invoices.
- Click on Send an invoice to create a new invoice.
- Fill in the required customer information and invoice details.
- Under Payment options, choose Cash App Pay as the preferred payment method.
- Preview the invoice, save it for future reference, or send it directly to the customer.
Using Square Invoices App
- Launch the Square Invoices app on your device.
- Under Invoices, tap the “+” icon to create a new invoice.
- Enter the customer’s information and invoice details accurately.
- When prompted to select payment methods accepted, opt for Cash App Pay.
- Review the invoice details to ensure accuracy, then send the invoice to the customer.
Cash App payment integrations – getting paid outside the Square ecosystem
Everything we looked at so far was within Square. Does that mean you can’t accept payments with Cash App outside this ecosystem?
Well, not quite.
We mentioned QR codes and $Cashtags that allow you to accept customer payments with Cash App. These don’t require a Square-based store or any other Square services involved.
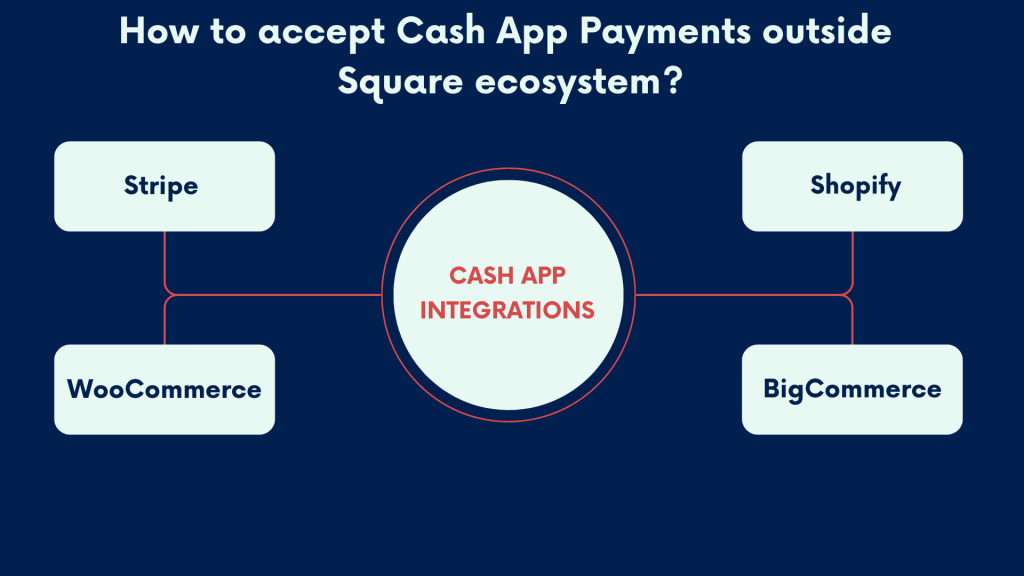
But what if you already utilize some payment gateways to accept payments for your goods or services (other than Square) or sell through marketplaces. Can you add Cash App as a payment method there? Cash App integrates with several third-party ecommerce and payment platforms, including Shopify, WooCommerce, BigCommerce, and Stripe.
Let’s look at these integrations.
#1 – Accepting Cash App payments on Stripe
Cash App can integrate with Stripe, allowing businesses to accept Cash App payments through their Stripe payment gateway.
Integrating Cash App Pay within a Stripe account allows for managing multiple payment methods from one centralized platform.
To enable Cash App Pay, you might want to:
- Log into your Stripe Dashboard, go to the Payments section, and select Payment methods.
- Here, you can enable Cash App Pay, though additional information may be required based on your account settings.
- Once enabled, Cash App Pay can be integrated as a payment method across various platforms, such as websites, mobile apps, or POS systems, using Stripe’s platform-specific integration options and instructions.
Integrated into Stripe, Cash App payments are automatically deposited into the business’s Stripe account, simplifying financial management.
#2 – Accepting Cash App payments on Shopify
It’s worth noting that Shopify doesn’t provide integration with Cash App in the classical meaning of integration. It rather accommodates Cash App payments through a manual workaround. But, if it works, it works.
To accept Cash App payments on Shopify:
- In your dashboard Settings, you might want to head to Payments.
- Scroll down to Manual Payments, click on Manual payment methods, and then Create custom payment method.
- Fill out the required information, including the custom payment name (e.g., Pay with Cash App).
- Under Additional Details, you can add instructions for customers, including your Cash App $Cashtag and any additional payment instructions.
- In the Payment Instructions section, you might want to provide further guidance and a short Thank You message.
- Click Save to finalize the setup, and you’re good to go.
#3 – Accepting Cash App payments on WooCommerce
Running your business on WooCommerce (which is an ecommerce addition to WordPress-based sites), you can use WooCash, a plugin that allows you to accept Cash App payments.
You might want to follow several steps to start using WooCash and add it to your WooCommerce store.
- Begin by installing the WooCash plugin on your WordPress website. You can find the plugin by searching for WooCash in the WordPress plugin directory or downloading it from a trusted source.
- Activate the plugin from the WordPress admin dashboard. Navigate to the Plugins section, locate WooCash, and click the Activate button.
- Upon activation, configure the settings for WooCash according to your preferences. This may include specifying your Cash App $Cashtag, setting up payment instructions, and customizing the appearance of the Cash App payment option on your WooCommerce checkout page.
Test transactions before going live with WooCash on your WooCommerce store to ensure seamless payment processing and make your WooCash live.
#4 – Accepting Cash App payments on BigCommerce
BigCommerce doesn’t integrate with Cash App directly. However, businesses can accept Cash App payments by using Stripe as the payment gateway on the BigCommerce platform. Stripe, as mentioned, supports Cash App Pay and is compatible with BigCommerce.
This integration allows businesses to offer Cash App as a payment option during checkout along with other methods. Customers can select Cash App Pay to initiate payments from their Cash App accounts.
How to make the most of your multichannel payment data?
As you can see, besides accepting payments directly through Cash App, you can add it as a payment method to various platforms and services you use for sales. At this point, I wanted to discuss one more aspect.
Since you can accept payments through multiple channels, how can you manage them efficiently and make the most of this data to understand your business performance and growth opportunities?
Here’s where you might want to look at Synder Insights – a smart business analytics tool. It allows you to consolidate transactions from all your sales channels into a single hub and have a 360-degree view of your sales, product performance, and customer behavior trends. Why would you need it?
Helpful automation
First, it’s automated. Primarily, Synder collects all the necessary data with a bunch of details from payment processors, ecommerce platforms, and marketplaces – literally anywhere you sell from. It brings all this data to your accounting (QuickBooks, Xero, SageIntacct, or its native accounting solution), categorizes it there for you, protects it from duplicates that can occur when you’re fetching transactions from multiple sources, and makes it ready for financial reporting and tax preparation.
It goes as far as to account for
- payment processing fees,
- sales and other withheld taxes,
- multi-currency transactions,
- invoices (automatically applying payments to open invoices and closing them), and more.
Comprehensive business analytics
If you go with Synder Insights, you, as mentioned, get a full picture of your business ready for you to analyze and make decisions based on your real numbers. Synder fetches plenty of transaction details, like those on products (or services) sold, customers, channels, and so on. It does it not for the sake of fetching, obviously.
Instead, it organizes them nicely into helpful reports, allowing you to analyze your business’s performance across channels, track the products’ profitability and selling trends, monitor customer buying patterns, understand your sales, etc.
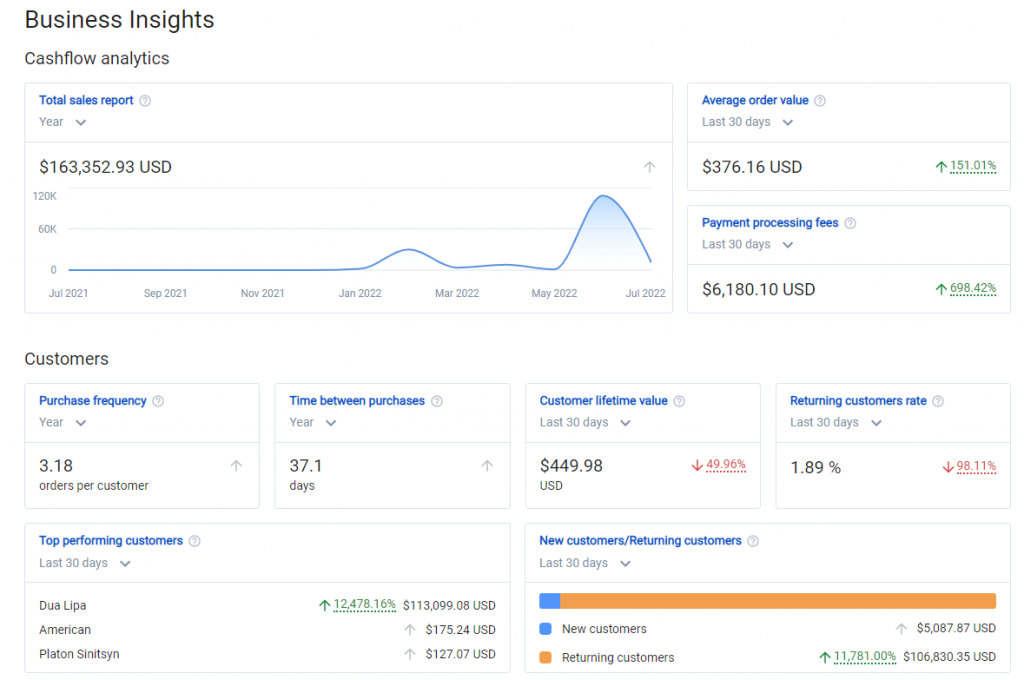
You can observe and manage these reports from a real-time dashboard, providing a general overview of your business and allowing you to dig deeper into its various aspects and filter your reports by channels, countries or states, customers, and more.
Let’s look at the reports you can have:
- Gross sales 👉 Learn more here
- AOV 👉 Learn more here
- Platform fees 👉 Learn more here
- LTV 👉 Learn more here
- Purchase frequency 👉 Learn more here
- Time between purchases 👉 Learn more here
- New vs Returning customers 👉 Learn more here
- Returning customer rate 👉 Learn more here
- Top performing customers 👉 Learn more here
- Least performing customers 👉 Learn more here
- Top refunded customers 👉 Learn more here
- Top performing products 👉 Learn more here
- Least performing products 👉 Learn more here
- Top refunded products 👉 Learn more here
- Products most purchased together 👉 Learn more here
Getting back to Cash App, you can clearly see that giving customers flexibility in payment options is critical for a business considering reaching a wider audience. That’s why you add all these widely used payment methods into your payment gateways and track the emergence of new ones so as not to miss the opportunity. But it’s no less critical to approach your payment data from all those channels in the right way to help you better understand your business and make informed decisions about its development and growth.
Bottom line
That was a long one, but let’s wrap it up.
Incorporating Cash App as a payment method for businesses offers multiple benefits, ranging from its widespread popularity and convenience to its cost-effectiveness and seamless integration within the Square ecosystem.
Embracing Cash App allows businesses to expand their customer reach, streamline payment processing, and enhance financial management, maximizing revenue potential and fostering growth.
On top of that, Cash App’s compatibility with third-party platforms like Stripe, Shopify, WooCommerce, and BigCommerce further extends its utility, allowing businesses to cater to diverse customer payment preferences and further optimize their various sales channels.
Share your thoughts
Feel free to share your thoughts in the comments! We’d love a good discussion.


