

If you’re running a Shopify store, keeping your books clean is how you know if you’re actually making money. According to recent industry data, Shopify now powers 4.82 million active stores worldwide and processed $292.3 billion in GMV during 2024. With this massive scale, thousands of business owners face the same daily challenge: how to get their Shopify sales data into QuickBooks without losing their minds (or their accuracy).
The problem isn’t just about moving numbers from point A to point B. Shopify’s payout structure includes sales, fees, taxes, refunds, and sometimes multiple payment gateways, all bundled together. Recording these transactions incorrectly leads to inaccurate financial reports, tax headaches, and the unsettling feeling that your books don’t match your bank account.
From this article, you’ll learn exactly how to record Shopify sales in QuickBooks Online, comparing automated versus manual methods, understanding proper fee and tax handling, and sidestepping the most common recording mistakes that trip up ecommerce businesses.
TL;DR
- Shopify payouts are complex: Each deposit includes gross sales minus transaction fees, platform fees, app charges, and refunds, with sales tax often handled separately. Understanding this structure is essential for proper categorization.
- Sales tax, fees, and refunds need special treatment: US QuickBooks uses liability accounts for tax while non-US versions require tax codes. Refunds must reverse both revenue and tax liability while keeping original fees as expenses.
- Automation saves time and reduces errors compared to manual entry: Tools like Synder automatically sync transactions with proper fee breakdowns and tax handling.
- Troubleshooting starts with timing: Most reconciliation issues stem from timing differences between sale dates and payout dates, missing fee categories, or incorrectly recorded refunds that don’t adjust tax liability. Automation tools handle these complexities automatically.
Why recording Shopify sales correctly in QuickBooks matters
You can’t really tell if you’re making money until your Shopify sales are reflected correctly in QuickBooks. Many Shopify sellers look at their gross sales numbers and feel successful, then wonder why their bank account doesn’t match. The gap lies in how fees, refunds, and taxes are recorded.
Understanding Shopify payout structure (fees, taxes, refunds)
Before you can record Shopify sales accurately in QuickBooks, you need to understand what’s actually in those deposits landing in your bank account. Shopify doesn’t just send you the gross sales amount. Each payout is a carefully calculated net figure that accounts for multiple transaction types and deductions.
What’s included in each Shopify payout
When customers buy from your store, Shopify collects the full amount, including sales tax and shipping. But you don’t receive that amount in your payout. Shopify automatically deducts transaction fees (typically 2.9% + 30¢ for Shopify Payments), subscription fees, app charges, and any refunds or chargebacks. If a customer in California buys a $100 product, Shopify might collect $108.75 (with sales tax), but your payout could be $102.50 after fees, with the sales tax held separately for tax remittance.
How multiple payment gateways affect your payouts
The payout structure also varies by your payment gateway. If you’re using Shopify Payments exclusively, you’ll have one payout schedule (typically daily or weekly). Add PayPal or other external gateways, and now you’re dealing with multiple deposit streams, each with its own fee structure and timing. PayPal might hold funds for 21 days on certain transactions, while Shopify Payments settles in two business days. This timing difference matters for cash flow management and reconciliation.
Why refunds cost you more than you think
Refunds add another layer. When a customer returns an item, Shopify doesn’t just give you back the transaction fee. The fees are gone. Your next payout gets reduced by the refund amount, but the original fees stay deducted. This means a $100 sale that later gets refunded actually costs you around $3.20 in non-recoverable fees. Your QuickBooks records need to reflect both the original sale and the subsequent refund correctly, while keeping those fees in your expense accounts.
Sales tax collection and remittance rules
Sales tax handling depends on where you’re registered to collect tax. In the US, marketplace facilitator laws mean Shopify often collects and remits sales tax on your behalf for certain states. Other states require you to remit the tax yourself. Your QuickBooks setup needs to track which taxes Shopify handles (recorded as expenses) versus which taxes you’re responsible for remitting (recorded as liabilities).
How to record Shopify sales in QuickBooks: Two approaches
You have two main options for recording Shopify sales in QuickBooks: automated sync through accounting automation tools or manual entry from payout reports. The method you choose affects accuracy, time investment, and how much detail you can track in your books.
Method 1: Automated recording with Synder (recommended)
Manual data entry might feel like control, but automating the process with tools like Synder is actually how you maintain accuracy at scale.
Synder is an accounting automation tool that integrates with 30+ platforms, including payment processors (Stripe, PayPal), ecommerce platforms (Amazon, Shopify), and point-of-sale systems (Clover). It’s designed to eliminate manual data entry by automatically recording transactions in QuickBooks Online, Xero, Sage Intacct, and NetSuite with proper categorization, fee breakdowns, and tax handling.
For Shopify stores, Synder connects directly to your books and syncs transactions only after Shopify processes payouts, ensuring your QuickBooks records match your actual bank deposits. The system handles the complete flow by:
- Recording sales revenue from all connected payment gateways (Shopify Payments, PayPal, Stripe) with separate clearing accounts for each
- Categorizing platform and payment processing fees into individual expense accounts so you can see exactly what each channel costs
- Tracking sales tax liabilities automatically – US QuickBooks uses liability accounts while non-US versions (Canada, UK, Australia) require tax codes on line items, which Synder’s Smart Rules assign based on customer location
- Processing refunds by reversing revenue and tax liability while keeping the original transaction fees as expenses, since payment processors don’t refund them
- Moving funds from clearing accounts to your checking account when payouts arrive, matching your actual bank deposits for seamless reconciliation
Want to see how this works with your actual Shopify setup? Book a demo to walk through your specific payment gateways and accounting needs.
How to set up Shopify sales transfer to QuickBooks via Synder
Setting up Synder requires connecting both your accounting software and sales platforms, then configuring how transactions should flow between them. Once configured, Synder handles ongoing sync automatically, but getting the initial setup right is very important for accurate books from day one.
Step 1: Create your Synder account
Start by creating a free trial account. You’ll begin the setup process for your first Organization, which will contain your QuickBooks and Shopify connections.
Step 2: Enter your business details
Fill in your business information, including company name, location, and contact details. This information helps Synder configure tax settings and compliance requirements specific to your jurisdiction.

Step 3: Select platforms to integrate
Choose which platforms you want to connect. Select Shopify from the list, and if you use multiple payment gateways (like Stripe or PayPal in addition to Shopify Payments), mark all the services you’re using. You can connect them all at once or skip certain integrations and add them later.
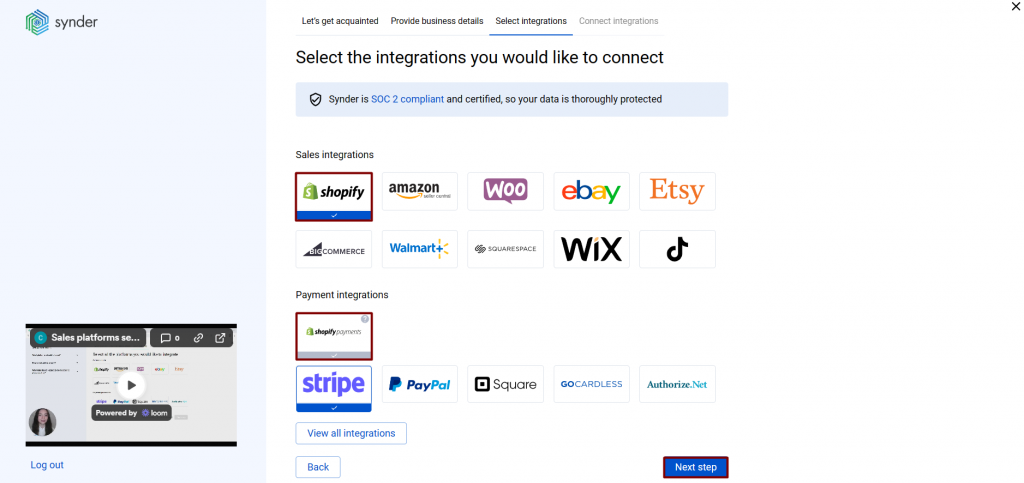
Important: If your Shopify store accepts payments via different channels other than Shopify Payments (like PayPal, Stripe, Amazon Pay), you must connect these payment platforms to Synder separately for the system to recognize and sync all transactions successfully.
Step 4: Connect your accounting platform
Select QuickBooks Online from the available accounting options and click Connect to authorize the connection.

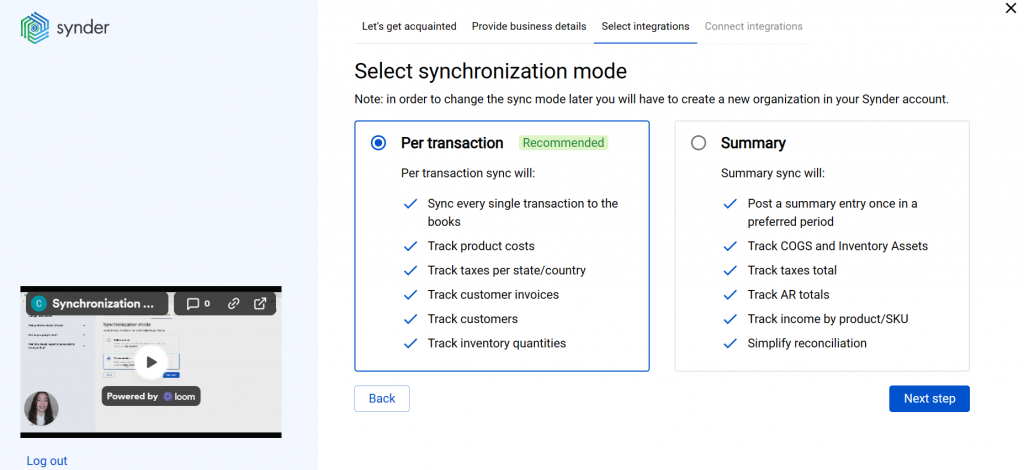
During this step, you’ll choose your sync mode:
- Per Transaction Sync creates individual sales receipts or invoices for every order with full customer and product details. Choose this if you track inventory in QuickBooks, need customer-level reporting, or require granular detail for audits.
- Summary Sync creates one daily (or payout-based) journal entry aggregating all sales, fees, refunds, and taxes. Best for high-volume stores (50+ orders daily) to keep QuickBooks clean while maintaining accurate totals.
Step 5: Connect your Shopify store
Open a separate browser tab and log in to the Shopify store you want to connect. Back in Synder, click Connect. You’ll be redirected to Shopify’s installation page, where you need to click “Install app” to authorize the connection.
Note: One Shopify account can have multiple stores. Double-check on the authorization page that you’re connecting to the correct store, as Synder connects to individual stores, not your entire Shopify account.

Step 6: Set up the Shopify integration
Choose an account for payouts (typically your Checking account) to enable smooth reconciliation of your Shopify transactions. Click Continue to finish the configuration.
Synder automatically creates a clearing account called “Shopify (required for Synder)” in your chart of accounts. All Shopify transactions flow through this clearing account first, then Synder creates transfers to your checking account when payouts occur, making bank reconciliation straightforward.
Method 2: Manual recording process
The manual process requires downloading your Shopify payout reports from Settings > Payments > View Payouts. Export the CSV file for each payout period, which contains transaction details including sales, fees, refunds, adjustments, and the final transfer amount.
Total the CSV data by category: sum all sales, calculate total fees, note sales tax collected, and identify any refunds. Use these totals to create a journal entry in QuickBooks: create a journal entry (+ icon > Journal Entry) with the payout date. Structure your debits and credits:
- Debit your bank account for the net deposit amount
- Credit your sales income account for gross sales
- Debit your fee expense account for Shopify and processing fees
- Credit your sales tax liability account for collected sales tax
- Debit your sales income account for refunds
The journal entry must balance (total debits = total credits). The net effect shows your bank account increasing by the deposit amount, income increasing by net sales, and expenses increasing by fees.
Automated vs. manual: Which method is right for you?
Both approaches get your Shopify sales into QuickBooks, but they differ significantly in time, accuracy, and detail level. Here’s a direct comparison to help you decide which method fits your business.
| Automated | Manual | |
| Pros | • Saves up to 70 hours monthly or $2,000+ monthly in bookkeeper costs • Full transaction detail (customers, products, SKUs) • Near-zero error rate• Automatic fee and tax categorization • Supports inventory and COGS tracking | • No subscription cost • No third-party access needed • Full control over entries |
| Cons | • Monthly subscription fee • Third-party access required • Initial setup needed | • Time-intensive manual work per payout • High error risk • No transaction detail • Can’t track inventory • No multi-gateway automation |
| Best for | Active stores, multi-channel sellers, businesses tracking inventory, and anyone who values accuracy and time savings | Very low-volume, extremely budget-constrained stores |
Troubleshooting: What to do when numbers don’t match
When numbers persistently don’t match, create a reconciliation worksheet. List your Shopify gross sales for a period, subtract all fees by category, subtract refunds, and compare the result to what hit your bank. Any difference needs investigation.
Here’s a table for troubleshooting the most common recording issues manually:
| Problem | Possible cause | How to fix |
| Bank balance is less than QuickBooks shows. | Fees not recorded properly or missing entirely. | Review fee expense accounts, verify all fee types are captured (platform fees, transaction fees, app fees). |
| QuickBooks balance is less than bank shows. | Duplicate entries or sales recorded before refunds. | Check for duplicate journal entries or sales receipts; verify refunds were properly recorded as negative entries. |
| Sales tax report doesn’t match tax collected. | Tax codes not applied (non-US) or wrong liability accounts used (US). | Ensure journal entries include proper tax codes; verify sales tax goes to liability accounts, not income. |
| Clearing account has large balance at month-end. | Transfers to bank account are missing or incorrect. | Review clearing account transactions; ensure each payout creates a transfer to the checking account. |
| Customer reports don’t match deposit dates. | Mixing accrual vs. cash basis recording. | Decide on accrual (record on sale date) or cash (record on deposit date) and apply consistently. |
| Refund doesn’t reduce sales tax liability. | Refund entry only reduces revenue without adjusting tax. | Create complete refund entries that reduce both revenue and sales tax payable by appropriate amounts. |
Looks a bit intimidating, right? But there’s an easier way to tackle Shopify accounting issues. If you’re using automated software like Synder, reconciliation is built-in. Synder matches every Shopify payout to the corresponding bank deposit and alerts you to discrepancies. The Balance Reconciliation feature lets you verify that your selected summaries match the expected starting and ending balances for a defined period, providing transparency and control over your financial data before posting to QuickBooks.
Final thoughts: Clean books start with clean recording
Recording Shopify sales correctly istedious and error-prone when done manually. Every sale needs proper revenue recognition, every fee needs its own expense line, every tax collection needs liability tracking, and every refund needs accurate reversal.
The real question is how much your time costs. Manual entry might work when you’re doing 20 orders a week. At 200, you’re burning hours that could go toward product development, marketing, or hiring. Tools like Synder pay for themselves fast – not just in saved time, but in having financial reports you can trust when making decisions.
Set up the foundation properly (correct accounts, clearing account structure, proper sync configuration), then let the system run. You get clean books to work with, your tax filing becomes straightforward, and you stop guessing whether you’re actually profitable or just moving money around.
FAQ
How often should I record Shopify sales in QuickBooks?
Record Shopify sales at least as frequently as your payout schedule – typically daily or weekly, depending on your Shopify settings. Most high-volume stores record daily to keep books current and make bank reconciliation easier. If you’re using an automated tool like Synder, transactions are recorded automatically within hours after they occur, eliminating the need to decide on a schedule.
Can I use QuickBooks Desktop for Shopify sales instead of QuickBooks Online?
Yes, you can record Shopify sales in QuickBooks Desktop, though it might require more work since most automation tools primarily support QuickBooks Online. You’ll need to create journal entries manually from your Shopify payout reports or use desktop-compatible automation like Synder, which supports both QuickBooks Online and Desktop versions for Shopify integration.
What happens if I switch from manual entry to automated sync mid-year?
When switching from manual to automated sync, first review your existing QuickBooks entries to identify any gaps or duplicates. Most automation tools let you set a “start date” for syncing historical data to avoid duplicating manually entered transactions. Clean up any incomplete or incorrect manual entries before the switch, then let automation handle all new transactions going forward.
Do I need separate QuickBooks accounts for each Shopify store?
No, you don’t need separate QuickBooks companies for multiple Shopify stores. Instead, use classes or locations within one QuickBooks company to track each store separately. Create a class for “Store A” and “Store B,” then apply the appropriate class to transactions from each store. This gives you consolidated financial statements plus the ability to filter reports by individual store. Synder’s Smart Rules can automatically apply the correct class or location to transactions based on which Shopify store they came from.
How do I handle Shopify sales in foreign currencies?
If you sell internationally and receive payouts in foreign currencies, enable multi-currency in QuickBooks Online before recording any foreign transactions. Create separate bank accounts for each currency (USD, CAD, EUR, etc.), and record sales in the transaction currency. QuickBooks handles exchange rate conversions automatically, but verify that rates match what your payment processor actually used for the conversion. Or use Synder, which handles this automatically by syncing transactions in their original currency and applying the exchange rates directly from your payment processor.