.png)

Reconciling Shopify payments in Xero can feel complicated due to multiple fees, taxes, and payouts, but it doesn’t have to be that way. The most efficient way to manage Shopify Xero reconciliation is by using integration software like Synder, which automatically syncs all of your Shopify transactions to Xero. This approach streamlines Shopify payouts bank reconciliation in Xero, reduces manual errors, and keeps your financial data accurate and up to date.
Common challenges in Shopify Xero reconciliation
Xero’s built-in Shopify integration can handle the basics, like pulling in daily transaction summaries, creating simple invoices, tracking pending sales, and importing up to 90 days of past transactions. But in reality, it can be a bit clunky, and users often run into issues.
It doesn’t automatically calculate sales tax, can’t create separate invoices for each sale, doesn’t track inventory or cost of goods, can’t connect multiple Shopify stores, has limited multicurrency support, and doesn’t help with tax filing across different regions.
That’s why using a tool like Synder is usually a better option. It smoothly syncs Shopify fees, taxes, and payouts to Xero, provides detailed financial reports, and takes a lot of the manual work off your plate, making Shopify Xero reconciliation much easier.
How to reconcile Shopify payments in Xero
Here are the steps you need to follow:
- Connect Shopify and Xero to Synder
- Pick the best way to sync your transactions
- Map Shopify payments to Xero accounts
- Configurate the settings to fit your needs
Let’s get into the details!
Step 1. Connect Shopify and Xero to Synder
First, you’ll need to connect Shopify to your Synder account:
- Switch to the needed Organization in the top-left corner of the Synder page.
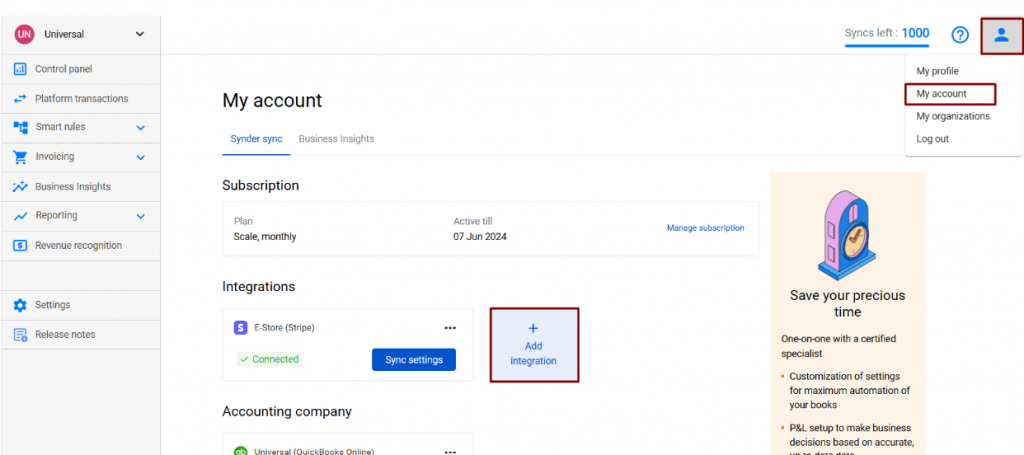
- Click on the Person icon in the upper-right corner and select Organization settings.
- In the Integrations section, click Add integration.
- Select Shopify.
- To complete the setup for the Shopify integration choose an account for payouts (usually, your Checking account) that will allow smooth reconciliation of your Shopify transactions in one click. Hit Continue to finish the configuration.
To finalize the setup, log in to your Shopify store and click Connect in Synder. If you don’t have admin rights, invite the account owner to approve the connection. You’ll then be redirected to the installation page. Click Install App to link Synder to Shopify.
If you use Shopify Payments, connecting your Shopify store to Synder is enough. For other payment gateways like Stripe, PayPal, or Amazon Pay, make sure to connect each provider to Synder to automatically capture sales, fees, refunds, and payouts, along with all relevant Shopify order details.
Step 2. Pick the best way to sync your transactions
While connecting Xero as your accounting company in Synder, you’ll be asked to choose how you want your transactions to be synced. Synder offers flexible sync options to match your accounting style and reporting needs:
- Per Transaction Sync
- Each Shopify sale, refund, or fee is recorded individually in Xero.
- This provides the most detailed view of your transactions and is ideal if you want granular reporting or need to reconcile each order.
- Summary Sync
- Instead of logging each sale separately, Synder groups all Shopify transactions from a single day into one summarized entry.
- This approach simplifies your books and reduces clutter in Xero, while still keeping totals for sales, fees, and taxes accurate.

Once you’ve made your choice, click on Connect to link your accounting company.
Step 3. Map Shopify payments to Xero accounts

- Click on Settings to configure how your transactions will be mapped to Xero.
- Go to the Products and services tab.
- Click Add line to add a new line for mapping products.
- Select your Xero products from the dropdown (the left field).
- Fill in the product names from your Shopify account in the right field. Remember that if your product names match between your sales integration and your accounting integration, Synder will match them automatically, but you also can map your products yourself if you want to override this or if names don’t match.
- Click Update to save the settings.
- Synchronize your transactions to check the results in Xero.
Synder automatically creates a Shopify clearing account in Xero to hold all Shopify transactions, then transfers payouts to your checking account for easy reconciliation.
Step 4. Configurate the settings to fit your needs
Synder’s General Settings give you control over how your Shopify data syncs to Xero:
- Auto-sync: Automatically sends new Shopify transactions to Xero as they happen. Turn this off if you want to review transactions before syncing.
- Skip duplicates: Prevents double entries by ignoring transactions that already exist in Xero.
- Multicurrency support: Sync transactions in your home currency and foreign currencies, which is necessary for international sales.
- Shipping item name: Lets Synder recognize and account for shipping charges correctly using the item name you specify.
- Apply location: Adds location tracking to synced transactions if location tracking is enabled in Xero, helping you track sales by store, region, or team.
Beyond these general options, Synder also lets you customize every detail of how your Shopify data moves to Xero. You can control how sales and invoices are recorded, track fees and payouts, and ensure the correct tax codes are applied. This makes sure your data ends up in the right place, keeping your books accurate and organized.
Step 5. Start reconciling accounts
Synder simplifies reconciliation by automatically managing your two key Xero accounts:
- A Clearing Account for each connected integration, where all Shopify transactions, like sales, taxes, discounts, and fees, are recorded.
- Your Checking Account, which is linked to your bank.
When Shopify transfers money to your bank, Synder records these payouts by moving funds from the Clearing Account to the Checking Account. This ensures your balances stay accurate and makes reconciling your accounts in Xero smooth and error-free.
Ready to simplify your Shopify Xero reconciliation and save hours on manual work? Book a free demo with Synder to see how it can transform your business.
FAQ
Can I import historical Shopify payments into Xero?
Yes. Using Synder, you can automatically pull past sales, refunds, fees, and payouts into Xero, properly mapping them to accounts and taxes for accurate, complete records. Included for free on the Premium plan, 3 months free on Pro, and available for a fee on Basic and Essential.
How to track sales tax and VAT?
Once you enable the Apply Taxes option, Synder automatically syncs taxes from each Shopify order to the correct Xero tax codes. You can set up mappings for different tax rates, apply them per transaction or as daily summaries, and ensure all fees, refunds, and payouts reflect the proper tax.
How do I handle multicurrency Shopify transactions in Xero?
Reconciling multicurrency Shopify payouts in Synder is simple. Just ensure that the option to process transactions in multiple currencies is turned on in Synder’s General Settings. Don’t forget to enable multicurrency in your Xero account as well for everything to sync smoothly.
What should I do if a Shopify transaction doesn’t match any invoices in Xero?
If a Shopify transaction doesn’t match any invoices in Xero, first check that it was synced correctly and isn’t a duplicate. With Synder, you can review unmatched transactions and manually match them to the correct invoice, or a new invoice can be created automatically.