Manually reconciling your checking account, whether for individual use or business purposes, is usually a tedious process. What’s more, it’s error-prone, more so as the number of transactions on your bank statement increases. That’s why online tools are a great way to streamline the whole process while ensuring accuracy.
In this article, we’ll walk you through the basics of checking accounts and bank reconciliation before diving into the actual process. We’ll also show you how to reconcile your account using a simple example and then move on to more complex business scenarios.
If you’re eager to leave behind the headache of complex transaction management, it’s time to explore what Synder can do for you and experience hassle-free, one-click reconciliation today!
TL;DR
- Accurate reconciling of checking accounts is crucial for any business because it keeps your financial records straight, helps you make smart business decisions, and ensures you’re on track with taxes and money management.
- Proper automation with Synder and the use of clearing accounts makes for an easy, one-click reconciliation.
Contents:
1. What is a checking account?
2. What does ‘checking’ mean in the checking account?
3. What is a business checking account?
4. What is bank reconciliation?
5. Bank reconciliation guide: How do you reconcile a checking account?
6. Reconciling a checking account example
7. How to accurately reconcile a bank account for a large volume of business transactions?
- Setup and integration
- Automated transaction import
- Categorization
- Clearing accounts transfer
- Reconciliation
- Discrepancies
- Bank reconciliations with Synder: Key takeaways
8. What are the common issues with bank account reconciliation?
9. Bank reconciliation for a checking account: Closing thoughts
What is a checking account?
A checking account is a type of bank account that allows for frequent, easy access to your funds. Unlike savings accounts, which are intended for storing money over time, checking accounts are designed for regular transactions, including deposits, transfers, and withdrawals using a debit card or checks. Most checking accounts offer little to no interest on your balance, which is a trade-off for their easy access.
This bank account often serves as the central point in your financial life, where your money comes in (deposits, paychecks) and goes out (bills, everyday spending). Some of these bank accounts offer overdraft protection, which can prevent you from bouncing checks or having transactions declined if you accidentally overdraw your account.
What does ‘checking’ mean in the checking account?
The term “checking account” originates from the primary function that distinguished these accounts historically: the ability to write checks.
Before the digital era, checks provided a convenient and safe way to transfer large amounts of money without the need for physical cash. They were particularly useful for businesses and individuals in managing daily financial transactions.
Today, the use of physical checks has declined with the advent of electronic banking, online transactions, and debit cards. However, the term “checking account” persists. Modern checking accounts now offer various features like direct deposit, electronic funds transfer, ATM access, and debit card transactions, yet the name remains tied to its historical function.
In some countries, what Americans refer to as a “checking account” might be known as a “current account” or a “transaction account,” reflecting the more diverse transaction capabilities of these accounts in the digital age.
What is a business checking account?
A business checking account is specifically intended for handling the financial transactions of a business. Unlike personal checking accounts, this account is tailored to manage higher volumes of transactions and different types of monetary activities related to business operations.
It’s used for depositing income, paying expenses, managing payroll, and handling other business-related financial transactions. This separation from personal finances is crucial for financial organization, tax purposes, and legal reasons.
What is bank reconciliation?
The reconciliation process is about making sure that your financial records exactly match what’s reported in your bank statements or other external financial reports. In other words, by reconciling your accounts, you’re showing that what’s recorded in your books and the reality of the actual bank transactions align perfectly (unless they don’t, but more about it later).
Banks sent bank statements to their customers every month making this process easier. When you compare your transaction records with your bank statement, you want there to be no difference between those 2 sources of information, i.e. you’re looking for the 0 balance.
Since reconciliation acts as a verification process, you can see why it’s so important. It’s your first line of defense against mistakes and any unauthorized or fraudulent transactions. Keeping your books in line with bank statements is crucial for tax purposes and legal compliance too. Accurate records are needed for tax filings and potential audits.
Bank reconciliation guide: How do you reconcile a checking account?
Now that we’ve covered the checking account and reconciliation basics, we can unravel the process of reconciling a checking account. Let’s look at the following steps.
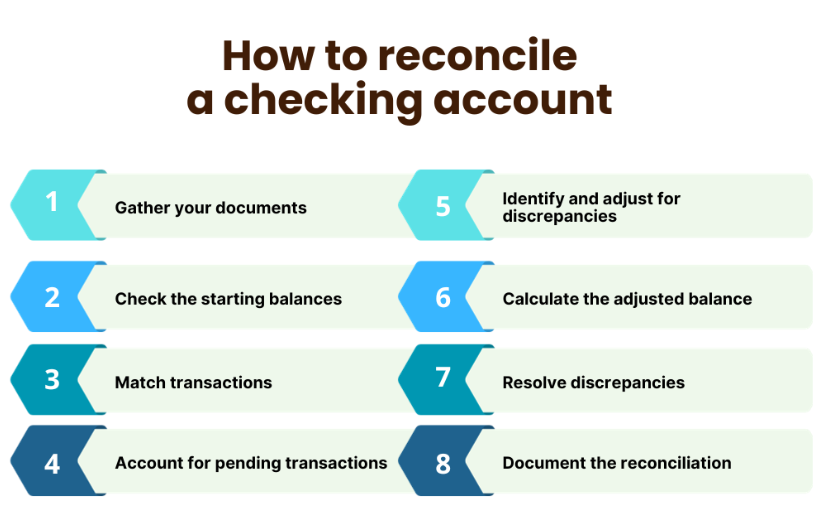
Step 1: Gather your documents
Obtain the most recent bank statement for the account you want to reconcile. This statement will list all transactions processed by the bank up to a specific date. Have your business ledger, check register, or accounting software records at hand. This is where all your transactions are recorded.
Step 2. Verify starting balances
Confirm that the starting balance in your ledger or accounting software matches the beginning balance on your bank statement for the same period.
Step 3. Match transactions
Compare each deposit or credit entry in your records against those on the bank statement. Ensure all amounts and dates match. Review all checks issued and other payments recorded in your ledger. Match them with withdrawals and payments on the bank statement. If you use a debit card linked to the account, ensure all card transactions are accurately recorded in your ledger too.
Step 4. Account for pending transactions
Look for any transactions in your records not yet appearing on the bank statement. These could be checks not yet cleared or recent deposits.
Step 5. Identify and adjust for discrepancies
Note any transactions that appear on the bank statement but aren’t in your ledger, and vice versa. Add any transactions that appear on the bank statement but were missed in your ledger. Adjust your ledger for any fees charged or interest earned that you haven’t recorded.
Step 6. Calculate the adjusted balance
After including all transactions and adjustments, re-calculate the ending balance in your ledger. Subtract any outstanding checks or add pending deposits to arrive at an adjusted ledger balance.
Step 7. Compare balances
Compare the adjusted balance in your ledger with the ending balance on your bank statement. They should now match. If there’s still a discrepancy, review all steps to find and correct any errors.
Step 8. Document the reconciliation
Once your ledger and bank statement balances match, make a note in your records that the reconciliation for the period is complete. Document any adjustments made during the reconciliation process for future reference and audit trails.
Reconciling a checking account example
The above steps might seem too detached without putting them in real context, so let’s go through an example of reconciling a bank account.
Imagine you’re reconciling the checking bank account for your small business for the month of December. Here’s how you might approach it.
Tip 1: How to gather the necessary documents
To start your reconciliation, you need 2 main things:
- Your bank statement for December.
- Your business ledger, check register, or accounting software where you record all transactions.
Tip 2: How to check the starting balances
Look at your ledger, it shows you that the starting balance on December 1st is $5,000. Then find the starting balance on the bank statement for the same day. It equals $5,000 too. Good start!
Tip 3: How to match transactions
Here, you really dig into your documents. Look at each type of transaction you have and compare your bookkeeping documents with the bank statements. It may look like this:
Deposits: Your ledger shows three deposits in December: $2,000, $1,500, and $3,000. The bank statement matches these deposits.
Checks and payments: You wrote several checks and had automatic payments. Check #101 for $500, Check #102 for $750, and an automatic payment for utilities of $250 are all recorded in both your ledger and the bank statement.
Debit card transactions: You find a debit card payment for office supplies for $300 in both records.
Tip 4: How to account for pending transactions
You notice a check (#103 for $400) you wrote in late December is listed in your ledger but not on the bank statement. This check is likely still pending and hasn’t cleared the bank yet. Your reconciliation for the current period should reflect the bank balance minus this pending check amount.
Tip 5: How to identify and adjust for discrepancies
All other transactions match, but you notice that there’s a bank fee of $15 on the bank statement that you forgot to record in your ledger. You add the missing bank fee to your ledger.
Tip 6: How to calculate the adjusted balance
After accounting for all transactions and the bank fee, your adjusted ledger balance should now match the bank statement, minus the pending check.
Ledger balance calculation:
- Starting balance: $5,000
- Add deposits: $2,000 + $1,500 + $3,000 = $6,500
- Subtract checks/payments: $500 + $750 + $250 + $300 = $1,800
- Subtract bank fee: $15
- Ledger balance before pending check: $9,685
- Subtract pending check: $400
- Adjusted ledger balance: $9,285
The bank statement should show a balance of $9,285, assuming there are no other pending transactions.
Tip 7: How to resolve discrepancies
If the balances match, great! If not, you’d need to review each transaction again to find any errors.
Tip 8: How you document the reconciliation
Lastly, you need to record that the reconciliation for December is complete and note any pending transactions.
Key takeaways
In this example, we successfully reconciled the checking account by matching transactions, accounting for pending items, and adjusting for any discrepancies. As you probably noticed, we needed to match less than 10 transactions – a drop in a sea of actual business transactions per month. That’s why let’s now move on to solutions that help you with efficient and error-free bank reconciliations for large transactional volumes.
How to accurately reconcile a bank account for a large volume of business transactions?
To show you how great software can ease the reconciliation process, let’s look at a complex example. Picture an ecommerce business with multiple online sales platforms and payment options. We’ll be using Synder to illustrate that this company’s bank reconciliation can actually be smooth and painless. Synder is a financial software that offers solutions for automated accounting, including the bank reconciliation process. It’s particularly known for its integrations with various ecommerce platforms and payment processors.
Let’s now look at how Synder’s bank reconciliation works for a checking account of an ecommerce business.
Setup and integration
The first step involves integrating Synder with your sales platforms (Shopify, Amazon, Etsy, etc.), payment processors (Stripe, PayPal, Square, etc.), and your accounting software (like QuickBooks, Xero, etc.).
Note: Your accounting software is already connected to your bank through a Bank Feed or Banking Tab.
Automated transaction import
Once integrated, Synder automatically imports transactions from your bank account into its system and your linked accounting software as well as automatically syncs transactional data from connected ecommerce platforms or multiple payment processors.
At this stage, both your bank statement information and all of the transactions for a given period are recorded in Synder (and in your accounting software). You might think that’s the right place to start the reconciliation process, but considering the complexity of these ecommerce transactions, Synder adds a key step: categorization of transactions.
Categorization
Once Synder is fully integrated and connected, it creates an ecosystem that’s capable of parsing all this high volume of different types of transitions such as sales, fees, expenses, or refunds and allocating them correctly into different accounts based on predefined rules (Synder offers Smart Rules feature for QuickBooks Online and QuickBooks Desktop connection).
Your transactions can also be categorized into different income accounts based on the product names reflected in the transactions.
Clearing accounts transfer
Each payment processor has its own transaction timelines, fees, and payment structures. That’s why Synder creates a clearing account for each type of payment processor as part of its approach to streamline and accurately track the flow of funds from various sources.
There’s often a delay between the time a customer makes a payment and when the funds become available in your bank account. A clearing account helps track these in-transit funds.
So the clearing account serves the purpose of a temporary storage that holds all the transactional data until it’s ready to be passed on to the checking account (i.e. when an actual payout from a payment processor happens).
Reconciliation
At this point, in your checking account, there’ll be pre-matched bank transactions with corresponding entries in your accounting software. This includes checks, deposits, payments, and other financial activities. Everything happens automatically, and all you need to do is accept the matches. That’s why with Synder, this process is called one-click reconciliation.
Discrepancies
The clearing account setup ensures a perfect reconciliation every time! So in your checking account, you only have matched transactions, without any discrepancies.
Bank reconciliations with Synder: Key takeaways
Synder isn’t just importing and syncing your transactions into your books. It intelligently categorizes each transaction – sales, fees, refunds, and more, and puts them in their designated account. This sets the stage not only for reconciliation but for record-keeping and even audits.
Each payment processor has its own rhythm and method. Synder sets up clearing accounts for each, acting as a financial holding area, ensuring that the journey of each transaction to your checking account is smooth and traceable.
By accurately matching bank transactions with your records, Synder turns what could be a tedious reconciliation process into a simple, one-click affair.
Interested in mastering your reconciliation process with ease? Join us for our Weekly Public Demo to discover Synder’s powerful features, or jump right in with a free 15-day trial. Experience firsthand how Synder can transform your reconciliation tasks into a seamless, efficient process.
What are the common issues with bank account reconciliation?
As we’ve seen, reconciling a checking account can sometimes be a tricky process, and several common challenges may arise. Identifying and understanding these issues can help in resolving them more efficiently. Let’s review some of the most common problems encountered during bank account reconciliation.
1. Mismatched balances
One of the most frequent issues is a discrepancy between the account balance in your records and the balance according to the bank statement. This could be due to unrecorded transactions, timing differences in recording transactions, or mathematical errors.
2. Outstanding checks or deposits
Checks that have been written but not yet cleared by the bank (outstanding checks), or deposits that haven’t been processed (outstanding deposits) can cause differences in balances. These transactions may appear in your ledger but not on the current bank statement.
3. Bank fees and interest
Sometimes, bank fees for account maintenance, overdrafts, or other services may not have been recorded in your ledger. Similarly, interest earned on the account balance might not be accounted for, leading to discrepancies.
Also, changes in bank policies or fee structures can result in unexpected charges or credits to your account, which you might not initially account for.
4. Data entry errors
Human error in entering data, such as transposing numbers (e.g., recording $53 instead of $35), forgetting to record a transaction, or double-entry of a transaction, can lead to reconciliation issues.
5. Unauthorized or fraudulent transactions
Unrecognized transactions appearing on your bank statement can be a sign of unauthorized access or fraud. These should be investigated immediately to ensure the security of your account.
6. Timing differences
Transactions near the end of the statement period might be recorded by the business in one month but reflected on the bank statement in the next month due to processing delays. This is common with electronic transactions.
7. Check sequencing issues
When checks aren’t cleared in the same order they were issued, it can make the reconciliation process more challenging, as you’ll need to carefully match each check with your records.
8. Errors by the bank
Although rare, banks can make mistakes too. This could include incorrect transaction amounts, duplicate transactions, or missing deposits.
9. Using different accounting methods
If your bookkeeping or accounting method (cash basis vs. accrual basis) doesn’t align with how transactions are recorded on the bank statement, reconciliation can be more complex.
Dive deeper into the world of accounting and learn more about key financial statements: the balance sheet, cash flow statement, and income statement.
Bank reconciliation for a checking account: Closing thoughts
Bank reconciliation stands as a verification tool for discrepancies and even fraudulent transactions, so the scope of what it can do for you is wide. That’s why, mastering the process, preferably with the help of technology, should be a regular job that provides peace of mind about your business’ finances (and takes minutes rather than hours).
So, whether you’re reconciling accounts manually or using advanced software like Synder, the goal remains the same: ensuring the accuracy and integrity of your financial records.
Share your reconciliation experience in the comments below. Tell us about the biggest obstacles you’ve had in the process of bank reconciliation.


