If you run a Shopify store and use QuickBooks, you’ve likely seen those bundled payouts and wondered how to categorize everything. You’re not alone – accounting operations are spending nearly 100 hours per month on manual processes (that’s 2.5 full-time-equivalent weeks) dealing with inconsistent data and reporting from ecommerce platforms.
That single Shopify deposit is really a mix of sales, fees, taxes, refunds, and adjustments. Categorizing each piece correctly is essential for tax compliance and understanding your actual profitability.
In this guide, you’ll learn how to categorize every part of your Shopify activity in QuickBooks and how automation can cut this work down to almost nothing.
TL;DR
- Proper Shopify categorization in QuickBooks requires separating sales revenue (income accounts), fees (expense accounts), taxes (liability accounts), and refunds (offsetting entries) – never lump everything together.
- Automation tools like Synder use smart categorization logic to automatically sort out transactions based on transaction details, connecting Shopify to QuickBooks and eliminating manual work.
- Automated categorization saves businesses time and achieves the utmost reconciliation accuracy across thousands of transactions.
Why Shopify categorization in QuickBooks gets complicated
Most brick-and-mortar businesses receive straightforward payments – a customer pays $100, you get $100 in your bank account, and you record $100 in sales. Shopify doesn’t work that way. Your Shopify payout represents net proceeds after Shopify has already deducted various fees, collected sales tax on your behalf, processed refunds, and made adjustments for disputes or chargebacks.
The accounting challenge stems from how QuickBooks expects to see this information versus how Shopify delivers it. QuickBooks wants to track gross revenue (what customers actually paid), separate expense categories for each type of fee, proper sales tax liability accounts, and clean refund processing. Shopify gives you a single number representing the net amount deposited into your bank account.
What does a Shopify payout include?
Open your Shopify admin and look at any recent payout under Finance > Payouts. That single deposit actually contains multiple components, each requiring its own QuickBooks category:
- Gross sales – the total amount customers paid for products
- Shipping charges – delivery fees collected from customers
- Sales tax – tax collected on behalf of tax authorities
- Shopify subscription fees – your monthly plan cost
- Transaction fees – charges for processing payments through Shopify
- Payment gateway fees – processing costs from Shopify Payments or external gateways like PayPal
- Refunds – money returned to customers
- Chargebacks and adjustments – dispute-related deductions or corrections
The payout you receive is what’s left after Shopify takes your gross sales plus shipping, subtracts all fees and refunds, and sets aside the sales tax. Your QuickBooks records need to mirror this breakdown, not just record the net deposit.
Manual vs. automated categorization approaches
Most Shopify merchants sync their data to QuickBooks using one of two methods: manual entry or automated sync tools that handle categorization based on preset rules.
| Approach | Pros | Cons |
| Manual entry | Complete control over each entry; no software costs; works for very low volume | Extremely time-consuming (3-4 hours daily for manual reconciliation); high error rate from data entry mistakes; inconsistent categorization across transactions; no scaling as business grows |
| Automated sync | Cuts time and costs; delivers consistently accurate books; applies the same categorization rules to every transaction and scales as your business grows | Requires initial setup and configuration, monthly software cost, and understanding of categorization logic |
The automated approach saves significant time and reduces errors, but only if you understand what should get categorized where and why. That’s why the rest of this guide focuses on proper categorization principles and automation tools like Synder – a QuickBooks Platinum Member recognized for high-quality integrations.
Synder streamlines Shopify bookkeeping by syncing transactions directly into QuickBooks, applying consistent categorization rules, and keeping your books current in real time. It reduces manual work by more than 70 hours per month, eliminates over $60,000 per year in staffing costs, achieves 99.5%+ reconciliation accuracy, and automatically processes 170,000+ transactions as your business scales.
How to categorize Shopify sales revenue in QuickBooks
Sales revenue represents the core of what you’re selling – the actual price customers paid for products or services, before any deductions. This should always be recorded as gross sales, not the net amount after fees.
Tip 1: Set up dedicated income accounts
Create a dedicated income account called “Shopify Sales” or “Online Sales – Shopify” to keep this revenue separate from other income sources. If you sell through multiple channels, use sub-accounts for different product categories or sales channels.
Tip 2: Separate shipping from product sales
Keep shipping separate with its own “Shipping Income” or “Freight Revenue” account – this reveals actual product profitability versus delivery costs and helps you analyze whether your shipping fees cover actual shipping expenses.
Tip 3: Choose the right recording method
Use per-transaction sync if you want individual sales receipts for each order (works best for lower-volume businesses), or summary sync if you prefer aggregated journal entries (ideal for high-volume businesses). Both methods are valid, pick based on your transaction volume and reporting needs.
Tip 4: What to record as sales revenue
- Product sales to your “Shopify Sales” income account
- Shipping charges to your “Shipping Income” account
- Gross amounts before any fee deductions (fees are expenses, not reductions in revenue)
Tip 5: Automate sales categorization with Synder
Synder automatically categorizes product sales, shipping charges, and discounts into the correct QuickBooks accounts. It syncs Shopify orders as either individual sales receipts (Per Transaction mode) or aggregated journal entries (Summary Sync mode), accurately recording gross amounts with fees tracked separately as expenses. The system handles coupons, discounts, and gift cards automatically, ensuring your revenue is always recorded correctly.
Categorizing Shopify fees and transaction costs
Fee categorization separates casual bookkeepers from people who actually understand their numbers. Shopify charges multiple types of fees, and lumping them together as “Shopify fees” obscures important cost information. Breaking fees into specific categories helps you track what you’re actually spending on payment processing versus platform subscription costs.
Tip 1: Categorize payment processing fees separately
Put payment processor fees (what Shopify Payments or PayPal charges to process credit cards) into a “Payment Processing Fees” or “Merchant Fees” expense account. These fees are variable: they increase directly with sales volume, which makes them fundamentally different from fixed costs. When you’re analyzing profitability or setting product prices, knowing your processing fee percentage matters.
Tip 2: Track subscription costs as fixed expenses
Record Shopify’s monthly subscription fee (Basic, Shopify, or Advanced plan) in a “Software Subscriptions” or “Ecommerce Platform Fees” expense account. This is a fixed cost that doesn’t vary with sales volume, and tracking it separately helps you evaluate whether you’re on the right pricing plan for your volume.
Tip 3: Separate transaction fees from processing fees
Give transaction fees (the additional per-transaction charge if you’re not using Shopify Payments) their own “Transaction Fees” expense account. These are separate from payment processing fees and only apply to merchants using third-party payment gateways.
Tip 4: Account for Shopify Plus and development costs
For Shopify Plus merchants, create a “Platform Development” expense account to track fees for advanced features or custom development separately from recurring costs. This distinction matters when evaluating ROI on platform investments versus operational costs.
Tip 5: Automate fee categorization
Synder automatically breaks out Shopify fees into separate expense categories in QuickBooks. Payment processing fees, chargeback fees, shipping label costs, and subscription fees are each categorized to their appropriate expense accounts. The system also handles specialized fees like the Colorado Retail Delivery Fee and Shop Cash transaction fees, ensuring every fee type is tracked separately for accurate profitability analysis.
Shopify fee categorization breakdown
| Fee type | QuickBooks account | Why separate? |
| Payment processing fees | Payment Processing Fees (expense) | Variable cost tied to sales volume |
| Monthly subscription | Software Subscriptions (expense) | Fixed cost for comparison across periods |
| Transaction fees | Transaction Fees (expense) | Only applies with third-party gateways |
| Shopify Capital fees | Financing Costs (expense) | Different tax treatment from operating fees |
Proper sales tax categorization in QuickBooks
Sales tax you collect from customers isn’t your money, you’re collecting it on behalf of tax authorities. Recording collected tax as revenue artificially inflates your income and creates tax filing headaches later.
Tip 1: Set up sales tax as a liability, not income
Create a current liability account called “Sales Tax Payable” in QuickBooks. Credit this account when recording sales, then debit it when remitting tax to authorities.
Tip 2: Use separate accounts for multiple tax jurisdictions
Create sub-accounts under Sales Tax Payable for each state or jurisdiction if you collect tax in multiple locations. This simplifies tracking and filing by jurisdiction.
Tip 3: Reconcile tax reports regularly
Match Shopify’s tax reports by jurisdiction to your QuickBooks sales tax liability accounts. Mismatches usually mean someone recorded gross sales (including tax) as revenue, then recorded the tax again as a liability – double-counting the tax.
Tip 4: Handle marketplace facilitator tax differently
For the tax that Shopify collects and remits directly on your behalf, record the sale at the net amount (excluding the marketplace facilitator tax). Since you never receive this money, don’t create liability entries for taxes you’ll never remit.
Tip 5: Automate tax categorization
Synder automatically handles sales tax categorization, including marketplace facilitator tax that Shopify collects and remits on your behalf. The system creates proper liability entries for the tax you’ll remit yourself while recording marketplace facilitator tax correctly at net amounts.
- For regular sales tax: assign sales tax to the appropriate QuickBooks accounts – Synder includes tax amounts in your summaries.
- For US QuickBooks: enable Group by region to split tax by state automatically.
- For non-US QuickBooks: enable tax tracking to apply tax codes to journal entries so they appear in tax reports.
- For marketplace facilitator tax: assign a Marketplace Facilitator Tax Category account, and keep Track Marketplace Tax as your own payable disabled. This records Shopify’s withheld taxes separately without affecting your sales tax payable balance.
Handling refunds and returns in QuickBooks
Refunds and returns create offsetting entries that reduce both your revenue and any tax you collected on the original sale. The key principle: don’t just delete or modify the original sale transaction. Instead, create new transactions that offset the originals, maintaining a clear audit trail.
Tip 1: Create credit memos for full refunds
When a customer returns an item and receives a refund, create a credit memo or return transaction in QuickBooks that reduces the relevant income account (Shopify Sales) and reduces your sales tax liability (Sales Tax Payable). The credit memo amount should match the refund amount Shopify deducted from your payout, including any sales tax refunded to the customer.
Tip 2: Track partial refunds separately
For partial refunds where a customer keeps the product but receives money back, record the refund as a deduction from sales. Consider creating a “Sales Returns and Allowances” contra-revenue account rather than directly reducing the Sales account. This gives you better visibility into refund patterns and helps identify products with quality issues.
Tip 3: Handle inventory implications correctly
When a product comes back and is resellable, increase your inventory quantity and adjust your Cost of Goods Sold. If the returned item isn’t resellable, write it off to a “Damaged Inventory” or “Inventory Shrinkage” expense account rather than putting it back in available stock.
Tip 4: Account for refund timing in accrual accounting
Shopify automatically reduces your next payout by the refund amount, but timing matters. If a sale happens in January and the refund processes in February, record the refund in the period it was authorized (January), even if the cash impact hits your bank account later.
Tip 5: Automate refund and return processing
Synder automatically creates refund receipts in QuickBooks when Shopify processes returns, properly offsetting the original sale and reducing your sales tax liability. The system handles inventory restocking based on Shopify’s restock_type settings: if set to no_restock, refunds use a default product to prevent incorrect inventory increases. Partial refunds, Shop Cash refunds, and POS refunds are all processed automatically with proper categorization, maintaining a complete audit trail.
Using QuickBooks classes and locations for Shopify data
Classes and locations in QuickBooks add another dimension to your categorization, letting you track sales and expenses by department, product line, or physical location beyond just the account structure.
The challenge with Shopify integration is that platform data doesn’t automatically include QuickBooks class or location information. A Shopify merchant selling, let’s say, skincare products and supplements would need to manually assign each transaction to “Skincare” or “Supplements” classes to track profitability by product line – unsustainable when processing hundreds of orders.
How Synder handles it:
Synder solves this through Smart Rules that automatically assign classes and locations based on transaction details like product name, customer information, or order tags. Create rules like “If product name contains ‘Serum,’ assign to Skincare class” or “If order tag contains ‘Wholesale,’ assign to Wholesale location”. These rules run automatically on every synced transaction, eliminating manual editing.
The system supports unified sync across online and offline channels, so POS orders, manual orders, and other payment gateway transactions can all be categorized consistently to the correct classes and locations. This means you can track profitability by product line, physical location, or sales channel without touching individual transactions.
Setting up a Shopify-QuickBooks categorization workflow
Proper categorization starts with connecting your systems correctly. Here’s how to connect Shopify to QuickBooks via Synder.
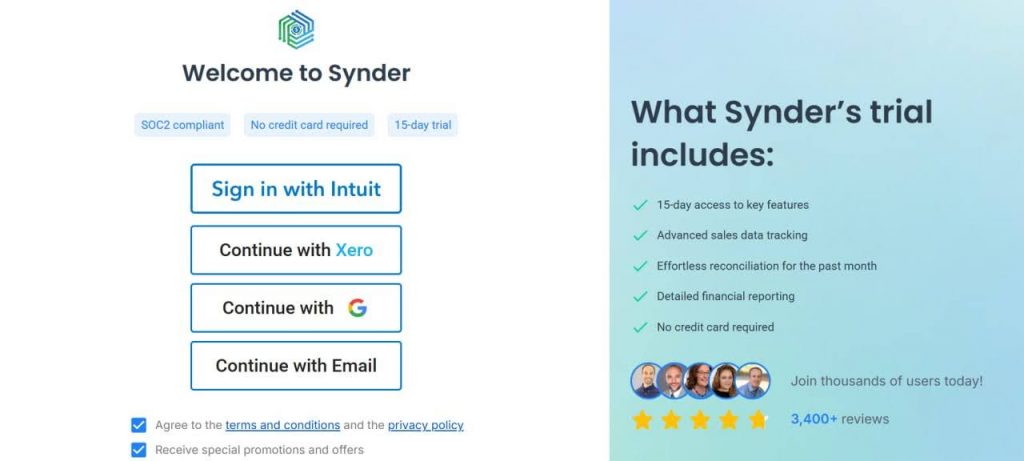
Step 1: Create an account
If you’re getting started with Synder you’ll need to create a free trial account and connect your accounting system first.
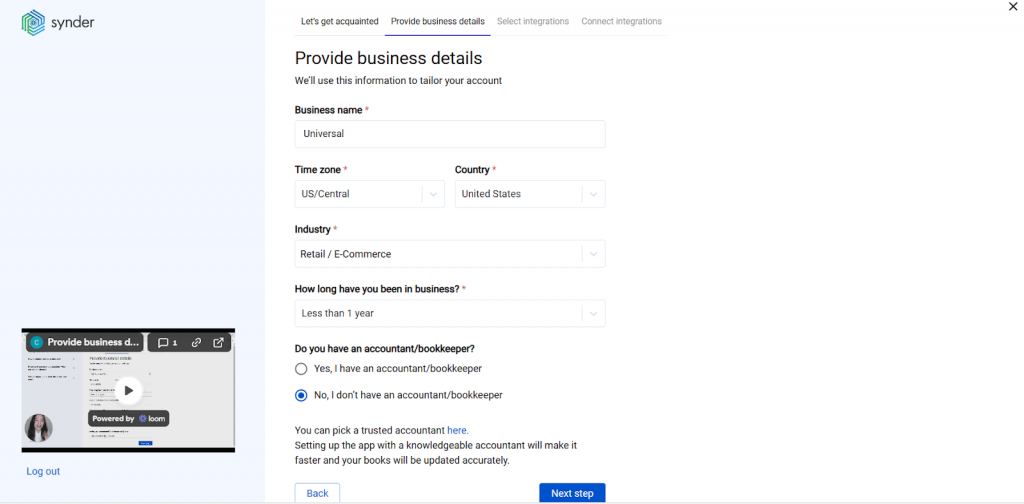
Step 2: Provide your business details
Going through the set-up process of an Organization for your QuickBooks company, fill in the information about your business and hit the Next step button.
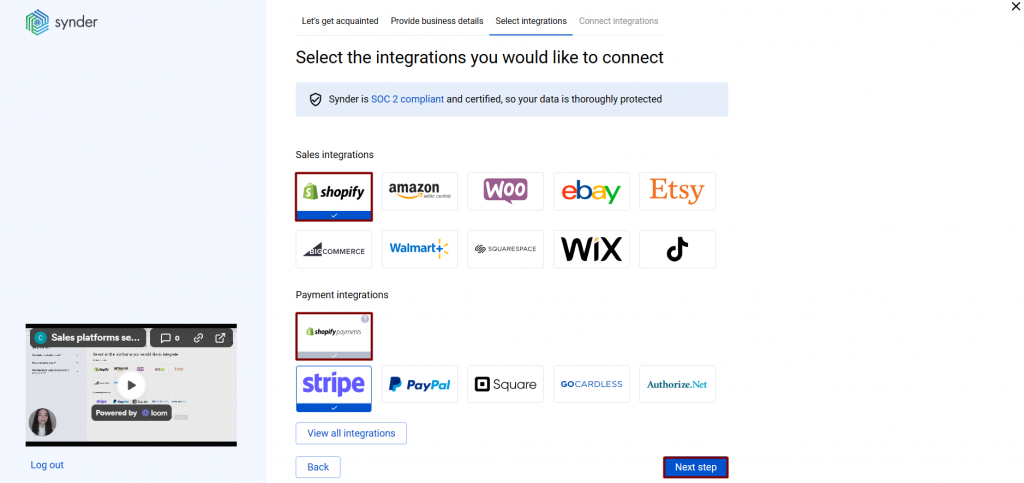
Step 3: Select the platforms you’d like to integrate
Now you need to select the platforms you would like to connect to Synder. Click View all integrations to see the list of all available platforms. Mark all the services you are using to receive payments. You will be able to connect all of them right away, or skip the connection of particular integrations and set them up at any time later.
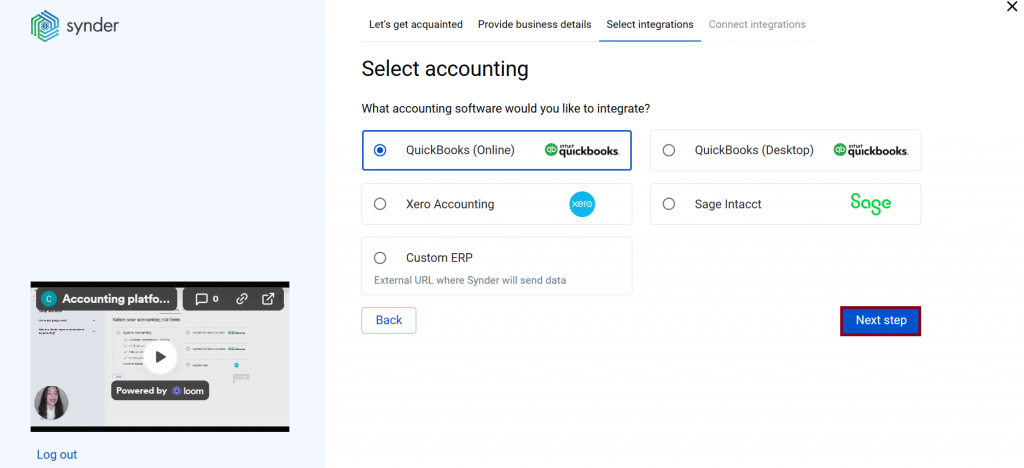
Step 4: Connect your accounting platform
Select the accounting company you’d like to connect to Synder and click on Next step.
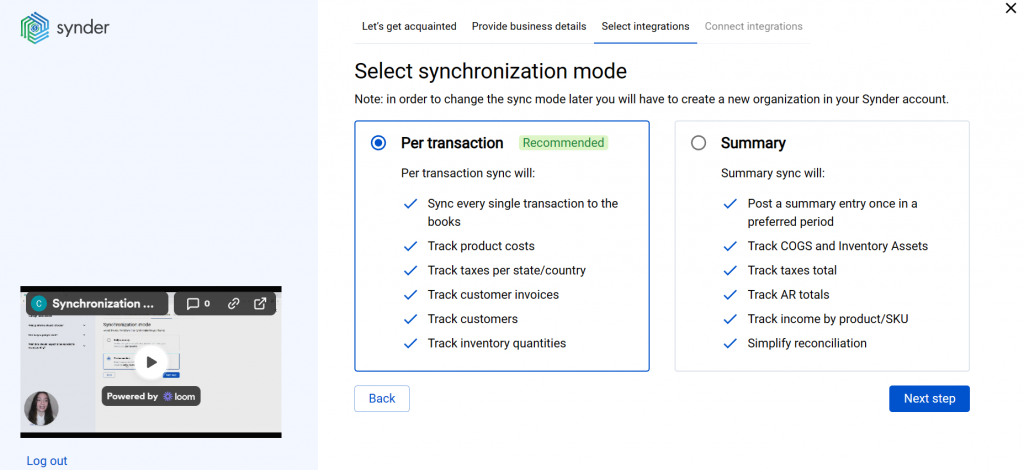
If you are connecting to QuickBooks Online, you will be prompted to select the sync mode: Per Transaction or Summary Sync. Proceed with the desired option.
Click on Connect to connect your accounting company.
Step 5: Connect your Shopify store
Open a separate tab and log in to the Shopify store you want to connect. If you have admin rights, simply click on Connect in Synder. You’ll be redirected to the Installation page. Click on Install app to link Synder to Shopify.

Step 6: Set up the Shopify integration
To complete the setup for the Shopify integration, choose an account for payouts (usually, your checking account) that will allow smooth reconciliation of your Shopify transactions in one click. Click Continue to finish the configuration.
Shopify categorization workflow with Synder
Once the setup is complete, Synder automatically syncs new Shopify transactions according to your payout schedule, applies your categorization rules, and creates properly categorized entries in QuickBooks.
Once you log into your Synder account, go to Settings → Mapping and map each transaction type to the right QuickBooks account: sales to Income, fees to Expenses, taxes to Sales Tax Payable, and so on.
Synder posts all activity to a clearing account first, then moves the net amount to match the actual bank deposit. If you need more detailed control, you can use Mapping Groups to split fees by type or Smart Rules to categorize transactions automatically based on their attributes.
Smart Rules work on if-then logic: if a transaction meets specific criteria (product name, amount, customer, description), then apply certain categorization (assign to this account, add this class, apply this tax code). The system applies rules automatically to every synced transaction, creating properly categorized entries in QuickBooks without manual intervention.
Common Smart Rules examples
- If description contains “Shopify Payment” → categorize to Payment Processing Fees
- If product category is “Supplements” → assign to the Supplements class
- If shipping address state is “California” → apply the California sales tax code
- If transaction type is “Refund” → create a credit memo reducing Sales and Sales Tax Payable
- If order total is over $500 → assign to Large Orders class for special tracking
Want to see exactly how automated categorization would work for your Shopify store? Book a demo with Synder to review your specific categorization requirements and see Smart Rules configured for your business model.
Typical categorization mistakes to avoid
Most ecommerce bookkeeping issues start with simple categorization errors that distort your profit picture and make cash flow harder to manage. Even with solid accounting knowledge, the same mistakes tend to appear in Shopify QuickBooks setups, so knowing the patterns helps you spot and fix problems early.
- Recording net deposits as sales: If you book only the payout amount, you miss all the deducted fees. This understates expenses and throws off your gross profit. Always record gross sales and account for fees separately.
- Categorizing sales tax as income: Sales tax isn’t revenue; it’s money you owe to the state. Recording deposits as full sales often hides this and inflates revenue.
- Putting all fees into one bucket: Lumping everything into “Shopify Fees” makes it impossible to compare variable processing fees vs fixed platform fees. Break them into meaningful categories.
- Deleting original sales when issuing refunds: Removing the original sale wipes out your audit trail and skews month-to-month comparisons. Use credit memos instead.
- Ignoring timing differences: Shopify sales and bank deposits rarely line up perfectly. Not accounting for payout timing leads to understated or overstated month-end revenue.
- Mixing personal and business spending: A blended bank account makes accurate categorization nearly impossible. Keep business and personal transactions separate to maintain reliable books.
To sum up: Your Shopify QuickBooks categorization strategy
Getting Shopify categorization right in QuickBooks comes down to understanding that you’re recording multiple types of transactions, not just bank deposits. Sales revenue, fees, sales tax, and refunds each play different roles in your accounting and need to be treated differently.
The manual approach to categorization works fine for very small operations, but most Shopify merchants quickly outgrow manual processing as order volume increases. Automated categorization through Synder’s Smart Rules eliminates repetitive work, reduces errors, and ensures consistency across all transactions.
Take time to set up your categorization logic thoughtfully, document your decisions, and review accuracy regularly to maintain clean books that actually reflect your business reality.
FAQ
How do I record Shopify sales in QuickBooks?
Record Shopify sales by creating sales receipts (for individual orders) or batch journal entries (for summarized) that reflect gross sales amounts before fee deductions. Categorize the sales amount to your Shopify Sales income account, record fees separately to expense accounts, and place sales tax in a liability account. Don’t record just the net deposit amount, as this understates both revenue and expenses.
How do I connect QuickBooks to Shopify?
Connect QuickBooks to Shopify using accounting automation tools like Synder. These tools sync transaction data automatically, eliminating manual entry. Choose an integration that offers Smart Rules or automated categorization features to ensure transactions are properly categorized as they sync.
Should I use cash basis or accrual accounting for my Shopify store?
Most ecommerce businesses benefit from accrual accounting because it matches revenue with the period it was earned rather than when cash hits your account. Accrual accounting handles timing differences between Shopify sales dates and bank deposits more accurately, which matters for businesses with regular payout schedules. Consult your accountant to determine which method suits your specific situation and tax requirements.
How do I categorize Shopify Payments fees?
Categorize Shopify Payments fees to a “Payment Processing Fees” or “Merchant Services” expense account, separate from your monthly Shopify subscription. These fees are variable costs that increase with sales volume, distinct from fixed platform costs. Breaking them into separate categories helps track what you’re spending on payment processing versus platform subscription.
What’s the difference between recording sales gross vs. net?
Recording sales gross means capturing the full amount customers paid (including fees that were later deducted), then recording fees as separate expenses. Recording net means only recording the amount deposited in your bank after fee deductions. Gross recording provides accurate revenue figures and properly tracks all expenses, while net recording understates both revenue and costs, making financial analysis less reliable.