


In online business, accurate and clear Profit and Loss (P&L) reports are crucial. A well-organized P&L report aggregates total sales figures and gives valuable insights facilitated by QuickBooks Online classes. It shows which products make more money, helping businesses make better decisions.
Assigning classes in QuickBooks Online is a repetitive task which can be automated to save time for crucial activities. Synder is a helpful tool that automates class tracking and streamlines financial processes, making it easier to generate detailed Profit and Loss (P&L) reports.
In this article, you’ll discover the key role of adding classes in QuickBooks Online and learn how to streamline your financial management. Plus, you’ll see how Synder seamlessly automates this repetitive task for the benefit of any online business.
Key takeaways:
- Utilizing QuickBooks Online classes allows businesses to gain a strategic advantage by obtaining detailed financial insights into product performance, expenses, and overall business health.
- Synder’s Smart Rules automation simplifies the process of applying classes, saving time and enabling businesses to focus on crucial aspects of performance and strategy.
- With the integration of classes tracking and connecting Synder, QuickBooks Online P&L reports evolve from generic sales numbers to precise, detailed analyses of product groups, guiding informed decision-making and business improvement.
Contents:
1. What are classes in QuickBooks Online?
2. How do classes work in QuickBooks Online?
3. Automatic class tracking in QuickBooks Online is a pain point for many ecommerce businesses
4. How to set up classes in QuickBooks Online
- How to enable classes in QuickBooks Online
- How to add a new class in QuickBooks Online
- How to edit a class in QuickBooks Online
- How to delete a class in QuickBooks Online
5. How to automatically add classes to sales with Synder’s Smart Rules
6. Checking results in QuickBooks Online
7. How to add classes in QuickBooks Online: Wrapping up
8. How to add classes in QuickBooks Online: FAQs
What are classes in QuickBooks Online?
In QuickBooks Online, classes are a powerful organizational tool designed to help businesses systematically categorize transactions and financial data based on specific criteria. Classes allow you to segment your financial information, making it easier to track and analyze data related to different business segments.
This feature benefits businesses with multiple departments, product lines, or locations, providing a more detailed and insightful view of your financial performance.
By assigning classes to income and expense transactions, you can effortlessly segregate financial data based on predefined criteria, providing a more nuanced perspective on your business operations.
How to use classes in QuickBooks Online: Benefits of class tracking
Beyond mere categorization, using classes in QuickBooks Online unlocks many benefits for businesses.
1. Detailed financial reports
One of the key advantages is the ability to generate detailed financial reports tailored to specific classes. This feature allows you to assess the performance of individual segments within the business, gaining insights into profitability, cost analysis, and overall financial health.
For instance, a company with multiple departments can evaluate the profitability of each department independently, facilitating strategic decision-making and resource allocation.
2. Budgeting & forecasting
Classes also play a crucial role in budgeting and forecasting. Businesses can set up budgets for each class, enabling them to monitor and compare actual performance against projected figures. This level of granularity ensures a more accurate evaluation of financial goals and allows for timely adjustments to business strategies.
3. Tax reporting & compliance
Moreover, using classes in QuickBooks Online enhances tax reporting and compliance. By categorizing transactions according to specific classes, businesses can streamline the process of identifying tax-deductible expenses and providing a detailed breakdown of financial activities to tax authorities.
Related reading:
14 Tax Tips for Small Business: Prepare Your Business for Tax Season
Tax Accounting for Businesses: A Comprehensive Guide on Accounting for Taxes
4. Adaptability
One fundamental aspect of how classes work is their adaptability to the unique structure of a business. You have the freedom to define classes based on your organizational needs. Whether it’s breaking down finances by department, location, product line, or any other relevant criterion, classes offer details beyond traditional accounting categorizations.
Moreover, as businesses evolve, organizational structures may change. Class tracking is adaptable and allows for adding, modifying, or deleting classes. This flexibility ensures the accounting system can evolve along with the business, providing accurate and meaningful financial insights.
5. Enhanced expense tracking
Class tracking allows businesses to categorize expenses with a high degree of accuracy. Class tracking is particularly beneficial for companies with multiple departments, locations, or product lines. It provides a detailed breakdown of how expenses are incurred in different business segments, offering a more precise understanding of where resources are allocated.
6. Segmented income analysis
Businesses can analyze their income streams on a segmented basis by using class tracking. This feature enables companies to independently assess the performance of different segments or business units. Whether tracking revenue from various product lines or services, class tracking facilitates a comprehensive view of the financial health of each segment.
Classes in QuickBooks Online aren’t just about organization; they’re a strategic tool that empowers businesses to delve deeper into their financial data. Analyzing and interpreting data at a segmented level facilitates more informed decision-making, leading to improved operational efficiency and financial management. Whether it’s for performance evaluation, budgeting, or tax compliance, classes in QuickBooks Online offer a versatile solution for businesses seeking a comprehensive and detailed understanding of their financial landscape.
How do classes work in QuickBooks Online?
In QuickBooks Online, the functionality of classes is designed to integrate seamlessly into a business’s day-to-day financial operations. Classes operate as customizable labels or tags that can be applied to various transactions, allowing you to categorize financial data based on specific parameters. Unlike general ledger accounts, which provide an overarching classification, classes offer a more flexible and dynamic way to organize information within those accounts.
When users create and edit classes in QuickBooks, they essentially define the parameters for how transactions should be organized. For example, a retail business with multiple store locations can create classes for each store, enabling the tracking of sales and expenses on a per-location basis. Similarly, a manufacturing company can categorize transactions by product line, providing insights into the financial performance of each product category.
The ability to edit classes ensures ongoing adaptability as the business evolves. This feature is precious in dynamic environments where changes in organizational structure, product lines, or other factors may impact how transactions are categorized.
By adjusting classes, businesses can ensure that their financial reports accurately reflect the current state of affairs, fostering precision in decision-making processes.
Automatic class tracking in QuickBooks Online is a pain point for many ecommerce businesses
Imagine you run an online business selling various products, such as earrings, rings, and necklaces. Instead of just tracking the overall revenue for all products combined, you want a detailed breakdown to understand the performance of each product group. This insight can guide your business strategy, helping you identify which product groups are thriving and which may need more attention. Additionally, you aim to streamline your Profit and Loss (P&L) report in QuickBooks Online for clarity and efficiency, reducing the time spent on manual tasks.
The most efficient solution for achieving this level of granularity in your P&L report is to automate the classification of your products using intelligent software. We recommend utilizing the class tracking feature in QuickBooks Online, seamlessly facilitated by Synder. This automated process applies classes to all your sales originating from various sales channels and payment platforms.
Currently, your QuickBooks P&L report likely displays a singular ‘Total Sales’ account without any classes, making it challenging to discern the performance of individual product groups.

To address this, we suggest creating 3 distinct classes in QuickBooks for your product types: ‘Earrings,’ ‘Rings,’ and ‘Necklaces.’ These classes will be automatically assigned to your sales transactions, ensuring a comprehensive performance breakdown when synced from sales channels and payment platforms to QuickBooks Online through the Synder software.
How to set up classes in QuickBooks Online
How to enable classes in QuickBooks
Before you can start using classes in QuickBooks Online, you need to enable this feature.
Note 1: Classes are available in QuickBooks Online starting from the ‘Plus’ subscription level.
Note 2: If classes are already turned on and created, skip this part of the article.
Here are the step-by-step instructions:
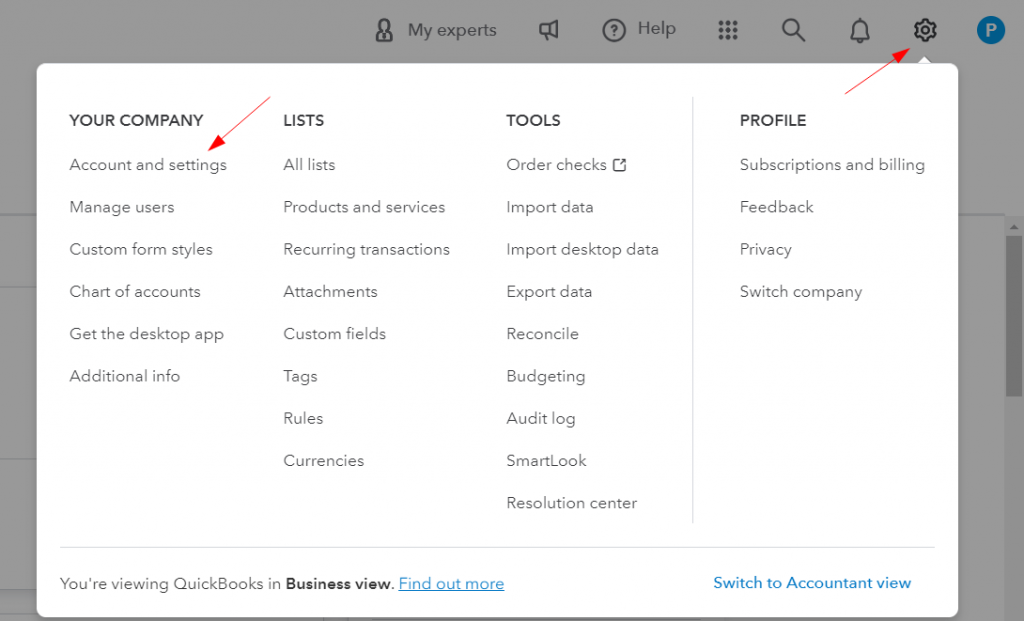
- Log in to your QuickBooks Online account using your credentials.
- In the top-right corner of the screen, locate and click on the ‘Gear’ icon.
- Select ‘Account and Settings’ from the dropdown menu under the ‘Your Company’ section.
4. In the left-hand sidebar, you’ll see a list of tabs. Click on the ‘Advanced’ tab to access advanced settings.
5. Within the Advanced tab, scroll down until you find the ‘Categories’ section.
6. Click on the pencil icon next to the ‘Categories’ section. This action will open the Categories settings.
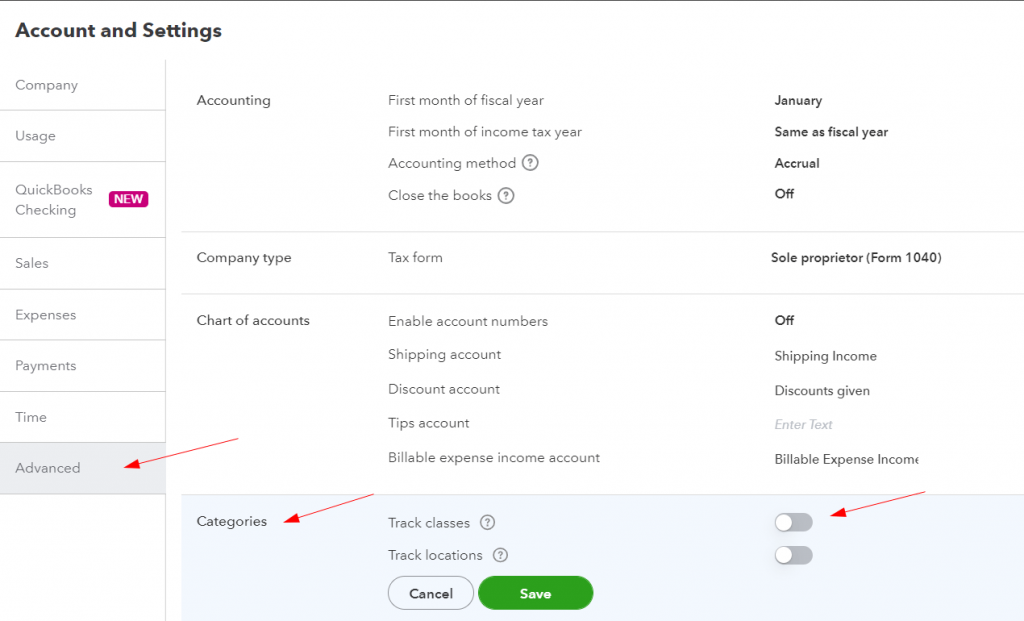
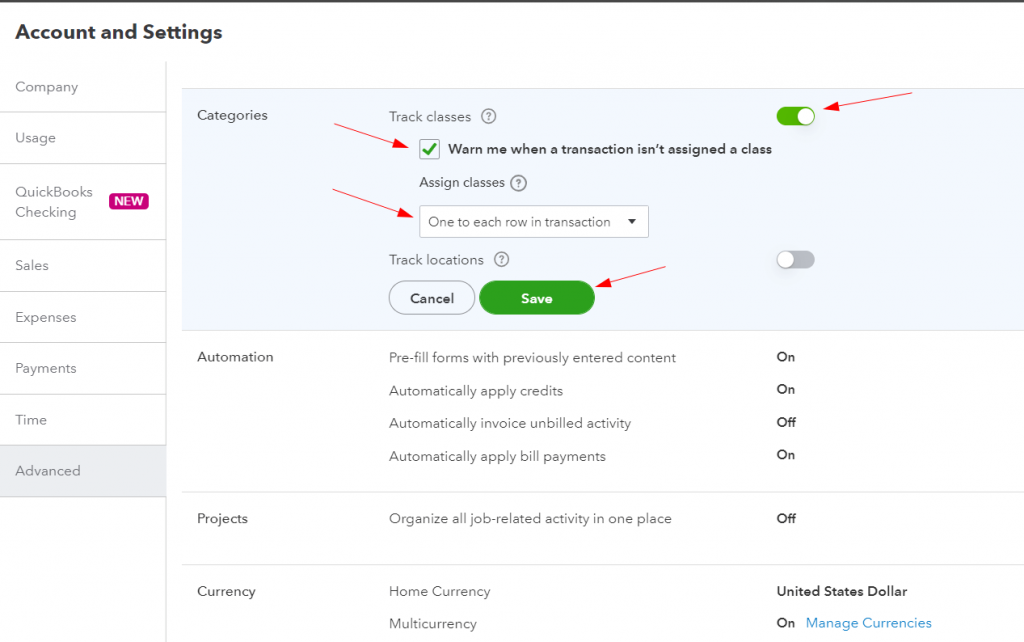
7. Look for the ‘Track classes’ option within the Categories settings. Check the box next to ‘Track classes’ to enable this feature.
8. Once you’ve checked the ‘Track classes’ box, save your changes by clicking the ‘Save’ button at the bottom-right corner of the screen.
You have now successfully enabled classes in QuickBooks Online. This will allow you to categorize transactions based on specific criteria, such as departments, locations, or product lines. After enabling classes, you can add, edit, and utilize them in your financial transactions for more detailed reporting and analysis.
How to add a new class in QuickBooks Online
Once classes are enabled, adding a new class is straightforward.
- In the top-right corner of the screen, locate and click on the ‘Gear’ icon.
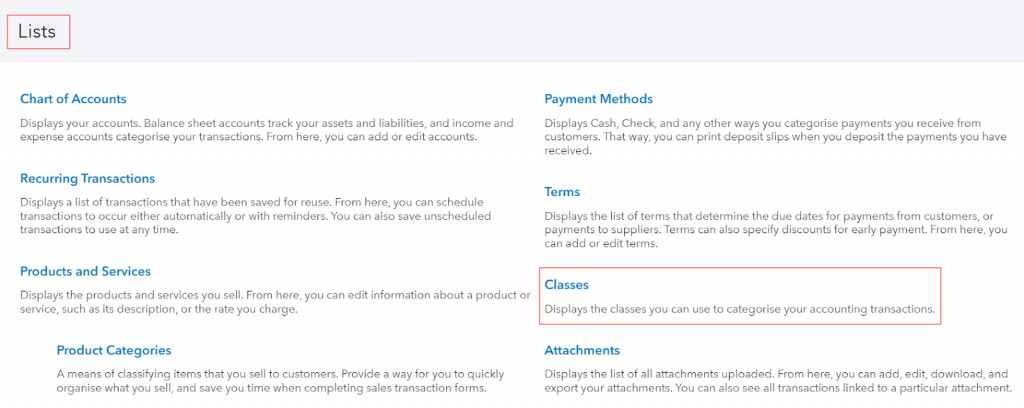
- Find and select ‘All Lists’ from the dropdown menu under the ‘Lists’ section.
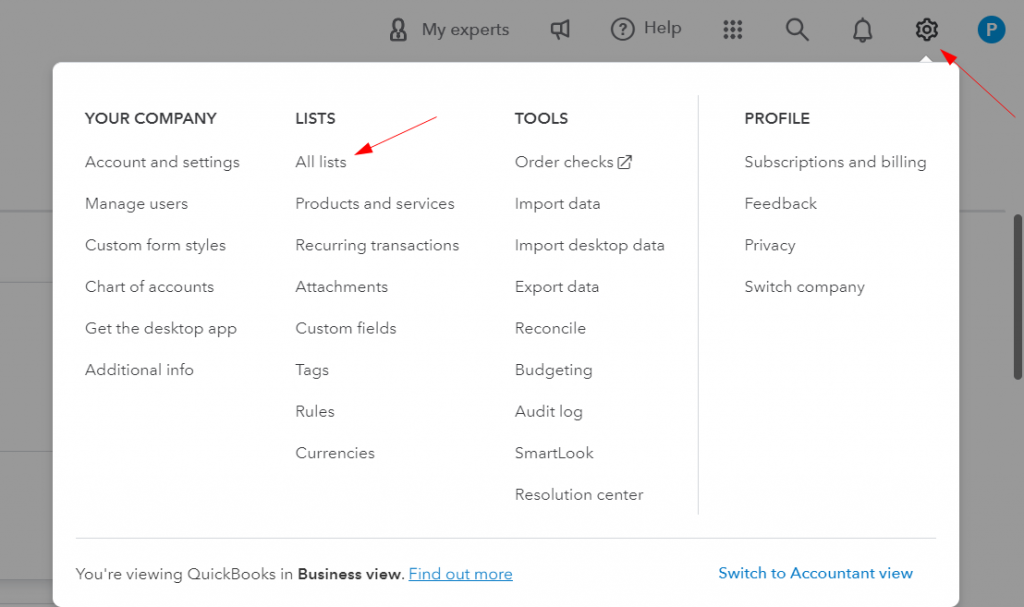
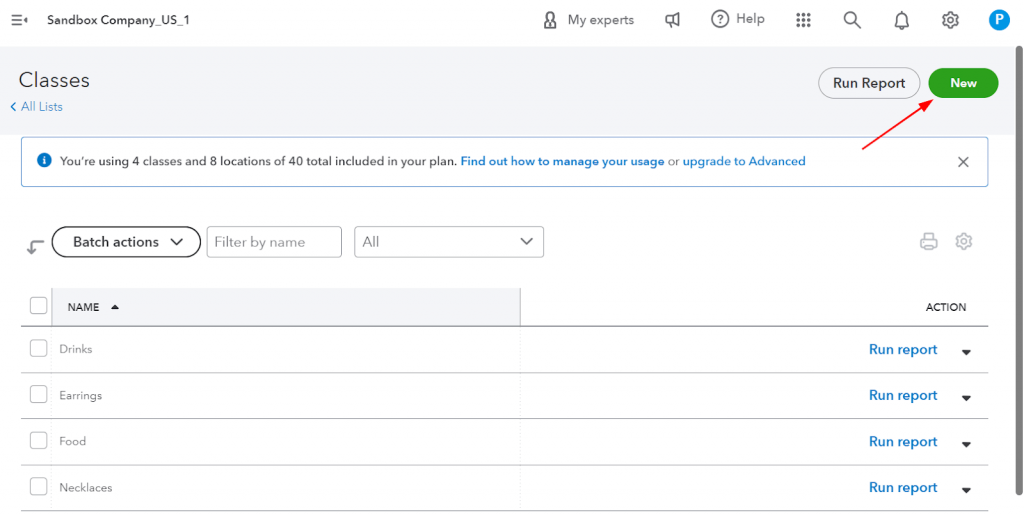
3. In the Lists menu, click on ‘Classes.’ This action will take you to the Classes page.
4. On the ‘Classes’ page, look for the ‘New’ button. Click on it to initiate the process of creating a new class.
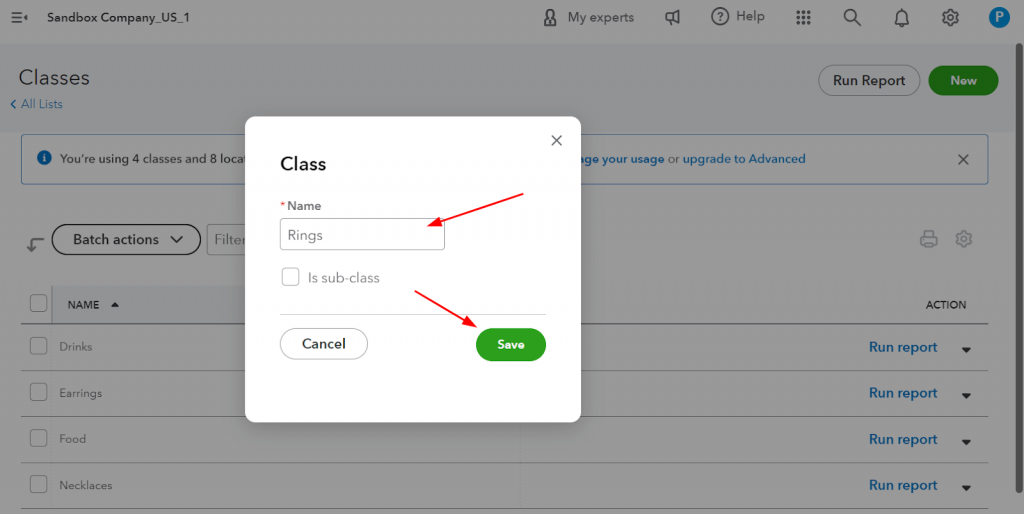
5. A form will appear where you can enter the details for your new class. Fill out the necessary information, including the class name and, if desired, a description.
6. Once you’ve entered the class details, click the ‘Save’ button at the bottom-right corner of the form. Your new class has now been added to QuickBooks Online.
How to edit a class in QuickBooks Online
If you need to adjust an existing class, it’s a simple process.
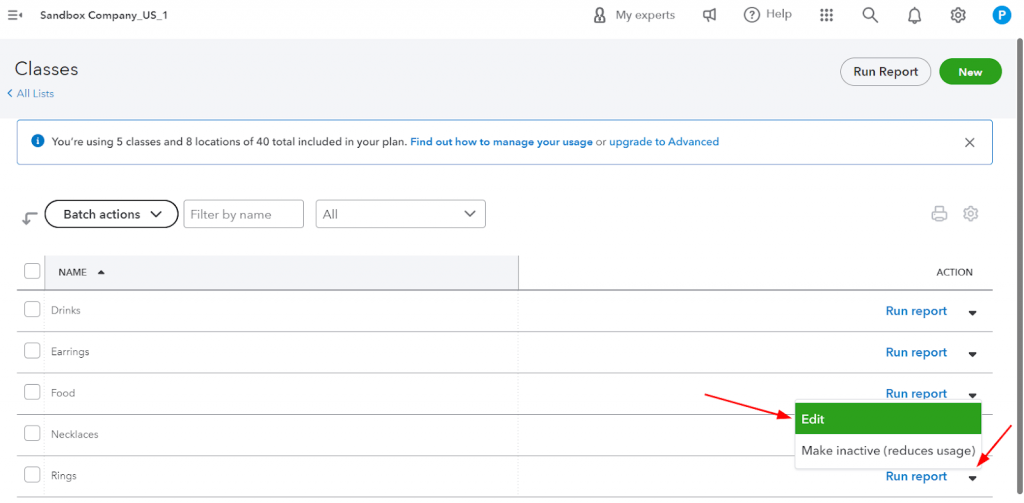
- On the ‘Classes’ page, find the class you want to edit. You can use the search bar or search the list to locate the class.
- Click on the dropdown arrow next to the class you wish to edit. This action will reveal additional options.
- From the dropdown options, choose ‘Edit.’ This action will open the class details for editing.
4. In the edit mode, you can modify the class name, description, or other details.
5. Once you’ve made the necessary edits, click the ‘Save’ button at the bottom-right corner of the form to save your changes.

How to delete a class in QuickBooks Online
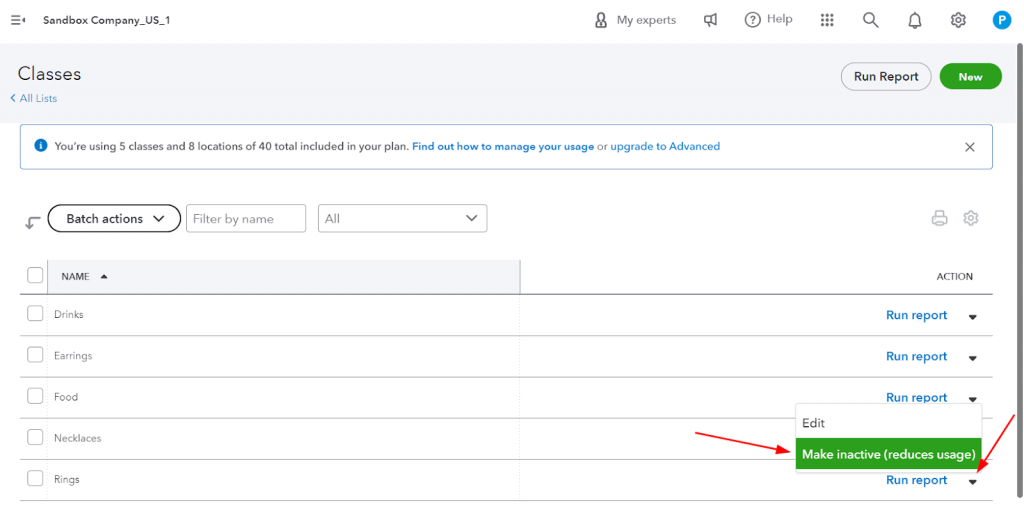
Should you need to remove a class that’s no longer relevant, follow these simple steps.
- Find the class you want to delete on the ‘Classes’ page. You can use the search bar or search the list to locate the class.
- Click on the dropdown arrow next to the class you wish to delete. This action will reveal additional options.
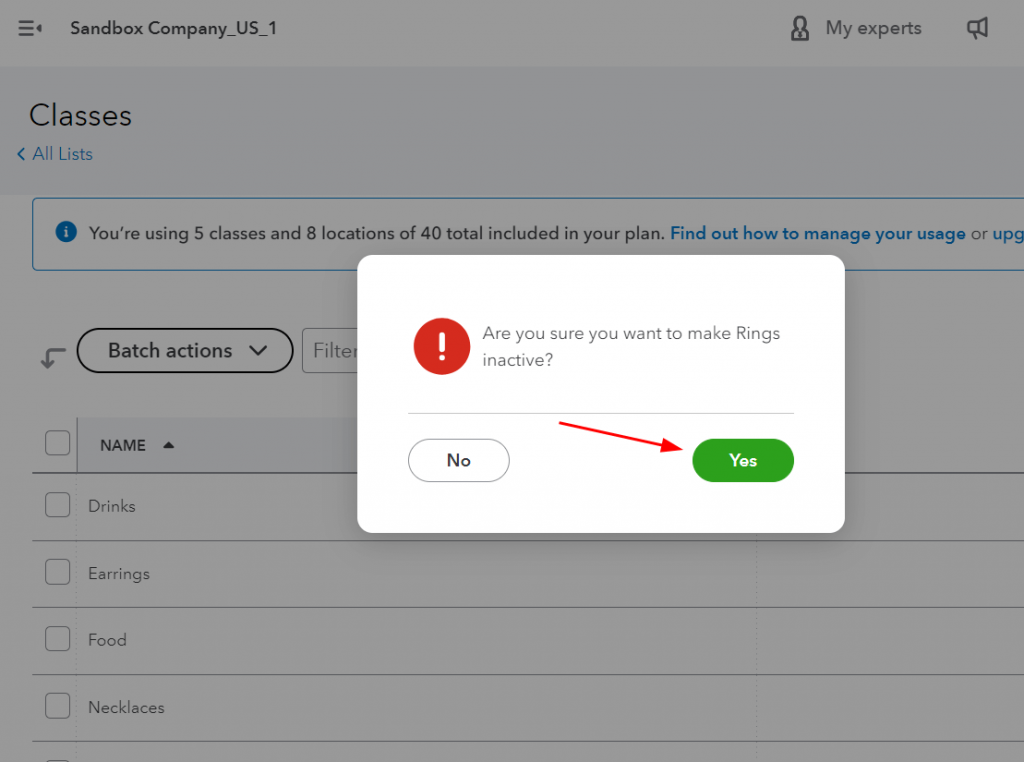
- From the dropdown options, choose ‘Make inactive.’ QuickBooks will prompt you to confirm the inactivation. Confirm that you want to inactivate the selected class.
4. Once you’ve entered the confirmation information, click ‘Yes’ to proceed with the inactivation.
5. QuickBooks will confirm that the class has been inactivated. Ensure that this is the intended action before moving forward.
How to automatically add classes to sales with Synder’s Smart Rules
Creating an account and connecting platforms
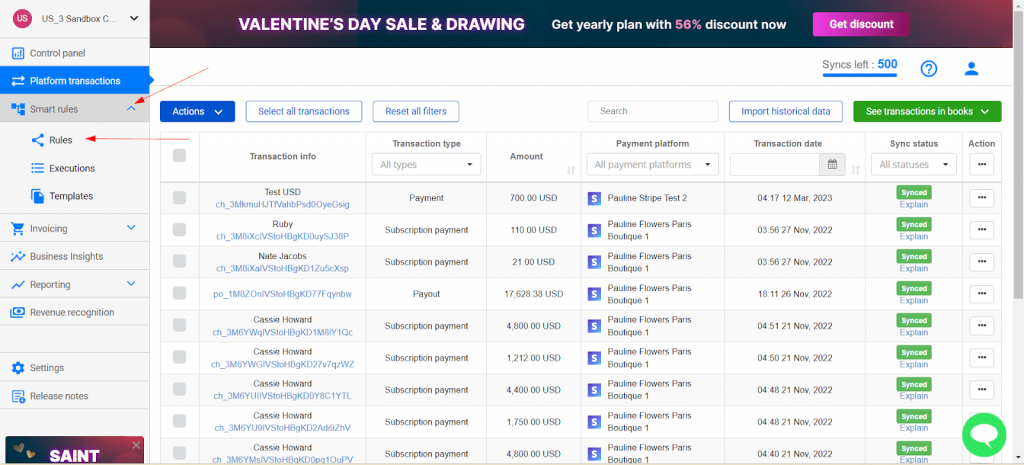
Synder software seamlessly integrates all your sales and expenses into QuickBooks Online by linking all your sales channels and payment platforms to the app. To begin, establish a connection between your QuickBooks Online account and all relevant sales channels and payment platforms you’re using.
Take advantage of the opportunity to optimize your business processes and explore Synder features on a 15-day free trial.
Applying classes automatically with Synder Smart Rules
What is a Smart Rule?
Synder allows you to create Smart Rules. Rules operate on a straightforward ‘if-then’ logic and can be tailored to your requirements. You can add any crucial data to the synchronization flow, but it’s missing in the standard process.
You can apply or edit classes/locations/tax/payment methods/product names, etc., in your books for synchronized transactions based on customer/product names/descriptions/amounts, etc. Or you can build a flow to trigger any necessary action like sending a notification email (thank you emails/reminders), a text message, etc.
Once the Rules are activated, Synder will automatically apply them to new transactions. You can choose specific triggers to modify only particular transaction types or select particular conditions for actions, such as classifying. As a result, you can automate various aspects, including income/expense categorization, assignment of classes and locations, or even sending reminders.
Additionally, you can use Synder’s pre-made templates as a starting point and customize them to align with your business processes.
Dive into our insightful article Smart Rules: Make small business accounting answer your specific needs.
To gain more insights and tips, book your seat on the informative Weekly Public Demo offered by Synder. Elevate your financial management with Synder – where simplicity meets effective financial operations.
Сreating the Smart Rule
Now, let’s create a categorization Rule to assign classes to sales transactions in QuickBooks Online automatically. This rule eliminates the need for manual classification and enhances the accuracy of your Profit and Loss (P&L) statements.
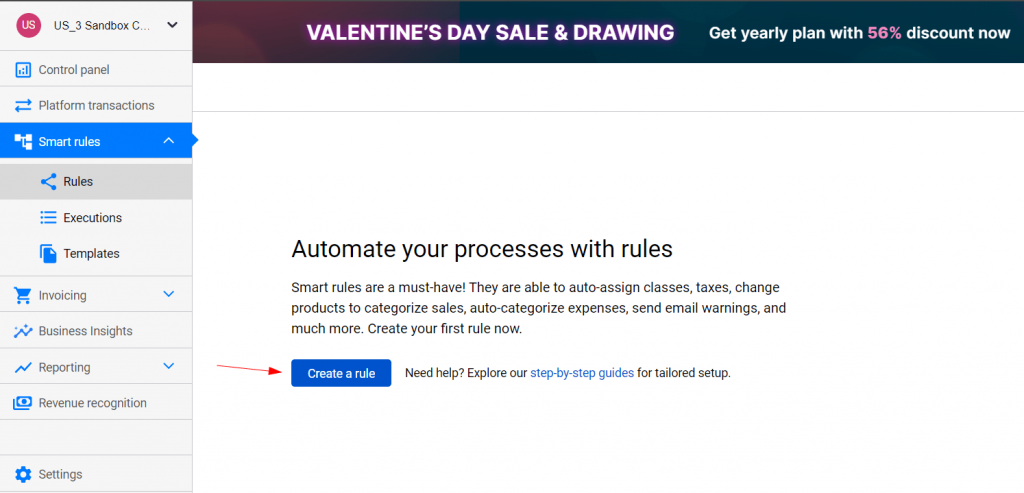
1. Navigate to categorization Rules in Synder
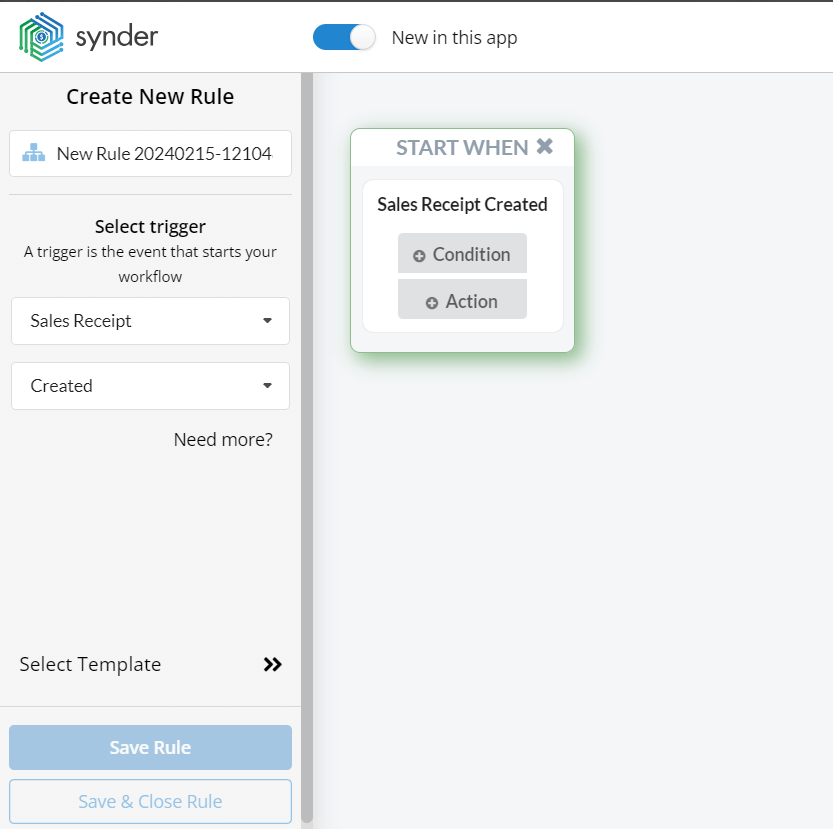
Access the ‘Smart Rules’ tab in Synder’s left menu. Click on ‘Rules’ and select ‘Create Rule.’
2. Define a Rule trigger
Add the trigger for your rule: ‘Sales Receipt → Created.’ This trigger activates the rule whenever Synder generates a sales receipt in QuickBooks.
3. Specify conditions for categorization
Set the condition to distinguish between sales receipts: ‘If Line: Product or Service → Name → Contains → earring.’
Add additional conditions: ‘If No: If Line: Product or Service → Name → Contains → ring’ and ‘If No: If Line: Product or Service → Name → Contains → necklace.’
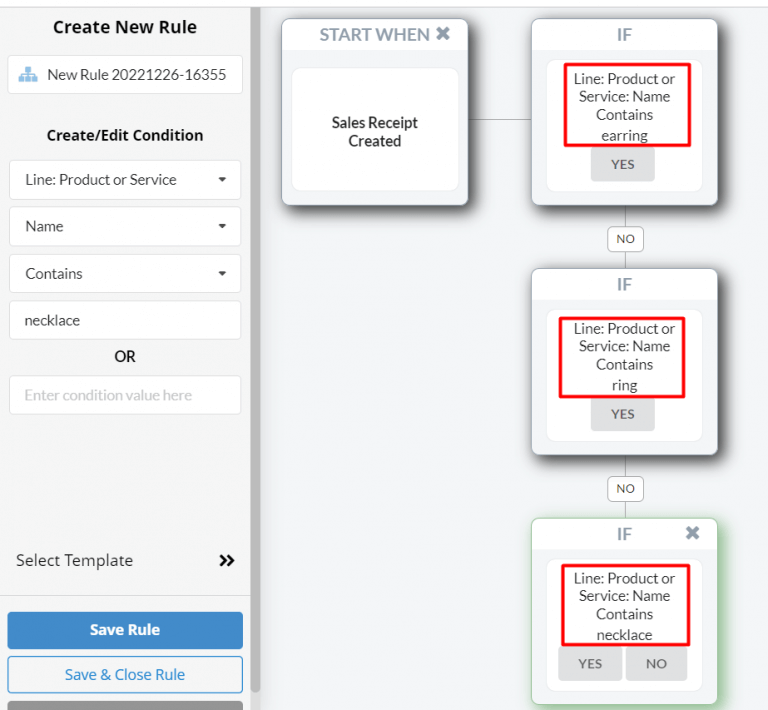
It means that any time the Product or Service name in any line of sales receipt will contain ‘earrings’ or ‘necklace’ or ‘ring,’ Synder will apply the Rule.
Note: It’s just an example. You can use any other condition that makes sense for your business flow (amount, description, etc.).
4. Define actions for each condition
After specifying the conditions for categorization, press ‘Yes’ and finally choose the action. Start defining the parameters of the action of this Rule.
In our example, we choose the action for each condition: ‘QuickBooks action → Sales Receipt → Update current.’ This instructs Synder to update the specific expense triggered by the Rule.
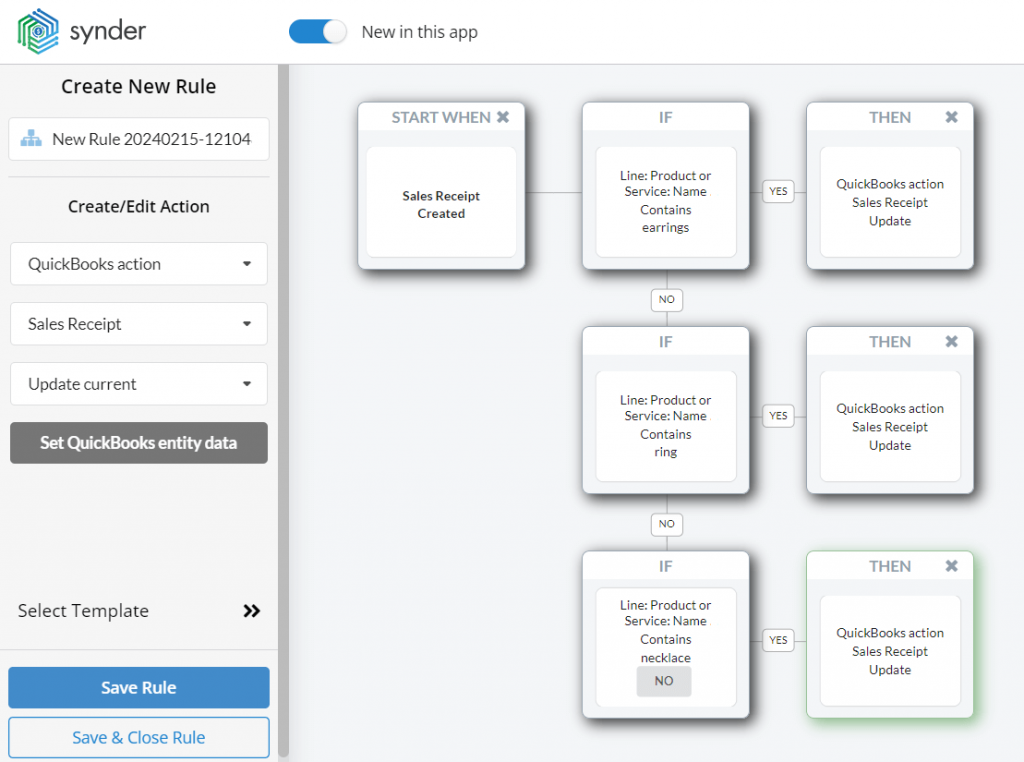
5. Assign a class for each product group.
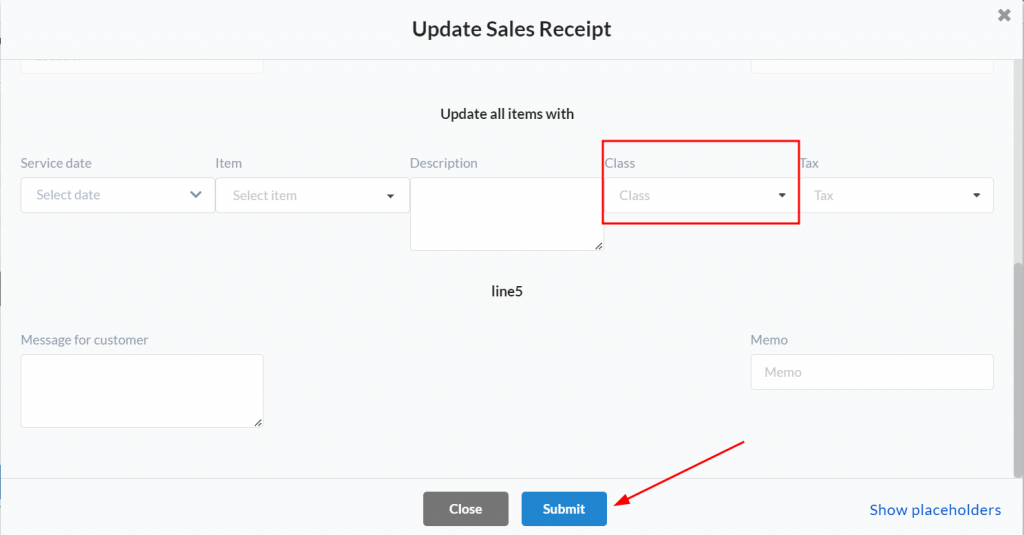
When the action is defined, press ‘Set QuickBooks entity data’ and assign the appropriate class from QuickBooks Online to each product group.
In this example, the classes we’ll choose are ‘Earrings,’ ‘Rings,’ and ‘Necklaces,’ depending on the condition. Start by selecting the class ‘Earrings’ from the dropdown of QuickBooks Online classes available.

Note: if you want this update to work for all products in the transaction lines, choose this particular class from the dropdown in the ‘Update all items with’ section.
Do the same for the rest of the conditions.
6. Save the Rule
Save the configured rule to implement automated class assignments by clicking on ‘Submit.’
Congratulations! With this setup, new transactions synchronized into QuickBooks Online will have classes applied automatically based on predefined conditions, which will streamline your accounting processes.
Check this insightful video tutorial to have a complete picture of the flow.
Checking results in QuickBooks Online
Now you’ve got it! Here’s your P&L report in QuickBooks Online, with the sales part divided into 3 classes based on product types: ‘Earrings,’ ‘Rings,’ and ‘Necklaces.’
We can see that the ‘Earrings’ are doing well, but the ‘Necklaces’ might need closer attention. Additionally, your P&L became well-organized and clear.

How to add classes in QuickBooks Online: Wrapping up
QuickBooks P&L report doesn’t have to be a place where you can only see the numbers of your total sales for a specific period without realizing what they stand for. It can be clear, accurate, and easy to read and give you details about what is sold, what performs well, and what to focus on and improve.
Adding classes to your sales gives you a clear picture of your product groups and their performance. Additionally, Synder’s intelligent automation of applying classes gives you more time to focus on your business performance and upgrade your strategy to get extraordinary results.
How to add classes in QuickBooks Online: FAQs
1. How do I add a class in QuickBooks Desktop?
- Access ‘Lists’ in QuickBooks Desktop.
- Choose ‘Class List.’
- Click ‘Class’ and select ‘New.’
- Input class details.
- Save by clicking ‘OK.’
2. How do I assign a class to an account in QuickBooks Online?
- Go to ‘Chart of Accounts’ in QuickBooks Online.
- Select the desired account.
- Choose a class from the ‘Class’ dropdown.
- Save to assign the class.
3. How do I add a class to a transaction in QuickBooks Online?
- Open the transaction you want to edit.
- Look for the ‘Class’ dropdown.
- Select the appropriate class for the transaction.
- Save the transaction to apply the class.
4. How do I group classes in QuickBooks Online?
- Go to ‘Settings’ in QuickBooks Online.
- Select ‘All Lists’ and pick ‘Classes.’
- Add a primary class.
- Create sub-classes for grouping.
- Save to confirm.
5. How many classes are available in QuickBooks Online?
The number of classes available in QuickBooks Online depends on your subscription level. Classes are accessible starting from the ‘Plus’ subscription level. QuickBooks Online Plus allows for up to 40 classes.


Excellent article! Was helpful learning how to add classes.
Thank you David, for the feedback! We’re delighted to hear you found the article on adding classes in QuickBooks Online helpful. Our goal is to make sure our content is both informative and practical for our readers. If there’s anything more you’d like to explore or learn about, don’t hesitate to let us know. Happy to help!