
Expense categories in QuickBooks are what keep your spending organized and your reports readable. They control how expenses appear on your profit and loss statement and make it easier to see where money is going and where it’s starting to drift. When categories are set up well, everyday bookkeeping stays manageable as your business grows.
That’s also why more teams are leaning on automation. According to Accenture’s 2024 research, companies with AI-led processes achieve 2.4× greater productivity than their peers, showing how automation can meaningfully improve financial operations. In this guide, you’ll learn how expense categories work in QuickBooks, how to set them up, how to categorize expenses manually and through bank feeds, how to correct common mistakes, and when automating the process becomes the smarter move.
TL;DR
- Expense categories control how spending appears on your profit and loss statement.
- A well-structured chart of accounts makes reporting clearer and reduces cleanup later.
- Expenses can be categorized manually, through bank feeds, or via CSV imports.
- Manual categorization becomes error-prone as transaction volume increases.
- Automation tools like Synder apply consistent, rule-based categorization and save time.
- Clean categorization leads to more reliable reports and better financial decisions.
Understanding expense categories in QuickBooks
Expense categories are accounts in your chart of accounts that track business spending. Each category represents a specific type of spending, such as:
- Rent and lease payments
- Utilities
- Office supplies
- Professional services
- Software and subscriptions
- Advertising and marketing
- Payment processing fees
- Shipping and fulfillment costs
- Travel and meals
- Repairs and maintenance
When you categorize an expense, you’re assigning it to the appropriate account, which determines how it appears on your profit and loss statement. These categories enable you to track spending patterns, identify cost increases, support tax deductions by separating deductible from non-deductible expenses, and provide data for budget planning. Without proper categorization, financial reports become cluttered and unreliable.
Why expense categories matter for reporting
The difference between expense categories and other account types matters for reporting. Expense accounts reduce net income on the P&L statement, while asset accounts appear on the balance sheet. Cost of goods sold accounts track direct costs tied to producing revenue. Understanding these distinctions ensures accurate financial reporting, which becomes particularly important for businesses managing ecommerce accounting across multiple sales channels.
Once you understand what expense categories do, the next step is setting them up properly in your QuickBooks account.
Setting up expense categories in QuickBooks Online
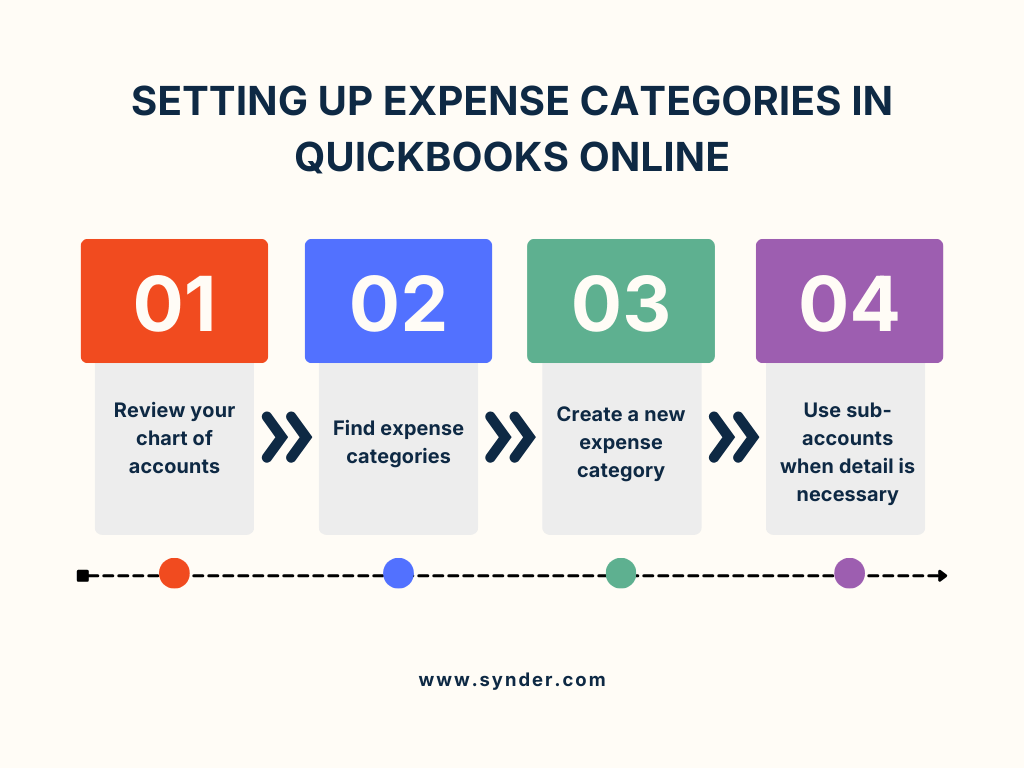
Getting expense categories right from the start makes day-to-day bookkeeping easier and keeps your financial reports reliable.
Step 1: Review your chart of accounts. Before categorizing expenses, make sure the right accounts exist. QuickBooks Online includes default expense categories, but most businesses need some customization.
Step 2: Find expense categories. Go to Settings → Chart of Accounts. Accounts are grouped by type, including assets, liabilities, equity, income, and expenses.
Step 3: Create a new expense category. To add a category:
- Click New
- Select Expense as the account type
- Choose the appropriate detail type
- Enter a clear, descriptive name
- Save
Step 4: Use sub-accounts when detail is necessary. Create sub-accounts only when reporting requires it. For example, use a main Travel account with sub-accounts for Airfare, Lodging, and Meals.
Practical guidelines:
- Avoid over-categorizing. Too many narrow categories increase maintenance without improving insight.
- Use descriptions for detail, not new accounts.
- Keep categories stable as volume grows, especially when using automation.
This structure keeps the section easy to scan, focused on clear actions, and aligned with how users actually work in QuickBooks.
With your categories set up, you’re ready to start categorizing actual transactions.
How to categorize expenses in QuickBooks
The mechanics of categorizing vary depending on how transactions enter QuickBooks, but the concept remains the same: assign each transaction to the appropriate expense account.
Categorizing manual expenses
When entering an expense manually, follow these steps:
- Click + New and select Expense or Bill.
- Choose the vendor name to help QuickBooks suggest a category.
- Select the expense account that best matches the transaction.
- Review the amount, date, and details, then save.
To split an expense across multiple categories:
- Click Add lines (Split).
- Add a separate line for each category.
- Assign the appropriate account and amount to each line.
- Let QuickBooks calculate the total automatically.
Categorizing through bank feeds
Bank feeds bring transactions into QuickBooks automatically once your bank is connected.
To review and categorize bank feed transactions:
- Go to Banking and select the connected account.
- Review transactions in the For Review tab.
- Check the suggested category carefully.
- If correct, click Add.
- If incorrect, choose the right category from the dropdown, then click Add.
To create banking rules for recurring transactions:
- Click the dropdown arrow next to a transaction.
- Select Create rule.
- Define the conditions (vendor name, text, amount, etc.).
- Choose the category to apply.
- Save the rule so future transactions are categorized automatically.
Categorizing imported transactions
When importing transactions via CSV:
- Ensure your file includes date, description, amount, and account name.
- Make sure account names match your Chart of Accounts exactly.
- Go to Settings, select Import Data, then choose Bank Data.
- Follow the import prompts to upload the file.
After importing:
- Review transactions to confirm correct categorization.
- Check for newly created accounts caused by unrecognized names.
- Reassign categories where needed to keep reports clean.
But as transaction volume grows, manual expense categorization quickly turns into a time-consuming process where small mistakes add up and inconsistencies become harder to catch. That’s where accounting automation becomes essential.
Automating expense categorization
Accounting automation shifts this work from manual review to consistent, rule-based processing, making categorization more reliable and easier to maintain over time.
To eliminate this bottleneck, you can use software like Synder, an accounting automation platform that integrates with over 30 sales channels and payment platforms to transfer financial data into QuickBooks Online.
Synder manages expense categorization through Smart Rules. Instead of categorizing each expense manually, you define rules once based on vendor names, descriptions, amounts, or other criteria. Every matching transaction is categorized automatically. For example, if all Amazon Web Services charges belong to Web Hosting, that rule applies consistently going forward.
This approach delivers clear benefits:
- Less manual work – your team spends time reviewing results, not entering data
- Consistent categorization – similar expenses are always treated the same, reducing errors and report noise
- Time savings – businesses report saving 480+ hours yearly on routine categorization tasks
- Cost savings – reduced data entry time can deliver $60,000-$72,000 in annual savings by eliminating the need for additional accounting staff
- Improved accuracy – automated categorization achieves sub-0.5% variance in reconciliation, compared to persistent errors from manual processes
As a result, you get cleaner financial data and more reliable reporting without ongoing manual effort.
See how automated expense categorization works in QuickBooks Online. Start Synder for free or book a demo.
Common categorization mistakes and how to fix them
Even with clear processes in place, expense categorization errors still happen. The table below outlines common mistakes, how to prevent them, and how to correct them when they occur.
| Error type | Prevention method | Correction approach |
| Wrong expense category | Use banking rules for recurring vendors | Edit transaction and change category |
| Personal expense in business account | Set up separate accounts or cards | Reclassify to Owner’s Draw |
| Duplicate categories | Regular Chart of Accounts review | Merge duplicate accounts |
| Missed category assignment | Bank feed review before reconciling | Assign category before reconciliation |
| Split transaction errors | Template for common split patterns | Delete and re-enter with correct split |
These corrections maintain data integrity while fixing errors, but prevention through automated expense categorization saves time in the long run.
Best practices for expense categorization
Consistent habits are the foundation of accurate expense categorization and reliable reporting. The practices below help reduce errors, simplify reviews, and keep your books maintainable over time.
- Review expenses regularly: Categorize transactions weekly instead of letting them accumulate. Recent transactions are easier to recognize and assign correctly.
- Use consistent category naming: Decide on a standard naming approach for expense categories and apply it consistently across your Chart of Accounts. This prevents confusion and duplicate accounts.
- Add clear transaction descriptions: Categories explain what type of expense it is. Descriptions explain what it was for. This is especially helpful for uncommon or one-off expenses.
- Review reports, not just transactions: Run a monthly profit and loss report to spot unusual changes in expense categories. Unexpected spikes or drops often indicate categorization issues worth reviewing.
- Document categorization rules: Maintain a simple internal guide for expenses that could fit multiple categories. Clear rules ensure everyone categorizes the same type of expense the same way.
These practices create a strong baseline for accurate reporting. For ongoing efficiency and consistency, accounting automation tools like Synder help apply these rules automatically, reducing manual effort while keeping categorization accurate in the background.
Final words
Accurate expense categorization in QuickBooks is what makes financial reports usable. When categories are applied consistently, profit and loss statements reflect actual spending patterns, anomalies are easier to detect, and decisions are based on reliable data.
Manual categorization can work at low volume, but it breaks down as transaction counts grow. Inconsistent labels, missed reviews, and small errors quickly erode report quality. Clear categories, documented rules, and regular checks create a strong baseline. Automation is what keeps that baseline intact over time, allowing expense data to stay accurate without constant manual intervention.
FAQ
What are the expense categories in QuickBooks?
Expense categories are Chart of Accounts entries tracking business spending. Common categories include Rent, Utilities, Office Supplies, Advertising, Professional Fees, and Travel. Customize categories based on your specific business needs and industry requirements.
How do I categorize transactions in QuickBooks Online?
Go to Banking, select the transaction from For Review, choose the category dropdown, and click Add. For manual entries, select + New, choose Expense or Bill, enter vendor details, and select the category. Use Split for transactions covering multiple categories.
How does automation help with expense categorization?
Banking rules and tools like Synder categorize transactions automatically based on predefined criteria. Banking rules handle recurring transactions, while advanced tools use Smart Rules for complex logic across multiple conditions, saving significant manual work.
Can I create custom expense categories in QuickBooks?
Yes. Click Settings, select Chart of Accounts, click New, choose Expense type, select the detail type, name your category, and save. Create sub-categories for detailed tracking within broader categories.
How do I fix an incorrectly categorized expense?
Find the transaction in the Banking or Expense list, open it, change the category dropdown to the correct account, and save. For reconciled transactions, use Reclassify Transactions under Accountant Tools to avoid unreconciling accounts.
What are the different ways to categorize fees in QuickBooks?
Categorize fees as Bank Charges & Fees, Merchant Processing Fees, Subscriptions & Memberships, or Professional Fees, depending on their nature. Create specific categories for significant fees worth tracking separately for better expense analysis.
Should I use sub-accounts for expense categories?
Use sub-accounts when you need detailed tracking within a broader category while maintaining totaled spending visibility. Travel with Airfare, Lodging, and Meals sub-accounts provides granular data without cluttering your Chart of Accounts. Avoid sub-accounts for expenses not requiring detailed breakdown.