
You have imported and synced your transactions — now what? Reviewing your synced data is a critical step that many new users skip. This guide walks you through the review process, shows you what to look for, and explains how to fix common errors.
Why You Should Review Synced Transactions
Syncing without reviewing is like filing your taxes without checking the numbers. Small errors compound:
- A wrong income account means your P&L is inaccurate.
- A missed tax mapping means your sales tax liability is wrong.
- A duplicate transaction means you are overstating revenue.
A quick review after your first sync can prevent hours of cleanup later.
Where to Find Your Transactions
Go to Platform transactions in the left-hand menu. You will see all your transactions listed with key columns including date, description, amount, and sync status.
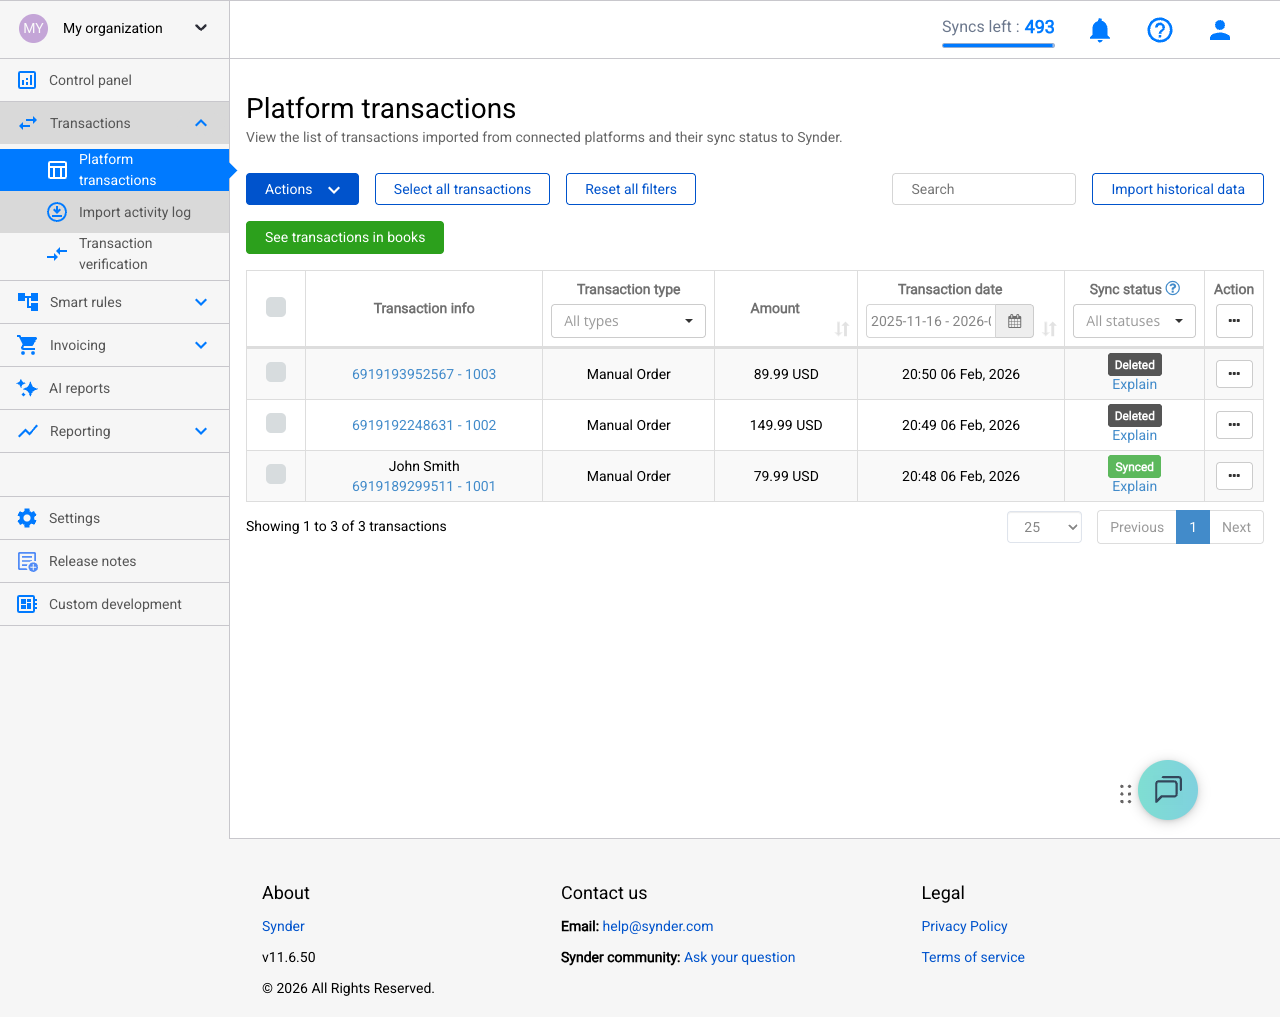
Understanding Sync Statuses
Each transaction shows a sync status. The most common ones are:
- Synced — Successfully posted to your accounting software. Review for accuracy.
- Synced with warnings — Posted to your accounting software, but Synder detected something that may need attention. Common warnings include: a product was auto-created (and may be using a default income account), a tax rate could not be matched exactly, or a customer name was truncated. These transactions are in your books — but review the warnings to ensure accuracy. Click Explain for specific details.
- Ready to Sync — Imported but not yet synced. Review, then sync.
- Failed — Sync was attempted but encountered an error. Click Explain for the specific issue and fix.
- Canceled — Sync was interrupted, often due to a configuration issue. Click Explain for guidance.
- Skipped — Excluded by your settings or filters. Verify this is intentional.
- Pending — Import or sync is still in progress.
For a complete list of statuses with detailed explanations, see Sync Statuses Explained.
Step-by-Step Review Process
Step 1: Filter for Recently Synced Transactions
- In Platform transactions, use the date filter to show transactions from your most recent sync.
- Optionally, filter by status “Synced” to focus on what has already been posted to your books.
- Sort by date (newest first) for the most relevant view.
Step 2: Spot-Check Individual Transactions
Click on any transaction to open its detail view. Click Explain under the sync status to see exactly what Synder created in your accounting software. Look for the “Show in QBO” or “Show in Xero” link — this takes you directly to the corresponding record in your accounting software so you can verify it without searching. Verify:
- Amount — Does the total match what you see on your payment platform?
- Customer name — Is it correctly captured?
- Date — Is the transaction date correct?
- Products/line items — Are individual items correctly identified and mapped?
- Income account — Is revenue posted to the right account? (Remember: income accounts are tied to products.)
- Fee amount — Are processing fees recorded as a separate expense?
- Tax — Is sales tax calculated and mapped correctly?
Step 3: Cross-Check in Your Accounting Software
Open your accounting software (QuickBooks, Xero, or Sage) and verify:
- Search for a synced transaction by amount or customer name.
- Confirm it appears in the correct income account and clearing/bank account.
- Check that the journal entry or sales receipt format matches your expectations.
- Verify the clearing account balance makes sense.
Tip: Compare 3–5 transactions between Synder and your accounting software. If they all match, your settings are likely correct for the rest.
Step 4: Check for Errors
Back in Platform transactions, filter by “Failed” or “Canceled” status. Click Explain on each one to see the specific error and recommended fix.
Common Sync Errors and How to Fix Them
Error: Product or Service Not Found
Cause: A product from your sales platform could not be found or created in your accounting software.
Fix:
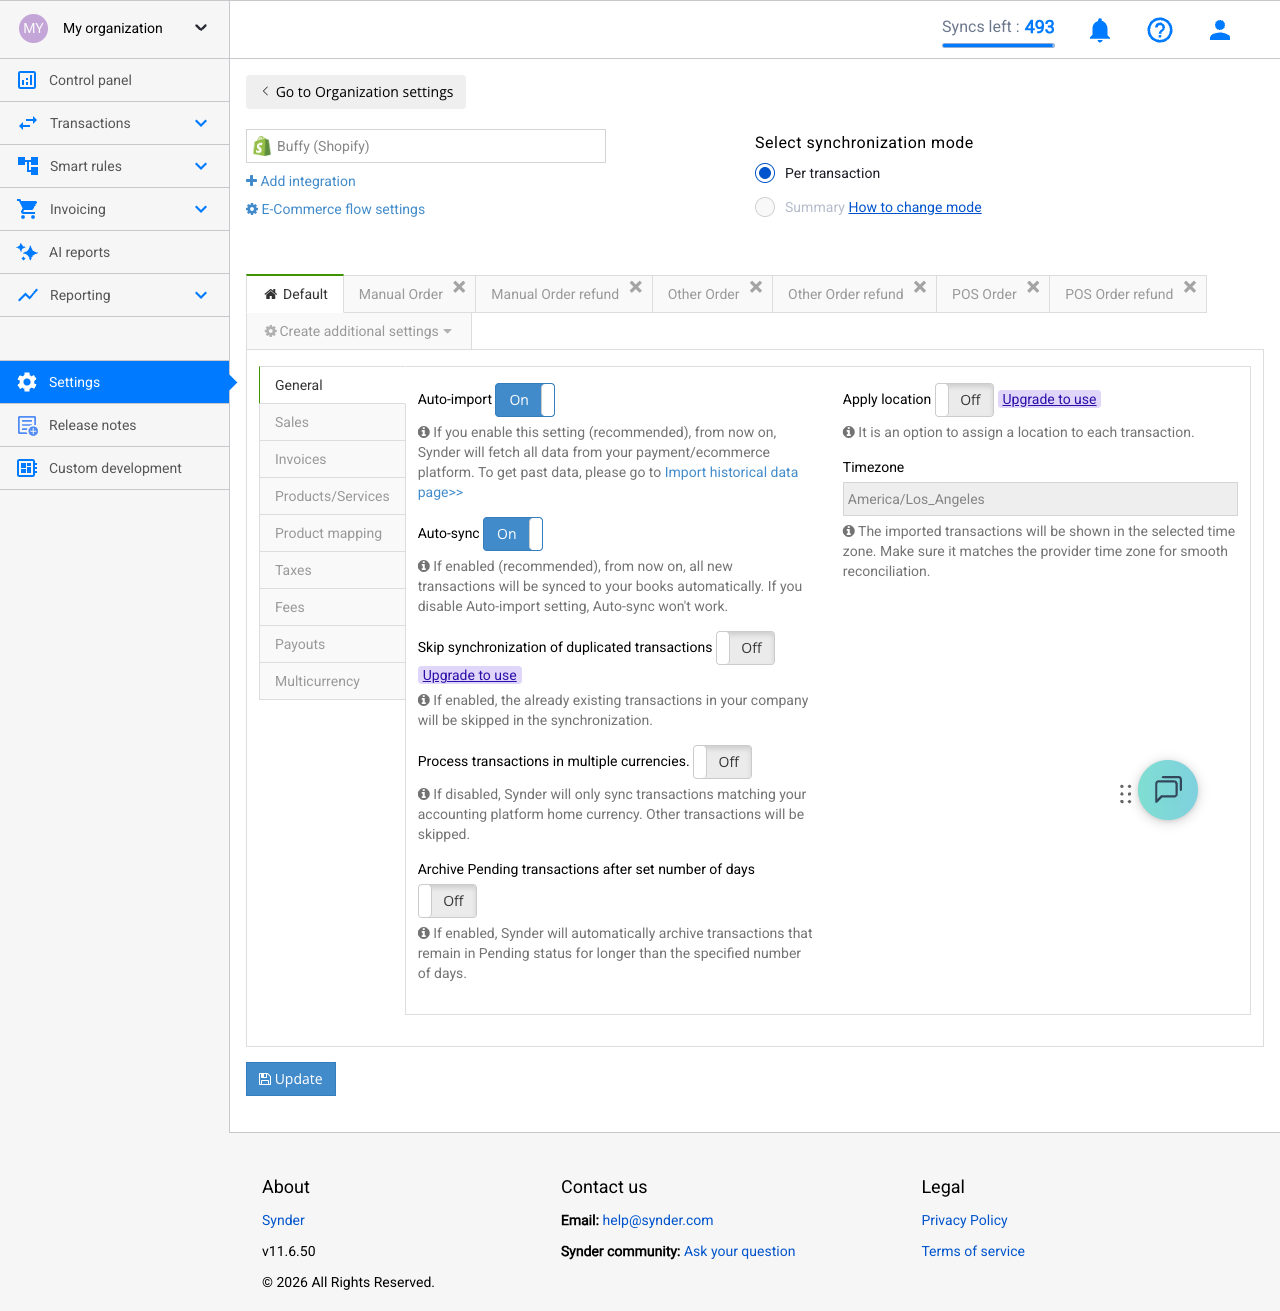
- Go to Settings → [Your Integration] → Products/Services tab.
- Add a product mapping for the missing item.
- Click Update.
- Return to Platform transactions, select the failed transactions, and choose Actions → Sync.
See the full guide: Transaction Cannot Be Synchronized Without Product or Service.
Error: Account Not Found
Cause: A mapped account was deleted or renamed in your accounting software.
Fix:
- Go to Settings → [Your Integration].
- Update the affected account mapping to an active account.
- Click Update.
- Return to Platform transactions and re-sync using Actions → Sync.
Error: Duplicate Transaction
Cause: This transaction was already recorded in your accounting software (manually or from a previous sync).
Fix:
- If the existing entry in your books is correct, you can skip the Synder transaction.
- If the Synder version is correct, delete the duplicate in your accounting software, then re-sync from Synder using Actions → Sync.
- To prevent future duplicates, use one method — manual entry OR Synder — not both.
If Something Is Wrong: How to Undo and Re-Sync
If you find errors after syncing:
- In Platform transactions, find the problematic transaction.
- Click Rollback to remove it from your accounting software.
- Go to Settings, fix the relevant configuration, and click Update.
- Return to Platform transactions and re-sync the transaction using Actions → Sync. It will now use the corrected settings.
Batch Review: Reviewing Large Numbers of Transactions
If you have hundreds or thousands of transactions to review, checking each one individually is not practical. Here is a batch review approach:
- Filter by status “Failed” or “Canceled” first — fix all errors before reviewing successful syncs. These are your highest priority.
- Filter by “Synced with warnings” — review each warning to ensure auto-created products or approximate tax mappings are acceptable.
- Spot-check 5–10 “Synced” transactions — pick a mix of different amounts, customers, and dates. If they all look correct, your settings are likely solid.
- Run a P&L comparison — in your accounting software, run a Profit & Loss report for the sync period and compare totals against your payment platform’s reports.
- Check clearing account balances — the balance in your clearing account should approximately match the balance shown on your payment platform’s dashboard.
Everything Looks Good? Next Steps
If your review confirms everything is accurate — congratulations! Here is what to do next:
- Enable auto-sync if you have not already — go to Settings → your integration → turn on the Auto-Sync toggle. This ensures new transactions are synced automatically going forward.
- Set up Smart Rules (Pro plan) — automate categorization, customer mapping, and other repetitive tasks. See Smart Rules guide.
- Import historical transactions — if you need to sync older transactions, use the date range filter in Platform transactions to import and sync past data.
- Schedule periodic reviews — check your synced transactions weekly or monthly, especially clearing account balances and any “Synced with warnings” entries.
- Connect additional platforms — if you sell through multiple channels (Shopify + Stripe + PayPal), connect them all to get a complete picture in your books.
Need Help?
If you encounter errors you cannot resolve, reach out to the Synder support team via chat or email. Include the Explain details from the affected transactions for faster diagnosis.
Related articles:
- Settings Checklist: Configure Synder Before Your First Sync
- Troubleshooting: Why Your Synder Sync Keeps Pausing
- Sync Statuses Explained
- Per Transaction Sync: Synder User Guide
- Product Search Priority