Setting up recurring bills in QuickBooks Desktop is a strategic move for businesses looking to streamline their financial operations and ensure timely payments. This process saves time and reduces the likelihood of late payments, thus maintaining healthy relationships with vendors. Automating bill payments can significantly enhance your financial management efficiency, allowing you to focus on other critical aspects of your business.
What is QuickBooks Desktop?
QuickBooks Desktop is an accounting software program developed by Intuit that is installed on a desktop computer or on a server for multiple users in a network environment. Unlike its cloud-based counterpart, QuickBooks Online, QuickBooks Desktop requires installation on a specific machine and offers a range of features designed to help small to medium-sized businesses manage their financial operations. These features include tracking expenses, creating invoices, managing bills and accounts payable, payroll processing, inventory management, and generating reports for planning and tax filing purposes.
QuickBooks Desktop comes in several editions, including:
- QuickBooks Pro: Designed for small businesses, offering basic accounting features suitable for most small business accounting needs.
- QuickBooks Premier: Includes all the features of Pro, with additional capabilities tailored to specific industries like manufacturing, nonprofit, and retail.
- QuickBooks Enterprise: The most advanced edition, suitable for medium to larger businesses, offering additional features like advanced inventory and reporting.
Each version is designed to provide different levels of functionality to meet the specific needs of businesses at various stages of growth. The software is popular for its user-friendly interface, comprehensive financial management tools, and the ability to customize and expand its features through add-ons and integrations with other applications.
How to create recurring bills in QBD
Here’s a step-by-step guide to setting up recurring bills through the memorization of transactions in QuickBooks Desktop:
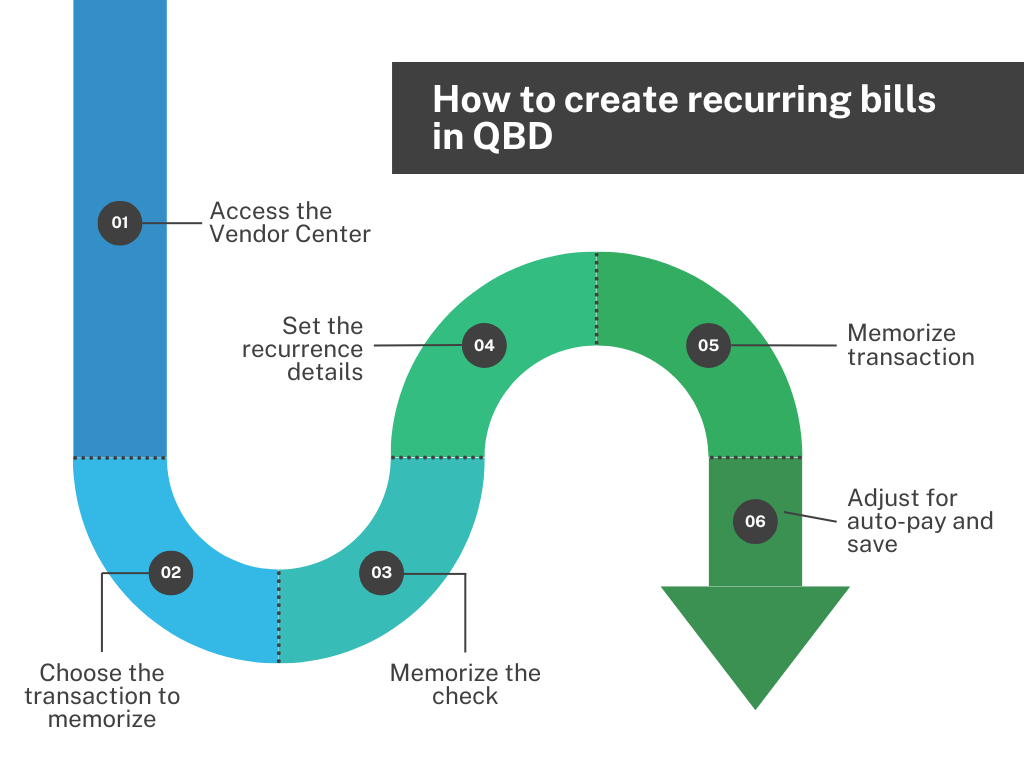
Step 1: Access the Vendor Center
Start by selecting ‘Vendors’ from the top menu bar, then click on ‘Vendor Center’ to access your list of vendors and associated transactions.
Step 2: Choose the transaction to memorize
Locate the transactions tab → Select the check.
Within the Vendor Center, go to the ‘Transactions’ tab and choose ‘Checks’ to view all the checks you have issued. Find the check that corresponds to the bill you want to set as recurring. Double-click on this check to open its details.
Step 3: Memorize the check
With the check window open, click on ‘Memorize’ (or press Ctrl+M on your keyboard) to create a recurring template for this bill.
Step 4: Set the recurrence details
Choose the reminder option → Define the frequency → Specify the next date → Set the number of payments.
Decide whether you want QuickBooks to remind you of this payment or if it should automatically enter the transaction. Select ‘How Often’ the payment should be made (options include monthly, weekly, daily, etc.). Choose the ‘Next Date’ for processing the next payment.
Enter the ‘Number Remaining’ to specify how many times this payment should be made. Determine ‘Days in Advance to Enter’ the transaction. If you want the program to post it on the day of the transaction, choose 0.
Step 5: Memorize the transaction
After setting up the recurrence details, click ‘OK’ to memorize the transaction. This action will bring you back to the ‘Write Checks’ window.
Step 6: Adjust for auto-pay and save
If the check is for an auto-pay bill, ensure to uncheck ‘Print Later’. Optionally, you can change the check number to ‘Autopayment’ or ‘Epay’ to indicate that it’s an automated payment.
Select ‘Save & Close’ to complete the setup of your recurring bill.
→ Learn how to void a check in QuickBooks Desktop.
Advanced tips for recurring bills in QuickBooks Desktop
Here are some advanced tips to optimize your experience with recurring bills, enhancing your business’s financial management.
#1. Leverage memorized transaction groups
Organize your recurring bills into memorized transaction groups. This allows for batch processing of similar bills, improving efficiency and reducing the risk of missing a payment.
#2. Utilize custom fields for better tracking
Use custom fields in the vendor setup to include additional information specific to your business needs, such as department codes or project numbers. This helps in better tracking expenses and can simplify reporting.
#3. Set up recurring bills with variable amounts
For bills with amounts that vary each period (like utility bills), memorize the transaction without specifying an amount. This prompts you to enter the actual amount each time the bill is due, ensuring accuracy.
#4. Implement split transactions for detailed categorization
When setting up a recurring bill, use the split transaction feature to allocate expenses across multiple accounts or categories. This is particularly useful for bills that cover several types of expenses, such as a single invoice for both office supplies and equipment maintenance.
#5. Schedule regular reviews of recurring transactions
Schedule a periodic review (monthly or quarterly) of all recurring transactions. This ensures that the amounts, vendors, and frequencies remain accurate and relevant to your current business operations.
#6. Optimize cash flow management
Align the scheduling of your recurring payments with your cash flow patterns. This may involve timing payments after key receivable dates to ensure sufficient liquidity.
#7. Automate payment reminders
Use QuickBooks Desktop’s reminder system or integrate with an email scheduling tool to receive alerts before a recurring payment is due. This can help in ensuring funds are available and can also serve as a prompt to verify the payment amount.
#8. Use attachments for record keeping
For each recurring bill, attach digital copies of contracts, agreements, or other relevant documents directly in QuickBooks. This keeps all pertinent information in one place and can be invaluable for reference or audit purposes.
#9. Integrate with online banking
Connect QuickBooks Desktop with your business bank account to automate the entry of recurring bill payments. This ensures your books are always up to date with the actual bank transactions.
#10. Customize reports for recurring bills analysis
Create custom reports that focus on your recurring bills. This can help you analyze spending patterns, identify opportunities for cost savings, and make more informed budgeting decisions.
Common issues when setting up recurring bills in QuickBooks Desktop
When automating your financial processes with QuickBooks Desktop, setting up recurring bills can sometimes be less straightforward than anticipated. Users often encounter several common issues that can hinder the efficiency and accuracy of their billing routines. Understanding these challenges and knowing how to address them is crucial for maintaining seamless financial operations.
Issue #1. Incorrect frequency settings
One common mistake is setting the wrong frequency for a bill, leading to missed or duplicate payments. Ensuring that the frequency matches the billing cycle of your vendor is crucial.
Issue #2. Failing to update vendor information
Business details change, and failing to update vendor information in QuickBooks can lead to payment discrepancies. Regularly review and update vendor details to avoid this issue.
Issue #3. Variable amounts not managed properly
For bills with variable amounts, forgetting to update the amount each cycle can result in incorrect payments. Always check and adjust the amounts for variable bills before processing.
Issue #4. Memorized transaction errors
Sometimes, memorized transactions do not process as expected. This can be due to incorrect setup or QuickBooks Desktop not running when a transaction is scheduled. Verify the setup and ensure QuickBooks is operational at scheduled times.
Issue #5. Overlooking payment reminders
Setting up reminders is crucial, but overlooking them can lead to missed payments. Utilize QuickBooks Desktop’s alert system effectively to prevent this.
Issue #6. Data file issues
Corruption or issues within your QuickBooks data file can disrupt recurring bill transactions. Regular data file maintenance and backups can help prevent these problems.
Issue #7. Difficulty in deleting or modifying recurring bills
Users sometimes struggle to find where and how to edit or delete memorized transactions. Familiarize yourself with the Memorized Transaction List for easy access to these settings.
Where to create recurring bills: QuickBooks Desktop or QuickBooks Online?
Choosing between QuickBooks Desktop and QuickBooks Online for creating recurring bills depends on your business’s specific needs, preferences, and the complexity of your financial operations. Both platforms offer robust capabilities for managing recurring bills, but they cater to different user preferences and scenarios. Here’s a comparison to help you decide which might be better for your situation:
QuickBooks Desktop
- Complex financial management: Ideal for businesses that require advanced inventory tracking, job costing, and industry-specific features.
- One-time purchase: Offers a one-time purchase option, which might appeal to businesses looking to avoid monthly subscriptions.
- Offline access: Since it’s desktop-based, it allows for accessing financial data and managing bills without an internet connection.
- Feature rich: Generally provides more comprehensive features out-of-the-box compared to QuickBooks Online, particularly in terms of reporting and customization options.
QuickBooks Online
- Accessibility: Being cloud-based, it offers the flexibility to access financial data and manage recurring bills from anywhere, on any device with internet access.
- Automatic updates and backups: Eliminates the need for manual updates and backups, as the software is updated automatically in the cloud.
- Integration with apps: Offers a wider range of integrations with third-party apps for extended functionalities, enhancing the automation of recurring bills and other financial tasks.
- User-friendly interface: Designed with a focus on accessibility and ease of use, making it easier for beginners to manage recurring bills.
- Real-time collaboration: Enables real-time collaboration with accountants or team members, facilitating easier financial management and decision-making.
→ Learn how to migrate from QuickBooks Desktop to QuickBooks Online.
Automate the workflow between your channels by integrating Synder software. With its ability to seamlessly integrate with your existing channels, it optimizes your accounting tasks and ensures accuracy and efficiency in managing your finances. It can be integrated with both QuickBooks versions: Online and Desktop.
Which is better for recurring bills?
For simplicity and accessibility: QuickBooks Online is often preferred for its ease of access, straightforward user interface, and the ability to manage financial tasks remotely. It’s well-suited for businesses that value flexibility and real-time data access.
For advanced features and specific needs: QuickBooks Desktop might be the better choice for businesses with complex financial management needs, requiring more detailed and customizable reporting, or those operating in industries with specific accounting requirements.
Decision factors
- Cost: Consider the ongoing subscription costs of QuickBooks Online versus the one-time purchase or annual subscription model of QuickBooks Desktop.
- Mobility: QuickBooks Online offers a significant advantage if you or your team need to access financial data on the go.
- Functionality: Assess each platform’s specific features for recurring bills and ensure they align with your business needs.
- Integration needs: Look into which third-party apps you might want to integrate with and whether QuickBooks Desktop or Online offers better support for those integrations.
Ultimately, the choice between QuickBooks Desktop and QuickBooks Online for creating recurring bills should be based on which platform best aligns with your business workflow, financial management needs, and growth plans.
Conclusion
Setting up recurring bills in QuickBooks Desktop simplifies financial management, ensuring timely payments and enhancing efficiency. This guide has equipped you with the steps and insights needed to automate bill payments effectively, saving time and reducing errors.
Embracing this functionality can significantly streamline your accounting processes, allowing you to focus on growing your business. Stay proactive by keeping QuickBooks updated and leveraging its full potential to maintain a strong financial foundation for your enterprise.
FAQs: How to set up recurring bills in QuickBooks Desktop
Can I set up recurring bills for any type of expense in QB Desktop?
Yes, QuickBooks Desktop allows you to set up recurring bills for any type of expense. This includes utilities, rent, subscriptions, and any other regular payments to vendors. The key is to ensure the vendor is properly set up in your QuickBooks system.
How do I edit or delete a recurring bill in QuickBooks Desktop?
To edit or delete a recurring bill, go to the Lists menu, select Memorized Transaction List, find the transaction you want to change, and right-click on it. You can choose to Edit Memorized Transaction to make changes or Delete Memorized Transaction to remove it completely.
Is it possible to set up recurring bills with variable amounts?
Yes, you can set up recurring bills with variable amounts by memorizing the transaction without specifying an amount. When the reminder for the bill comes up, you can manually enter the variable amount due for that period.
What happens if I need to skip a payment for a recurring bill?
If you need to skip a payment for a recurring bill, you can simply go to the Memorized Transaction List, find the transaction, and choose to skip the next occurrence. This will not affect the future scheduled payments.
Can I set different frequencies for recurring bills, such as weekly or monthly?
Absolutely, QuickBooks Desktop allows you to set various frequencies for your recurring bills, including daily, weekly, monthly, quarterly, and annually. You can customize this setting when you memorize the bill based on your payment agreement with the vendor.
How can I ensure my recurring bill payments are secure in QuickBooks Desktop?
To ensure your recurring bill payments are secure, regularly update QuickBooks Desktop to the latest version, use complex and unique passwords, enable multi-factor authentication if available, and regularly back up your company file.
Will QuickBooks Desktop remind me before a recurring bill is due?
Yes, you can set up QuickBooks Desktop to remind you before a recurring bill is due. During the memorization process, you can choose a reminder option and specify how many days in advance you want to be reminded.
Can I attach documents, like contracts or invoices, to a recurring bill in QuickBooks Desktop?
Yes, you can attach documents to a recurring bill in QuickBooks Desktop by using the Attach File feature in the transaction window. This is useful for keeping related documents easily accessible for reference or audit purposes.
→ Learn how to create an invoice in QuickBooks Desktop.
How do I handle a recurring bill that has ended or the vendor relationship changes?
If a recurring bill has ended or the vendor relationship changes, go to the Memorized Transaction List, find the appropriate transaction, and either delete it or edit the details to reflect the new situation. This ensures your financial records remain accurate.
What should I do if I encounter errors while setting up recurring bills?
If you encounter errors while setting up recurring bills, check for any input mistakes, ensure your QuickBooks Desktop is updated to the latest version, and verify that your vendor information is correct. If problems persist, consider consulting the QuickBooks Desktop support resources or a certified QuickBooks ProAdvisor.
Share your experience
Did you discover any shortcuts or face any hurdles that others might benefit from knowing about? How has automating your bills in QuickBooks Desktop changed the way you handle your business finances? We’re eager to hear about your journey. Drop your comments below to share your experiences!