TikTok has rapidly evolved from a platform for sharing short, entertaining videos to a powerful marketplace where businesses can reach millions of potential customers. But how to stand out in this bustling marketplace?
Becoming a TikTok seller requires more than just uploading a few product photos or a fun video (sometimes it works, though). You need to show your product in the best way and list it in accordance with all the requirements. How?
Today, we’ll walk you through the process of both single and batch uploads and provide some useful tips that might be a game-changer for your business. Ready to join the TikTok Shop arena? Let’s get started!
Key takeaways:
- TikTok Shop supports both single and batch product uploads.
- Ensure you and your items meet all the requirements before adding items.
- When filling out the general information about the products, keep your descriptions brief and to the point.
- Utilizing additional tools might help you manage sales data and keep your financial records in order.
Contents:
1. Going live on TikTok Shop: First steps first
4. How to manage your TikTok Shop sales like a pro
Going live on TikTok Shop: First steps first
It’s not a big surprise that if you want to run a successful business, you need to control every step. Moreover, you need to be ready to make any adjustments to the selling strategy.
So, when we’re talking about an online business, the essentials are the following:
- Product setup with captivating visuals;
- Interactive engagement with the customers;
- Smart inventory management;
- Strategic promotion.
But today, we’ll talk about TikTok Shop in particular and cover the very first step – product setup.

Source: Statista
TikTok is like the Gen Z of online marketplaces. While the workflow is similar, it’s good to remember that the majority of users are young adults who first used TikTok for entertainment.
So, what’s the takeaway?
You can’t use the strategies from selling on Amazon when selling a TikTok Shop product.
However, if you’re familiar with managing a seller account on other platforms, you’ll find some similarities here. And today, we’ll reveal the process of adding new items.
Note: TikTok Shop supports single-product and batch-product uploads. Below, we’ll discuss both options, so stay tuned!
Requirements checkbox before adding product
Before starting a TikTok Shop, you need to make sure that you and your products meet certain requirements. Here’s a short version of the checkbox of what TikTok expects you to be as a seller:
- You have to be 18 years old;
- Your store needs to be located in the United States and have a verifiable address in your settings;
- The product you’re going to sell is not on the list of prohibited or restricted items.
How to upload new products: Single-product upload
If all the requirements are checked, you’re good to move onto the next stage: adding the product to the account.
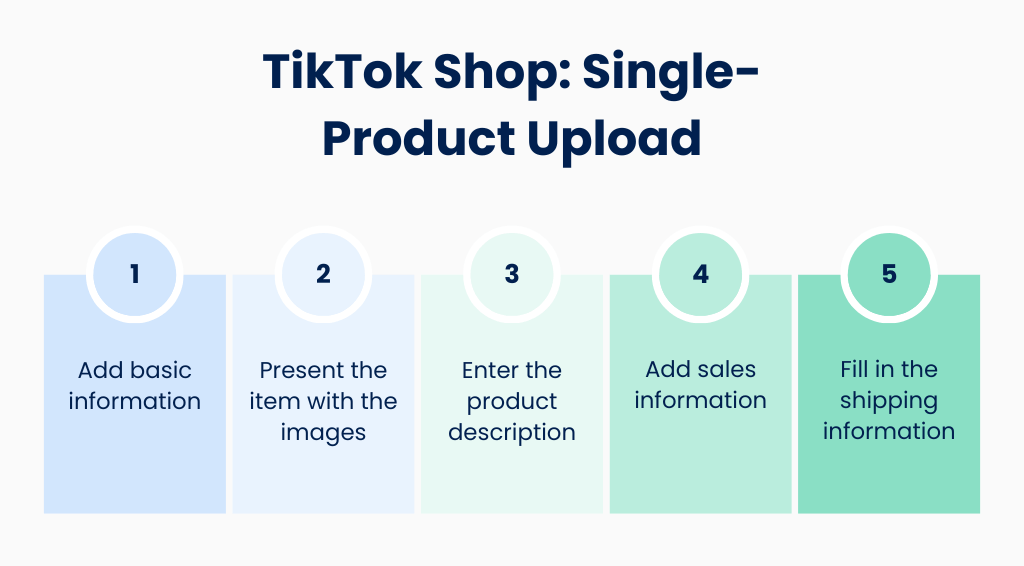
The process itself consists of filling the five sections about the product:

The platform shows a circle with a percentage to indicate how much information has been filled out. So the mandatory task looks like a small achievement when done – yay!
Now, let’s discuss in more detail how to not only hit 100% but also make the product wantable.
#1. Basic information
Let’s imagine you’ve decided to sell t-shirts on TikTok. The first thing that the platform will ask you to do will be to enter general information about the product:
- Product name;
- Category;
- Brand;
- Product attributes.
Seems like an easy step for a new seller but a struggle for an experienced one.
What do you need to keep in mind when filling out the general information?
Be concise. Be specific. Be transparent.
Let’s talk about it one by one.
1. Product name
Bad news for those who were ready to simply put “Unisex Sweatshirts With a Heat Press Print” for their product – TikTok recommends a length of 25-255 characters for the product name and suggests the following structure:
[Brand] + [Content] + [Scope of application] + [Product type] + [Main function/Feature/Advantages]
For the t-shirt case, the exaggerated version would be something like “Quirky Chic Vibrant Unisex T-shirt with a Heat Press Print—Comfortable and Stylish.”
2. Category
The platform automatically suggests possible categories based on the product name. If a category is incorrect, you can manually reselect the right one, so there’s nothing extraordinary in this step.
3. Brand
For the brand, you can either choose “No brand” or search for any specific/create a new one if necessary.
4. Product attributes
Here, you’ll need to enter the country of product origin, quantity per pack, product dimension, baby tub feature, and recommended age. This step isn’t mandatory, but it’s recommended that you provide at least several details to get more information about your product.
And that’ll be the last step of the first section.
Now, moving to the next part!
#2. Media
This is where you need to present the item you’re selling in the best way possible. Images and videos are the most direct ways to attract customers and interest them in your product.
To maintain a professional look, it’s recommended that at least three images of the product be added to a consistent background. Use additional images to show different angles, close-ups of key features, and the product in use. This helps potential buyers get a comprehensive view of what they are purchasing.
Note: Aside from brands and logos, don’t place any distracting elements such as text, icons, borders, color blocks, watermarks, or other shapes. This helps maintain a clean and professional look that keeps the focus on the product.
#3. Product details
Now is the time for a little writing task. But how you make a catchy description?
Present your selling points in separate paragraphs. This will help customers quickly grasp the key benefits of your product. Aim to keep each selling point description under 250 characters.
If you’re unsure how to describe your product, you can use the AI-generated product description tool. By entering the product benefit, brand, feature, or description, the tool will help generate neatly formatted, rich content based on the keywords you input. However, if choosing this option, be careful and recheck the text generated with AI before submitting the product.
Let’s create a description for our Quirky Chic Vibrant Unisex T-shirt with a Heat Press Print as an example:
Step up your fashion game with the QuirkyChic Vibrant Unisex T-shirt. Designed to make a statement, this t-shirt features a unique heat press print that adds a pop of personality to any outfit.
- Comfortable and stylish
Made from soft, breathable fabric, this t-shirt ensures all-day comfort while keeping you stylish. Perfect for casual outings or lounging at home!
- Unique heat press print
Featuring a vibrant heat press print, our t-shirt stands out in any crowd. The high-quality print is durable and retains its color even after multiple washes.
- Perfect fit for everyone
Available in various sizes, our t-shirt offers a perfect fit for everyone. The classic cut ensures it flatters all body types, providing both comfort and style.
- Easy care
The t-shirt is easy to care for—just machine wash and tumble dry. The fabric is resistant to shrinking and fading, maintaining its vibrant look over time.
Upgrade your wardrobe with the Quirky Chic Vibrant Unisex T-shirt. Order yours today and enjoy the perfect mix of fashion and comfort!
#4. Sales information
Here, you can add your product’s variations (in colors, for example). This is optional and should be based on the nature of your product and your inventory capabilities.
The mandatory task is to fill out the price and the quantity of the product.
→ Learn about the cost of selling on TikTok.
#5. Shipping
The shipping section provides clear and detailed information to help customers make informed decisions and ensure they’re satisfied with their purchases.
Here, you’ll need to fill out the weight with the package and product dimensions. Based on the actual weight, the platform will calculate the estimated TikTok shipping fee cost for your product (if you’ve chosen the default shipping option). You can ship orders on your own provider by setting the custom shipping option.
And that’s the last step! After that, you can submit the product for review, and if everything’s alright, it’ll appear in your store within the next 24 hours.
→ Learn how to start your dropshipping business on TikTok.
Batch-product upload
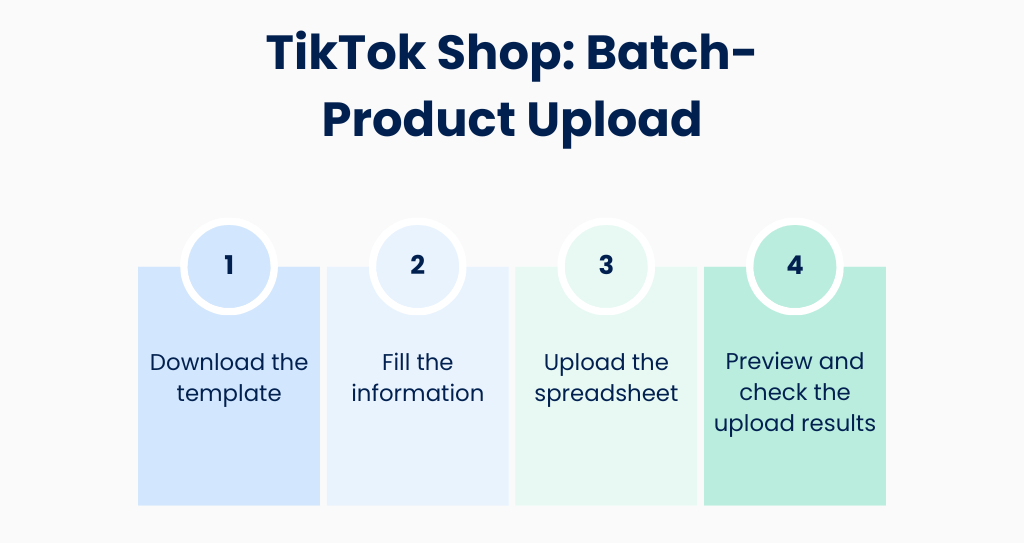
Now, let’s consider another option for uploading our items: uploading in bulk.

The first thing that’s important to mention is that batch product uploads can display up to 1000 products online. The requirements are the same as for the previous option, so moving to the steps straight away.
#1. Download the template
The main difference between the batch upload and single product upload is that for the first option, you’ll need to download a spreadsheet to fill out the product information, while for the second one, you do this online.
By selecting the category, you’ll be provided with a downloadable spreadsheet.
#2. Fill the information
Here comes the main step: filling in the cells with the relevant information. Each row in the spreadsheet represents an SKU. The columns, on the other hand, have the information you need to provide about each item.
Don’t add or delete any rows or columns.
The information you need to enter in each column isn’t very different from when you’re uploading each product separately, so let’s just mention it:
- Category;
- Brand*;
- Product description;
- Parcel weight;
- Package dimensions;
- Variations (if necessary);
- Retail price in local currency;
- Quantity;
- Main product images**;
- Size chart;
- Product attributes;
- Product statues.
* – For branded items, you’ll need to upload related certificates as proof that you or your corporation is the Trademark Owner, a 1st Level Authorized Seller, or a 2nd Level Authorized Seller.
** – Include URLs for high-quality images of each product. Ensure you follow the guidelines: at least three images per product, with the first image on a white background.
#3. Upload the spreadsheet
Before uploading the file, make sure to:
- Double-check the consistency between the title and content on the Preview page;
- Upload the spreadsheet no larger than 5MB and in .xlsx format.
If everything’s right, upload a pre-filled template file.
#4. Preview and check the upload results
Once the spreadsheet is uploaded, you can preview the first product in the list to check whether everything was filled correctly and see how it’ll look in your shop.
When all is done, click on “Confirm to start import” to import items.
Note: If there are products in the list that were successfully uploaded and products that failed, the items that have been uploaded successfully don’t need to be uploaded again.
How to manage your TikTok Shop sales like a pro
As your business grows, manually handling accounting tasks becomes a nightmare. Automating these tasks isn’t just a nice-to-have; it’s becoming a necessity.
While basic automation can keep track of transactions, it doesn’t cut it when you need to sort income and expenses, handle taxes, and ensure everything matches up. That’s where Synder comes in, offering a robust solution to make your life easier.
Synder is designed to tackle almost any accounting challenge, making it an invaluable tool for businesses. And here’s how:
- The software records the ongoing and historical completed orders right into the accounting software, with all the details from the sale, including product name, taxes, discounts, customer names, and fees. Refunds and returns can also be synced seamlessly.
- The Smart Rules feature allows you to create custom algorithms with just a few clicks, automatically categorizing transactions into the appropriate accounts. The software has more than 30 platform integrations, so it can be particularly useful if your items share the same name across different platforms. It ensures consistent and accurate categorization without the need to do it manually.
- By recording sales, Synder not only helps keep the income statement in order but also matches the transactions between your sales channels and accounting software. The matching cleans up all the records, providing you with an error-free reconciliation process.
- With Synder, you can easily track and manage international sales. The software’s multicurrency management feature automatically converts transactions into your base currency at the current exchange rates.
→ Learn how to connect TikTok with QuickBooks Online via Synder.
Just like that, by leveraging Synder’s advanced features, businesses can maintain accurate, up-to-date financial records while saving time and minimizing errors. This allows you to focus more on growing your business and less on managing complex accounting tasks.
Want to give it a try?
Track your TikTok Shop sales right now by signing up for a 15-day free trial or book a seat on a Weekly Public Demo with Synder’s expert to learn more about the perks of the software.
Conclusion
TikTok opens up a powerful avenue for reaching millions of potential customers in an engaging and dynamic way. There’s no right or wrong approach, just opportunities for sellers to showcase their items and for buyers to discover exactly what they need.
But do remember, success on TikTok Shop requires more than just having great products. It demands a well-thought-out strategy that covers every aspect of your online business, both within the app and beyond. From creating eye-catching visuals and compelling descriptions to efficiently managing inventory and shipping.
So, are you ready to embrace the dynamic nature of this marketplace and watch your business grow in ways you never imagined?
Share your thoughts
How has your experience with the platform been so far? Have you discovered any tips or strategies that have significantly boosted your success on the platform? Share your experience or success stories of your TikTok journey!


Thanks for the article!