Diving into QuickBooks Online for check printing can be straightforward and stress-free. If you’re gearing up to send out your first batch of payments or aiming to streamline your existing process, this guide is your go-to resource.
You’ll learn everything from configuring your printer settings to effortlessly printing those essential payroll checks and pay stubs. Let’s demystify the process together and transform how you handle your financial operations.
Say goodbye to manual entries and hello to accuracy and efficiency. Discover how Synder can revolutionize your bookkeeping process. With seamless integration and real-time data synchronization, managing your finances has never been easier. Join thousands of businesses already enjoying stress-free financial management.
How to write checks in QuickBooks Online?
If you need a little brush-up on how to write checks in QuickBooks Online, here is a guide on how to do it. However, if you are already familiar with it, head straight to the next section.
Step 1: Navigate to the check-writing section
Once you’re logged in to your QuickBooks Online, look for the + New button on the left-hand side of the dashboard. Click on this button, and a menu will appear. From this menu, select Check under the Vendors category. This action takes you to the check-writing window.
Step 2: Choose the payee
At the top of the check-writing screen, you’ll find a field labeled Payee. Click in this field to either select a payee from your existing list (if you’ve previously set up vendors or individuals you pay regularly) or add a new payee by typing in the name and pressing Add.
Step 3: Fill in the check details
Now, it’s time to enter the specifics of your payment. This includes:
- Bank account: Choose the bank account from which the funds will be drawn.
- Payment date: Select the date you’re making the payment.
- Category: Select the type of account that best corresponds to the payment you are about to make. This categorizes the payment within your financial records, aiding in accurate bookkeeping and financial analysis.
- Check number: If you’re using pre-numbered checks, ensure the check number matches the one you’re physically using. QuickBooks Online usually auto-populates this field based on the last check number used, but you can adjust it if necessary.
- Amount: Type in the amount you’re paying. Make sure to double-check this number for accuracy to avoid any payment issues.
Step 4: Add memo or description (optional)
Although optional, it’s good practice to fill in the Memo field with a brief description of the payment’s purpose. This information will appear on the check and can be helpful for record-keeping for both you and the payee.
Step 5: Review your check
Before proceeding, review all the information you’ve entered to ensure everything is correct. Mistakes can be costly and time-consuming to rectify.
Step 6: Save and print now or later
Once you’re satisfied with the check details save it and proceed to the printing options:
- If you’re ready to print the check immediately, select Print or Preview.
- If you prefer to print the check later and add it to the queue, click Print later.
Then click Save and close to record your check and exit the check window or select Save and new to record the check in your books and open a new check.
If you would like to void a check in QuickBooks Online or QuickBooks Desktop, read our guides.
How to configure your print settings for printing checks in QuickBooks Online?
Printing checks is a routine task for many businesses, but ensuring each check is printed correctly can be the difference between a smooth transaction and a financial headache. QuickBooks Online offers a robust solution for printing checks directly from your account, but the key to getting crisp, clear, and professional-looking checks lies in properly configuring your print settings first.
Access Print setup
First up, you need to find where QuickBooks Online keeps its print settings known as Print setup. Head over to your dashboard and select + New. Then click on Print checks. When you are trying to print checks in QuickBooks Online for the first time, the software will automatically take you to the Print setup.
Select check type
Within the printer setup options, you’ll need to choose the type of checks you’re printing. QuickBooks Online supports 2 formats, namely standard checks and voucher checks. Standard checks come with three checks on each page, while voucher checks are printed one per page and come with extra sections (stubs) for detailed payment information.
Select the one that matches the check stock you’re using. This ensures that the software aligns the printout correctly with your physical checks.
Make a printer selection
Make sure QuickBooks Online is set to print to the correct printer. This might seem obvious, but it’s an easy detail to overlook, especially if you’re working in an office with multiple printers. If you have a printer dedicated to printing checks, ensure it’s selected in the printer options.
Adjust printer settings
Now, dive into the nitty-gritty of printer settings. You’ll want to ensure the print quality is set to high (if your printer has this option), especially if you’re using check stock with security features. Also, check that the paper size matches your check stock and adjust the orientation if necessary (most checks print in landscape mode).
Conduct a test print
Always, always do a test print before printing an entire batch of checks. Use plain paper for this to save your check stock. Click View preview and print sample. Now place the printed check on top of the actual check stock, if all the boxes match perfectly, your checks are good to go. If something’s off, it’s much easier to tweak settings and try another test print than to correct a batch of incorrectly printed checks.
Finishing up the print setup
If you’re happy with the printing and alignment of your test check, click Yes, I am finished with the setup, if not, select, No, continue setup then click it again to keep going. This opens your check in an alignment window where you can move the edges to make sure everything lines up right.
Troubleshooting common issues
If you encounter issues like misalignment, faded print, or printer errors, here are a few tips:
- Misalignment: Go back to the alignment settings and adjust as necessary. Sometimes, even a small tweak can make a big difference.
- Faded print: Check your printer’s ink or toner levels. For laser printers, a low toner level can result in faded prints.
- Printer errors: Ensure your printer drivers are up to date. Printer manufacturers often release updates to improve performance and resolve common issues.
Key takeaways
Getting your print settings just right for check printing in QuickBooks Online might take a bit of trial and error at first. But once you’ve got everything dialed in, printing checks becomes a breeze. Remember to save your settings after you’ve made adjustments, so you don’t have to go through the setup process every time you print checks. With a little patience and attention to detail, you’ll be producing professional-looking checks in no time.
Find out how to avoid common QuickBooks mistakes with our expert guide.
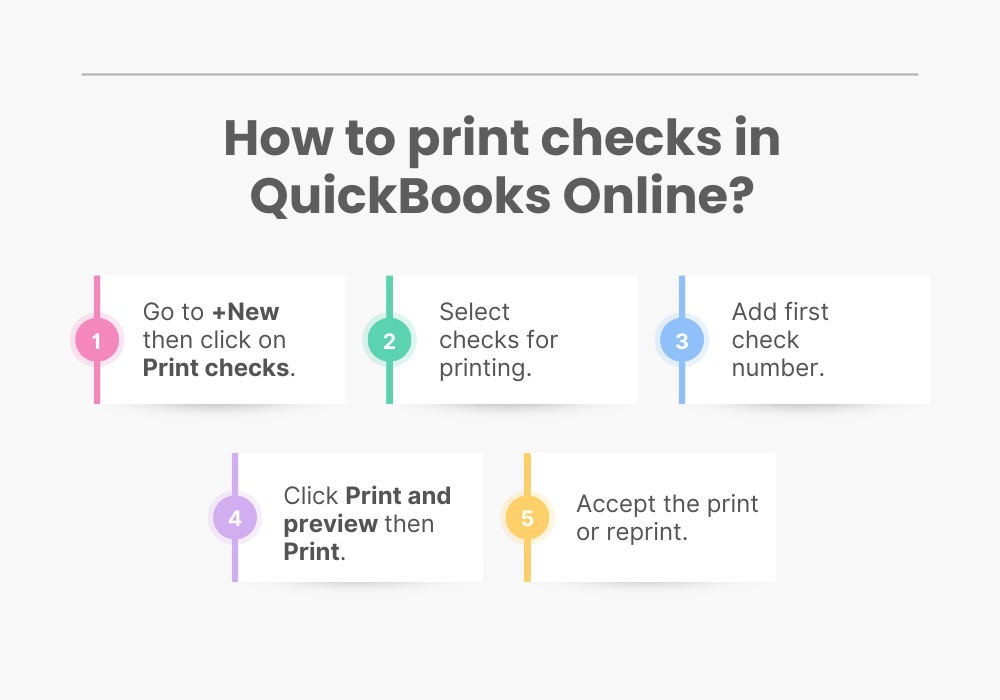
How to print checks in QuickBooks Online?
With the printer settings finely tuned, let’s move on to mastering check printing in QuickBooks Online, ensuring your business payments are handled smoothly and professionally.
Step 1: Ensure your printer is ready
Before you start with QuickBooks, make sure your printer is on, filled with paper, and functioning properly. If you’re using special check paper (which most businesses do), load the printer with the check stock. It’s a good idea to print a test page to confirm everything is working correctly.
Step 2: Access the check you want to print
Follow the guide on how to create a check in QuickBooks Online if you need to write a new one. If you’re printing a check you’ve already created, go to + New then click on Print checks. Here you will see all the checks that were sent to the queue.
Step 3: Initiate the printing process
In this window, you can choose whether you want to print all the checks that are in the queue or only the selected ones. Here you will also write the number of the first check you want to print.
Step 4: Preview and print
QuickBooks Online offers a way to preview the check before printing on your check stock by Print and preview. If you’re satisfied with the alignment on the preview, just hit Print.
Step 5: Confirm the check was printed correctly
After printing, examine the check to ensure all details are printed correctly and are legible. Make sure the amount, payee name, date, and signature (if you have a pre-signed signature) are all correct. QuickBooks will ask you whether you are happy with the prints and you will need to choose 1 of the 3 options:
- Yes, they are all printed correctly;
- Some prints need reprinting, starting with check: (insert check number).
- No, keep all checks in Print the Checks list.
Step 6: Record the printed check
Once you’ve successfully printed your check and you’re satisfied with the quality of the print, just click Done on the dialog.
Now that your check is printed, handle it with care. If you’re going to wait to mail it, store it in a secure location until it’s ready to be delivered. Just make sure to sign it before mailing it.
If you’re looking for a QuickBooks ProAdvisor, read our guide on finding the perfect ProAdvisor for your business.
How do I print paychecks and pay stubs in QuickBooks Online Payroll?
Keeping your payroll process smooth is important to make sure your employees are happy by giving them precise documentation of their wages. To access payroll you need to have QuickBooks Online Payroll or QuickBooks Desktop Payroll. Here we will look at how to generate both paychecks and pay stubs using QuickBooks Online Payroll.
Choose your printing options
First, start by opening Settings in QuickBooks Online Payroll by clicking on the gear icon. Then, go to Payroll settings. Look for the Printing section and click the edit icon to make changes.
If you want to print pay stubs you only need plain paper for it. However, if you’d like to print paychecks you need a check paper voucher that’s QuickBooks-compatible. For printing paychecks, choose whether you want one pay stub or two with each paycheck.
Then you proceed to Align check, similarly to the previous alignment process. Once you are satisfied with the printing quality and alignment just hit Save.
Access your payroll checks
If you’ve already run your payroll, all the checks you need to print will be queued up and waiting for you. Navigate to the Payroll menu, then to Employees. Look for an option called Paycheck list.
Select the paycheck or pay stub for printing
Here, you can pick the specific paycheck (or pay stub) that you need to print. If you need to find a paycheck from a certain time period or for a specific employee, click on the Filter dropdown to adjust the Date range or select a particular Employee. Once you’ve found the paycheck, go to the Action column and click on Print.
This will open a preview of the paycheck or pay stub. To get it printed, just click on the printer icon. This simple process will help you print out the paycheck or pay stub you need.
Want to find out more about QuickBooks? Read our guides on QuickBooks Multiсurrency, QuickBooks Undeposited Funds, and Chart of Accounts in QuickBooks.
Conclusion
Congratulations! You’ve just navigated the comprehensive journey of check printing in QuickBooks Online, from initial setup to the intricate details of processing payroll checks. Armed with this knowledge, you’re now equipped to manage your business payments more effectively, ensuring accuracy, transparency, and satisfaction for both you and your recipients. Remember, the key to success lies in attention to detail and consistency in following these steps. Happy printing!
Share your experience
We’d love to hear from you! Your experiences with QuickBooks Online, especially in the realm of check printing, are invaluable to us and our community. Whether you’ve found a handy trick, encountered a challenge, or have a question about streamlining your payment processes, please share your stories in the comments below.