


Sending invoices sounds simple until you’re staring at a new QuickBooks account, looking for a button to press. And the stakes are real: according to the Atradius Payment Practices Barometer, half of all B2B invoices in the US are currently overdue, with administrative inefficiencies in the billing process cited as one of the main drivers. Getting invoicing right from the start matters more than most business owners realize.
This guide covers how to create an invoice in QuickBooks, both the Online and Desktop versions, along with tips on customizing templates, setting payment terms, sending invoices to customers, tracking what’s been paid, and automating the invoicing process.
TL;DR
- QuickBooks invoicing ties billing directly to accounting: every invoice updates accounts receivable, reports, and reconciliation automatically.
- QuickBooks Online and Desktop both support invoicing, but differ in workflow, automation, and collaboration features.
- Creating invoices is straightforward once customers and products/services are set up in advance.
- Common scenarios like partial payments, refunds, and invoice errors are handled through built-in tools such as receiving payment, credit memos, and refund receipts.
- For businesses that also need online payments, fee tracking, recurring billing, and automatic reconciliation, Synder extends QuickBooks by automating the entire invoice-to-payment-to-sync flow, cutting manual work and speeding up month-end close.
How QuickBooks invoicing works
QuickBooks is built around the idea that invoicing and accounting should live in the same place, and for the most part, they do. When you create an invoice in QuickBooks, it doesn’t just generate a document for your customer, but also records the transaction in your accounts receivable, updates your financial reports, and creates a paper trail that makes reconciliation far less painful at month end.
There are two versions to be aware of: QuickBooks Online, which runs in your browser and syncs in real time across devices, and QuickBooks Desktop, which is installed locally and tends to offer more granular control for businesses with complex accounting setups. Both support full invoicing, though the interface and exact steps differ.
Before diving into the steps, it helps to have two things ready: your customer records and your products or services list. QuickBooks pulls from both when you build an invoice, so setting those up in advance makes the actual invoice creation much faster and keeps your data consistent across transactions.
How to create an invoice in QuickBooks Online
QuickBooks Online is where most small business owners and their accountants spend their time, and the invoicing flow is designed to be quick. Here’s the full process.
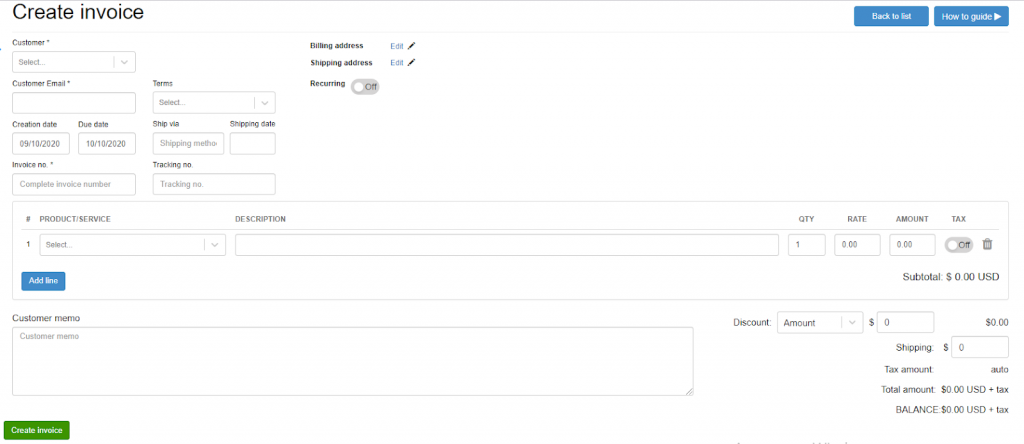
Step 1: Navigate to invoices
- From your QuickBooks Online dashboard, click Sales in the left-hand navigation menu.
- Select Invoices.
- Review the list of existing invoices (or an empty screen if you’re just starting).
- Click the green Create invoice button in the top-right corner to open a blank invoice form.
Note: Alternatively, you can go to Customers, select a specific customer, then click New transaction → Invoice. This pre-fills the customer field automatically, which saves a step if you already know who you’re billing.
Step 2: Select your customer
- In the Customer field at the top of the form, start typing the customer’s name.
- Choose the correct customer from the suggested matches in your existing list.
- If the customer is new, select Add new from the dropdown to create the record.
- You can add or update additional customer details later.
Step 3: Set invoice date and payment terms
- QuickBooks defaults the invoice date to today, but you can change it to match when the work was completed or the goods were delivered.
- Payment terms (for example, Net 30 or Due on receipt) automatically determine the due date.
- You can set default payment terms in your account settings to avoid adjusting them manually on every invoice.
Step 4: Add your products or services
- Click into the Product/Service field to search your item catalog.
- Select an item to automatically fill in the description, rate, and tax status based on its configuration.
- Adjust the quantity as needed.
- Repeat for each line item – you can add as many lines as necessary.
Step 5: Review totals and send
- Review the subtotal, any applicable taxes, and the total at the bottom of the form.
- Add a discount, include a shipping charge, or write a custom message to your customer if needed.
- When everything looks right, click Save and send the invoice to email from QuickBooks Online.
- Or click Save and close to save the invoice and send it later.
Note: QuickBooks Online also lets you attach files directly to an invoice, which is useful if you need to include a signed contract, timesheet, or delivery note alongside the bill. Once sent, the invoice appears in your customer’s email with a Pay now link if you’ve enabled QuickBooks Payments.
How to create an invoice in QuickBooks Desktop
QuickBooks Desktop follows the same core logic but navigates differently. The layout is more menu-driven, with most actions living in the top toolbar rather than a sidebar.
Step 1. Open the invoice form
- Go to Customers → Create Invoices from the top menu.
- The invoice form opens in a new window.
Step 2. Select the customer
- Choose a customer from the Customer: Job dropdown.
- QuickBooks Desktop automatically fills in the billing address and saved payment terms.
Step 3. Add line items
- In the central grid, click the Item column and select an item from your list.
- Enter the quantity; the rate populates from the item settings (adjust if needed).
- Repeat for all items on the invoice.
Step 4. Add notes
- Use Customer message for notes that appear on the printed invoice.
- Use Memo for internal notes that stay in QuickBooks only.
Step 5. Save or send the invoice
- Click Save & Close to finish, or Save & New to create another invoice.
- To email the invoice, click Send in the top toolbar using your configured email settings.
QuickBooks Online vs Desktop: invoice feature comparison
Both versions cover the invoicing essentials, but they differ in meaningful ways depending on your workflow. Here’s a side-by-side look at the key differences:
| Feature | QuickBooks Online | QuickBooks Desktop |
| Access | Browser-based, any device | Installed locally, typically on one machine |
| Invoice creation path | Sales → Invoices → Create invoice or Customers → select customer → New transaction → Invoice | Customers → Create Invoices |
| Email invoices | Directly from QuickBooks Online | Via configured email client |
| Online payment link | Yes (via QuickBooks Payments) | Not natively included |
| Attach files to the invoice | Yes | Limited |
| Payment status tracking | Automatic (Sent, Viewed, Partial, Paid) | Manual status updates |
| Automatic payment reminders | Yes | No |
| Invoice customization | Templates, logo, color, columns | More advanced layout editor |
| Recurring invoices | Yes | Yes (memorized transactions) |
| Multi-user access | Yes, from any device | Yes, on the same network only |
| Best for | Small to mid-sized businesses, remote or distributed teams | Businesses with complex accounting needs or long-standing Desktop setups |
Overall, QuickBooks Online is the more practical choice. QuickBooks Desktop tends to suit businesses that have been using it for years and need features like advanced job costing or more detailed inventory tracking.
How to customize invoice templates in QuickBooks
A default QuickBooks invoice gets the job done, but a branded, professional-looking invoice makes a better impression and can even speed up payment as customers are more likely to act on something that looks legitimate and polished.
In QuickBooks Online, go to Settings (gear icon) → Custom form styles to manage your invoice templates. From here, you can choose from several layout options, upload your company logo, set a primary color, and edit the columns that appear on your invoice (for example, hiding SKU or showing service dates). You can also control what appears in the footer, including payment instructions and a thank-you note.
In QuickBooks Desktop, template customization lives under Lists → Templates. Right-click on any existing invoice template and select “Edit template” to open the layout designer. The Desktop editor is more granular and lets you drag and reposition fields, adjust fonts, and create multiple templates for different billing scenarios, like one for product sales and another for
One practical tip: set up your payment terms, default message, and preferred columns once, and every new invoice you create will inherit those settings. It’s a small investment of ten minutes that saves a recurring headache going forward.
How to send and track invoices in QuickBooks
Creating the invoice is only half the job, but you also need to make sure it gets to the right person and that you know when it’s been paid.
In QuickBooks Online, once an invoice is saved, its status is tracked automatically on the Invoices list page. You’ll see labels like Sent, Viewed, Partial, and Paid, which update as your customer receives and opens the email and as payments come in. If a customer has viewed the invoice but not paid, QuickBooks can send automatic payment reminders on your behalf – you can configure the timing and message under your invoice settings.
When a payment comes in, you can record it directly on the invoice by clicking Receive payment and entering the amount. QuickBooks will match the payment to the outstanding invoice and update your accounts receivable balance.
In QuickBooks Desktop, you track open invoices through Customers → Customer Center, where you can filter by customer and see all outstanding balances. Payments are recorded via Customers → Receive Payments, where you select the invoice being paid and enter the details.
Common QuickBooks invoicing issues and how to fix them
Even with a reputable tool like QuickBooks, certain invoicing scenarios come up again and again. Below are the most common problems users run into and the correct way to handle each one.
Problem: A customer pays only part of the invoice
Solution: Go to receive payment, enter the amount actually received, and apply it to the invoice. QuickBooks records the partial payment and keeps the remaining balance open on the customer’s account for future collection.
Problem: You need to issue a refund
Solution: Use a refund receipt for a direct refund, or create a credit memo if you plan to apply the amount to a future invoice. Both options keep accounts receivable accurate and update the customer’s balance correctly.
Problem: There’s an error on an invoice
Solution:
- If the invoice hasn’t been sent, open it and edit it directly.
- If it has already been sent, issue a credit memo to correct the amount.
- If the error is significant, void the invoice and create a new one instead.
How to automate invoicing in QuickBooks Online
QuickBooks Online covers the basics of invoicing, but when you also need to collect payments online and reconcile them automatically, Synder closes the gap between billing and bookkeeping.
Synder connects QuickBooks Online with 30+ ecommerce and payment platforms, letting you manage invoices, collect payments, and keep your books accurate without manual entry or cleanup.
With Synder, you can:
- Create invoices directly in Synder and sync them to QuickBooks Online.
- Set up recurring invoices for subscriptions or repeat customers.

- Generate standalone payment links.

Once a customer pays via Stripe or Square, Synder automatically:
- Records the payment in QuickBooks Online.
- Separates platform and processing fees.
- Matches the payment to the correct open invoice (fully or partially, based on your settings).
The result is a single, connected billing flow, from invoice creation to payment reconciliation, without switching tools or fixing discrepancies later.
For ecommerce businesses and finance teams handling high invoice volumes, this kind of automation reduces manual work, speeds up month end, and keeps invoice-based revenue accurate as volume grows. And it translates into real numbers: companies save 480+ hours yearly on transaction categorization and bookkeeping, or cut reconciliation time by 50% across a client portfolio.
Try it yourself → Start a free Synder trial and see how it handles invoice sync and reconciliation for your QuickBooks setup. Prefer to see it live first? Book a free demo with our team.
Read more about how to automate invoice creation & payment matching for ecommerce in QuickBooks Online.
Wrapping up: creating invoices in QuickBooks the right way
Creating an invoice in QuickBooks is a straightforward process once you understand the layout, but the real value comes from setting things up properly from the start: accurate customer records, well-configured product lists, consistent payment terms, and a clean template that reflects your brand. Both QuickBooks Online and Desktop give you the tools to do this. The version you use mostly comes down to how your business operates day to day.
Where things get more complex is on the payment reconciliation side, especially if you’re receiving payments through multiple channels. For businesses with any significant transaction volume, manual reconciliation becomes a bottleneck fast. Automating that piece through tools like Synder means your QuickBooks data stays current and accurate without someone spending hours on data entry every week, so you can focus on actually running the business.
FAQ
Can QuickBooks be used for invoicing?
Absolutely. Invoicing is one of QuickBooks’ core features. It lets you create, customize, send, and track invoices, record payments, and manage accounts receivable within the same platform. Both the Online and Desktop versions support full invoicing workflows.
How does QuickBooks invoicing work?
When you create an invoice in QuickBooks, it simultaneously records the amount as accounts receivable in your books, generates a professional document to send to your customer, and tracks payment status in real time. Payments recorded against the invoice automatically update your financial reports.
How to create an invoice step-by-step?
In QuickBooks Online: go to Sales → Invoices → Create invoice. Add a customer, set the date and payment terms, add line items from your product list, then click Save and send. The whole process takes under five minutes with existing records.
What do I need to generate an invoice?
At minimum, you need: your business name and contact details, the customer’s name and billing address, a description of the goods or services provided, quantities and rates, payment terms, and an invoice number. QuickBooks stores most of this automatically once your account is configured.
Does QuickBooks have an invoice template?
Yes, QuickBooks includes default invoice templates that you can fully customize. In QuickBooks Online, go to Settings → Custom form styles to upload a logo, set colors, and adjust layout. QuickBooks Desktop offers a more advanced template editor under Lists → Templates.
Can I customize invoice templates in QuickBooks?
Yes. In QuickBooks Online, use Custom form styles under Settings to adjust the layout, logo, and colors. In QuickBooks Desktop, the template editor under Lists → Templates gives you granular control over field placement, fonts, and design.


Outstanding QuickBooks invoice guide! Your blog’s simplicity and clarity made creating invoices a breeze. A must-read for anyone navigating QuickBooks. Thank you!