.png)
You may want to start a new career or may consider starting an ecommerce store as a possibility of additional income. Whatever the reason, selling on Shopify may become your solution as it’s really easy and convenient.
In this article, we’ll answer all your questions so you can have a better picture of what it’s like — to start your own small business with Shopify.
A guide to e-commerce business with Shopify:
1. How to start a Shopify business: Setting a goal and choosing product ideas for your store
2. How to set up a Shopify ecommerce store?
3. How to customize a Shopify store?
4. Starting to sell: How to add products to Shopify?
5. How to add helpful pages to your Shopify store?
6. How to add a blog to your Shopify store?
7. How to add your shop policies to Shopify?
8. How to improve SEO on Shopify?
9. How to turn on Shopify email notifications?
10. Which Shopify payment providers to use?
11. How to add tax to Shopify?
12. How to set up product shipping on Shopify?
13. How to optimize customer service in a Shopify store?
14. How to add apps to a Shopify store?
15. Do you need to run a Shopify marketing campaign?
✔️ How to start a Shopify business: Setting a goal and choosing product ideas for your store
👉 Don’t think too much to grasp an opportunity.
When you embark on Shopify accounting for your ecommerce store, you do it with a clear purpose in mind. This is why setting your goals is critical. Are you aiming to make this a full-time business venture, or is it a side project for additional income?
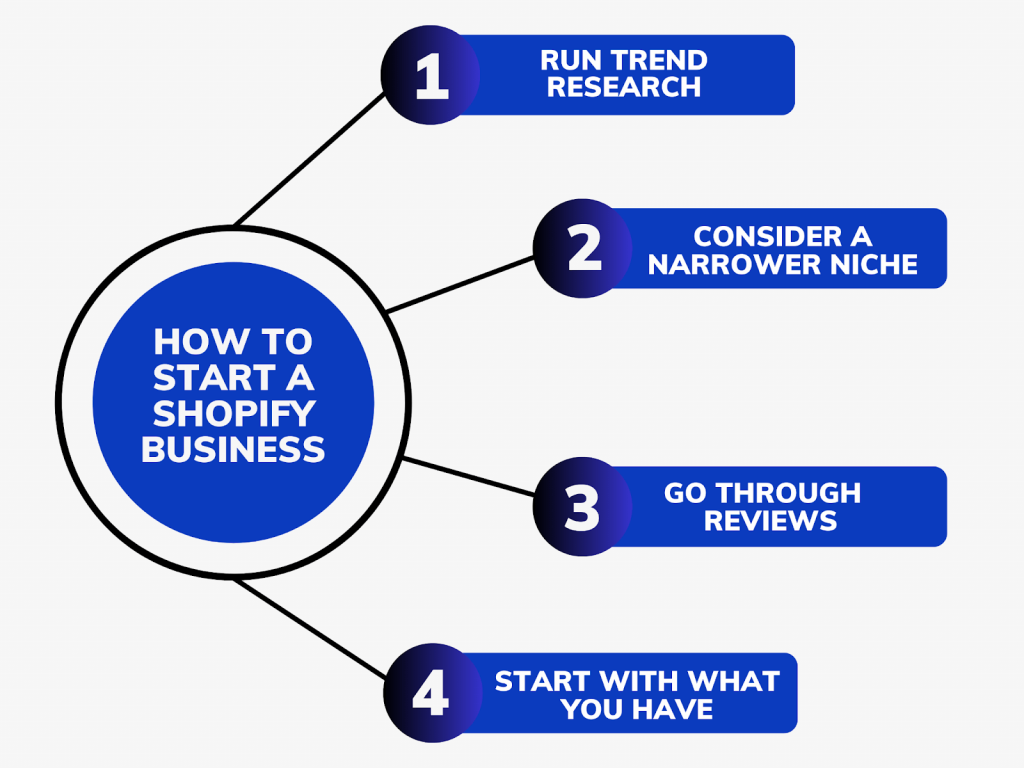
Your next step will be choosing what to sell in your Shopify store. Here, you need a wise approach because – it’s a sad truth – about 95% of new ecommerce products fail. The reason is ecommerce is a highly competitive industry, and the competition increases year over year. At this point, you might want to be careful in selecting products for your ecommerce store. Here are some recommendations for choosing your product ideas:
- Run trend research. You definitely want to sell products on the website that people intend to buy. That’s why you can’t skip research (a lot of research, being frank). Depending on where you’re going to sell, look for what local people prefer to buy. Think of everything that they might need, and consider every little detail. You might want to consult online consumer trend publications, use product trend discovery sites, do social listening, etc.
- Consider a narrower niche. Choosing smaller categories and narrower niches to run your ecommerce store on the Shopify website at the start might be a great idea. After all, we often hear about the start-small thing. This decision comes with a smaller number of potential customers. On the other hand, you have fewer competitors and a more targeted audience on the website with a higher purchasing intention. Think about one more virtue: lower competition on the website makes it easier for your store to win top positions at Google and other popular search engines, which can be more cost-effective and efficient in terms of advertising.
- Go through customer product reviews on popular ecommerce websites and marketplaces. If you plan to run your ecommerce store for a long time, the quality of the products you sell can be a cornerstone of your success. Customer reviews can be an invaluable source of truth about product vendors to avoid. They can also give you plenty of ideas about what people like to buy, so you can promote these products by emphasizing higher quality.
- Start with what you have. Have you already bought a set of products for your ecommerce store? It’s totally fine. After all, you can start selling on the website with what you have and analyze your product performance to identify top-sellers, low-sellers, and those poor things that go obsolete. This way, you can tweak your inventory using your real numbers (which can be a great path to increasing profitability).
To streamline your ecommerce store performance analysis, it’s highly recommended to automate this process. Synder Insights is a powerful tool that will gather detailed sales data from your Shopify store (and others if you operate on multiple sales platforms), payment gateways, and pack it in actionable reports reflecting essential business metrics like AOV, gross sales, customer behavior, product performance, and more.
Give Synder Insights a go by signing up for a free trial or spare a spot at our weekly public demo to learn more about Synder’s versatile functionality and how it can boost your bottom line.
When you’re considering some Shopify store ideas, just remember that every great achievement was once considered impossible. No matter how crazy an idea might seem to you, take every opportunity and try it out. Yet, it’s also crucial to realize that even behind the craziest ideas there must be some solid rationale.
It takes a lot of time and energy to come up with a business plan and sustain it since your Shopify store name will be the representation of not only your Shopify small business but you as well. The best way to choose your Shopify store idea is by looking at your skills and interests. Maybe you’re a wonderful DIY person who thinks that there are too few stores with cool stuff in your favorite fandom. Maybe there’s an opportunity that you’ve been overlooking as you search for the perfect niche or what people may like, forgetting about your own interests.
Once you do this, it’ll be much easier to see what direction your Shopify ecommerce store should go in.
✔️ How to set up a Shopify ecommerce store?
👉 Use the Shopify store name and create your Shopify domain — this will be your store.
Starting a Shopify store will take less than 10 minutes. We’ll guide you through the whole path providing the examples you may need. So first things first — you need to log in to Shopify’s dashboard and set up your Shopify store.
Your path on this step will be the following: Shopify admin → Settings → General.
Here you can change your Shopify store name, address standards and formats and your store currency.
In the tab Domains, you can also buy a new Shopify domain for your ecommerce business, connect existing domain or transfer it to another one.
Now it’s time to improve your Shopify store visually. Let’s take a look at the provided options.
✔️ How to customize a Shopify store?
👉 Be practical.
Starting a Shopify small business is a great choice for people looking to create and run an online store without any experience in creating a website.
Shopify offers a range of themes and templates that will help you create the perfect store for your brand. You can customize your Shopify store in any way you’d like.
Go back to the Shopify admin and go to the Online Store → Themes. Here you can choose one among Shopify’s free themes or purchase a theme for your store from the paid options. If you want to copy a theme of a certain store but you’re unsure of the exact theme used, you can use Shopify Theme Detector to quickly determine the theme being used on that Shopify store.
Shopify store themes and templates are easy to utilize and customize. You don’t need to have any special design skills to customize a Shopify store and make it look good — you can edit almost anything to create a Shopify store that is as unique as your small business.
The main advantage is that each theme has a description for which store this one will be a great choice, which pages have been already added to the Shopify theme and more.
Another option is to customize your Shopify store by yourself (remember that a visually appealing store is important but your main goal here is to sell the product).
Here you’ll see a whole range of different tabs that probably catch your eyes. Let your curiosity win this battle between rushing and the desire to have a quick look. Check them all just to understand what’s essential to you on the first steps.
✔️ Starting to sell: How to add products to Shopify?
👉 Make the product noticeable with the help of images and descriptions.
When you’ve set up and customized your ecommerce store, it’s time to add your products and start selling. After all, it’s what you run your Shopify store for.
Adding products to your store is considerably easy using Shopify’s tools. And not that time-consuming either.
First, head over to your Shopify admin → Products. You’ll be taken to the product page where you can start adding your Shopify store products. Click the Add Product button in order to start creating your first product listing!
There are two ways to add products to your Shopify store: manually and automatically.
When adding products manually, you need to upload a product image for every item you want to sell on your Shopify store. In contrast, when adding products automatically, you only need to upload a product image once, and then any time someone purchases that item from your site, Shopify will automatically update their order with those items.
📌 Note: Сonsider possible searching questions about the product you sell to gain more audience and improve your Shopify’s SEO.
After adding your products, managing your pricing, and overseeing your inventory becomes crucial in bookkeeping for Shopify, enabling you to streamline your operations effectively.
The options you can choose under each section
- Pricing section: whether to charge tax on this product or not.
- Inventory section: tracking quantity (yes/no), continue selling when out of stock (yes/no).
- Shipping section: whether it’s a physical product or not.
✔️ How to add helpful pages to your Shopify store?
👉 Make them as informative as possible so your customers won’t have any questions about your products.
Selling on Shopify isn’t only about adding products to the store but it’s also about making your Shopify store trustworthy. You can gain this trust through these helpful pages. But how many of those helpful pages should you actually create?
Creating helpful pages is one of the most important ways to keep your Shopify ecommerce small business running smoothly and looking fantastic.
Go to the Shopify admin → Online store → Pages → Add page. This will take you to the page editor.
If you’re just getting started with a Shopify store, here are some pages you might want to consider:
- About Us: provide contact information, tell more about your Shopify store and yourself. This will help see that the store isn’t something inanimate — there’s a human being behind the screen.
- Shipping: this page will tell customers about all shipping details, as well as whether they qualify for free shipping, and how long it’ll take to ship their order.
- FAQ: provide the answers to the most frequently asked questions about your Shopify store that may be on your customer’s mind.
✔️ How to add a blog to your Shopify store?
👉 The Shopify blog is where you can be fancy, actually. Share new information with your customers and keep them updated about new products.
Creating a blog for your Shopify ecommerce business in your store itself is pretty similar to the previous step.
The Shopify blog can be used to provide valuable insights for your followers. It’s a way to share the best practices, promote products, announce updates, or simply tell the story of your company or about some interesting cases. Shopify blog pages also give you the opportunity to promote new products or promotional offers that may not otherwise be seen.
Go to the Shopify admin → Online store → Blog posts → Create blog post. You can also insert images and add videos to your Shopify blog pages.
When the page is published, you can manage the Comments section as well by searching “blog” in the search bar at the top of the page.
✔️ How to add your shop policies to Shopify?
👉 You should be strict, but loyal so that the customers can trust you and your products.
The platform gives you the freedom to set your own policies for your Shopify store. It’s also possible to create your own custom policies that you apply to your Shopify small business.
📌 Note: The most important thing you need to know is that every change you make to your Shopify policies will affect all of your products and orders currently in the store.
To manage Shopify policies go back to Shopify admin → Settings → Policies.
Hereб you can update your:
- Shopify refund policy;
- Shopify privacy policy;
- Shopify terms of service;
- Shopify shipping policy.
Shopify itself recommends you to add to your refund policy the following information:
- Which items are eligible for return and exchange;
- How long a customer has to make a return or exchange;
- In what condition products can be returned;
- How to initiate a return;
- Which products are final sale.
✔️ How to improve SEO on Shopify?
👉 Search for possible keywords that can lead people through search engines to your Shopify store and use them when writing helpful pages or blog pages.
You’ve got a great Shopify store, but no one can find it? It’s not that your site lacks quality content – it’s just that your Shopify small business needs the right search engine optimization (simply saying, SEO).
SEO has become an integral part of small business’ marketing strategy on the Shopify platform (anywhere actually) and it has a significant impact on your traffic boost.
SEO isn’t something you do for your Shopify store. It’s something you do for your customers. It’s about trying to predict what the user wants and finding the best way to give that to them. When done well, it can help you increase your Shopify small business traffic, conversions, and sales. But when done poorly, it can actually be harmful or even worse than doing nothing at all, so be careful!
✔️ How to turn on Shopify email notifications?
👉 Unfortunately, no small tip for this one… Check the block for details.
You need to know exactly what’s happening in your Shopify store at all times, and you need the ability to respond quickly to any situation that arises. Quick responses are also the reason your customers may respect you and your small business. And that’s where Shopify email notifications come in!
But how to set up Shopify email notifications?
The first one is: go to the Shopify admin → Settings → Notifications. Here, you can check the codes for each notification to make sure they meet your needs.
Then go to the Staff order notifications and click Add recipient.
Here, all you have to do is to write the email which you’re going to use for receiving Shopify email notifications. Then click Add an order notification.
📌 Note: After that, at the very bottom of the page, you can check whether your desktop notifications are turned on or off (they’ll probably be turned on by default but it’s best to check just in case).
✔️ Which Shopify payment providers to use?
👉 The ecommerce platform provides you with a bunch of alternatives you can use to manage your Shopify store. All you have to do is just choose a better option.
One of the most important aspects of running an ecommerce store is the ability to accept secure payments.
When someone wants to buy from your Shopify store, they may be stuck with the question of how to make the payment. Luckily, Shopify supports a wide range of payment gateways that you can integrate with your online store. Keep in mind that the availability of specific gateways can vary based on your location and the Shopify plan you’re using. Here are some of the popular payment gateways that can be added to your Shopify store:
- Shopify Payments (available in selected countries): This is Shopify’s own payment gateway. It offers seamless integration, and if available in your country, it can simplify the setup process.
- PayPal: PayPal is widely used for online transactions. You can integrate both PayPal Express Checkout and PayPal Payments Standard with your Shopify store.
- Stripe: Stripe is a versatile payment gateway that supports credit card transactions and other payment methods. It’s available in many countries and offers a robust developer-friendly platform.
- Authorize.Net: Authorize.Net is a popular payment gateway that supports credit card transactions and provides additional security features.
- 2Checkout: 2Checkout (now rebranded as Verifone) supports online payments and offers multiple payment methods, including credit/debit cards and digital wallets.
- Amazon Pay: Amazon Pay enables customers to use their Amazon accounts to make payments on your store, which can enhance the checkout experience.
- Klarna: Klarna offers “Buy Now, Pay Later” options and flexible financing solutions, which can be appealing to customers.
- Apple Pay: If you cater to Apple users, integrating Apple Pay allows them to make quick payments using their Apple devices.
- Google Pay: Similar to Apple Pay, Google Pay allows customers to make payments using their Google accounts and devices.
- Square: Square offers both online and in-person payment solutions. It’s known for its simplicity and ease of use.
- Worldpay: Worldpay is a global payment gateway that supports a variety of payment methods and currencies.
- Adyen: Adyen is a full-stack payment platform that provides global coverage and supports various payment methods.
- Skrill: Skrill offers a range of payment options, including credit cards and digital wallets, for customers worldwide.
Want to use several payment platforms but don’t fancy juggling multiple apps? Synder’s got you covered! Check out the list of available integrations.
Adding a payment gateway to your Shopify store
Adding a payment gateway to your Shopify store is a crucial step in enabling your customers to make purchases online. Here’s how to do that:
Go to the Shopify admin → Settings → Payments → Payment Gateway.
Once you’ve chosen a payment gateway, click on it to enable it for your store.
Depending on the payment gateway you choose, you’ll need to provide specific information. This may include your business details, bank account information, and any credentials associated with the payment gateway.
After that, you’ll be required to configure the settings related to the payment gateway. This might include specifying whether customers can pay with credit/debit cards, digital wallets, or other methods supported by the gateway.
Keep in mind that most payment gateways have a test mode that allows you to simulate transactions without real money being involved. This is an important step to ensure that the integration is working correctly to catch any potential issues.
Depending on the gateway and your Shopify plan, you might be able to customize the checkout and payment confirmation pages to match your store’s branding. This can enhance the customer experience.
Before making your payment gateway live, double-check all the settings and information you’ve entered. Once you’re satisfied that everything is accurate, you can save the changes and make the payment gateway active on your store.
After your payment gateway is live, regularly monitor your transactions to ensure they are being processed correctly. Address any issues that arise promptly.
📌 Note: It’s always a good idea to refer to Shopify’s official documentation or support resources for the most up-to-date and accurate instructions tailored to your situation.
✔️ How to add tax to Shopify?
👉 You can customize your Shopify sales tax by setting up tax-specific rules.
Taxes aren’t always fun to deal with, right? But they’re an integral part of life and especially small business. As a Shopify ecommerce store owner, you’ll need to set up tax rules for your store. Depending on the country in which your business operates, you may need to set up more than one tax rule for your products.
Using Shopify’s admin tools, you can easily customize the Shopify sales tax. Begin by heading over to Shopify admin → Settings → Taxes. There, you’ll see an option to edit the tax settings for every possible territory belonging to your country (regional taxes) or state (provincial taxes).
If you want customers located in one territory or state to pay different rates than customers in other territories or states, simply change the settings for each territory or state accordingly.
If you’re already collecting taxes in a particular region, you can manage your Shopify sales tax. All you need to do is click the button Manage.
✔️ Do I need accountant for Shopify?
👉 No, you don’t necessarily need one but it can be tremendously helpful to have one.
Deciding if you need an accountant for your Shopify store depends on a few things. Think about how complicated your sales and expenses are, what you know about taxes and bookkeeping, and how big your business is.
If you’re just starting out and things are pretty simple, you might be okay handling things on your own, especially if you’re good with numbers or willing to learn some basic accounting software. However, if you’re dealing with lots of different products, selling to people in other countries, or just feeling overwhelmed by the paperwork, an accountant could really help you out.
An accountant does more than just crunch numbers; they can give you advice on how to save money, help you understand how well your business is doing, and make sure you’re following all the tax rules.
As your business grows, keeping up with all the financial stuff gets tougher. If you find that you’re spending too much time trying to figure out your finances instead of focusing on making your business better, it might be time to hire an accountant. They can take care of the complicated stuff so you can focus on what you do best: running your shop.
✔️ How to set up product shipping on Shopify?
Managing shipping from your Shopify ecommerce store can be a hassle. You have to take into account the cost, time, and packaging itself. Being a Shopify small business owner means you can’t overlook this important aspect. However, it can be hard to know where to begin.
You can check and manage all the settings by going to Shopify admin → Settings → Shipping and delivery.
Shopify Shipping is Shopify’s integrated service that helps you run your delivery without any troubles. It allows you to set up tariffs and offers discounts or credits depending on the customer type. You can also integrate Shopify shipping with third-party carriers for even more options.
Here you can check the list of shipping carriers with which Shopify Shipping works.
How to dropship on Shopify
Dropshipping is a popular business model that allows you to sell products to customers without holding any inventory. Instead, when you make a sale, the products are shipped directly from a supplier to the customer. Shopify is a platform commonly used for setting up dropshipping stores due to its user-friendly interface and various integrations that support this model.
After you select your niche, create your Shopify account, and set up your ecommerce store, you need to carefully research potential suppliers. Look for reliable suppliers who offer dropshipping services. Some popular platforms for finding suppliers include AliExpress, Oberlo (integrated with Shopify), SaleHoo, and Spocket. Ensure that the suppliers have a good reputation and offer quality products.
Then, install dropshipping apps.If you’re using Oberlo, Spocket, or any other dropshipping app, install it from the Shopify App Store. These apps help you import products from your chosen suppliers and manage inventory.
Use the dropshipping app to import products from your chosen suppliers. You can typically import product images, descriptions, and pricing with just a few clicks.
Don’t forget about providing excellent customer service. Address inquiries, concerns, and issues promptly. Good customer service is crucial for building trust and retaining customers.
✔️ How to optimize customer service in a Shopify store?
👉 It’s important to have strategies in place beforehand to ensure that customers are getting the help they need from you before they buy.
Just like with any other ecommerce store, selling on Shopify can be challenging. Your success depends on your ability to provide your customers with the best possible experience from the moment they land on your Shopify store until they make a purchase.
One of the most important parts of this process is providing the customers with accurate customer service. It helps you build trust and a good first impression with your customers and it ensures their satisfaction with your products on your Shopify store.
Not only does it help create a positive customer experience, but it also helps you learn how customers use your Shopify store and what needs they have. That way, you can fix issues and improve the layout to make it more user-friendly and efficient for your customers.
✔️ How to add apps to a Shopify store?
👉 You can find whatever app you want on the Shopify marketplace. It’ll help you with the work A LOT.
Do you want to increase your Shopify store sales? Then you need to learn how to use the right apps. There are a variety of apps like product bundles app that can help you make your ecommerce store more efficient: from boosting your social media presence to improving customer service. With the right mix of apps, you can take your ecommerce business to the next level.
Your path on this step will be Shopify admin → Apps. Here, you can customize your Shopify store as you like trying out different apps. Whether you need inventory management or customer alerts, Shopify has an app for that.
If you’re looking for some inspiration on great Shopify apps ideas, we also have a list of our favorite apps that help improve your Shopify store.
✔️ Do you need to run a Shopify marketing campaign?
👉 Of course! A simple answer to a simple question, that’s it.
Marketing your ecommerce store is the process of getting your products or services in front of potential customers. Marketing can be done through advertising, publicity, and various other methods. The goal of marketing is to create awareness for your business so that people continue to buy your products or services.
Shopify small business owners often struggle with tight deadlines and budget when starting a Shopify store. The marketing strategies they can implement are usually very limited. One way to get the word out about your Shopify store is through your social media channels.
With the right Shopify marketing campaign, you can increase your visibility and take your small business to the next level. You’re now in charge of promoting your brand and ensuring that it stands out from the crowd.
Final thoughts
Shopify is a perfect solution for any entrepreneur looking to get their small business up and running quickly. If you’re trying to start your business from scratch or if you want a new challenge, then starting a Shopify store can be a great idea. It’s easy and doesn’t require any experience in the world of ecommerce or website building.
Shopify’s inbuilt features can help create an attractive and efficient Shopify store. It also simplifies the process of building an online business and provides you with all the tools needed to get started.
Let us know if this kind of Shopify tutorial was helpful to you! Also read our guide about Shopify and QuickBooks Online integration.