
Importing Shopify sales into QuickBooks Online means connecting your store’s transactions, including sales, fees, refunds, and taxes, with your accounting software so the numbers stay accurate without manual copying. If you’re a Shopify seller or an accountant managing ecommerce finances, getting this right is the difference between chasing discrepancies every month-end and actually trusting your P&L.
The opportunity is significant: McKinsey research found that currently available technologies can fully automate 42% of finance activities and mostly automate a further 19%, yet many ecommerce businesses are still reconciling Shopify data by hand. This guide covers every method for getting Shopify data into QuickBooks Online: from manual CSV import to full automation, so you can choose the right fit for your volume and set up reconciliation that actually holds.
TL;DR
- Manual CSV import is simple but doesn’t scale: Works for very early-stage stores, but becomes error-prone fast as order volume grows.
- The native Shopify Connector by QuickBooks is free and syncs individual orders: Straightforward to set up, but it doesn’t fully automate payout reconciliation or handle multi-gateway fees.
- Third-party automation tools handle fees, taxes, and payouts together: They match Shopify payouts to bank deposits and categorize everything automatically.
- Reconciliation is the step most sellers overlook: Getting data into QuickBooks is only half the job, matching payouts to bank deposits is where errors hide.
- Synder automates both sync and reconciliation end-to-end: It connects Shopify and QuickBooks Online, categorizes transactions in real time, and handles multiple payment gateways in one workflow.
Why Shopify data doesn’t flow into QuickBooks on its own
Most Shopify merchants assume their accounting is in reasonable shape because gross revenue shows up in the dashboard. But importing Shopify data to QuickBooks needs something more specific:
- Net payouts broken into product sales
- Shopify fees, shipping income
- Sales tax and refunds
These numbers don’t match the dashboard total, which is bound to create room for accounting errors.
The challenge gets bigger with multiple payment gateways. Shopify Payments, PayPal, and other third-party processors each batch payouts on different schedules and report data in different formats. Reconciling those manually means cross-referencing multiple payout reports against one bank statement every month.
Three ways to import Shopify sales to QuickBooks Online
There’s no single correct method. Everything depends on your transaction volume, how much detail you need in QuickBooks, and whether you want automated reconciliation.
| Method | Best for | Reconciliation | Cost |
| Manual CSV import | New / very low-volume stores | Manual | Free |
| Shopify Connector by QuickBooks | Low-to-medium volume | Partial | Free |
| Third-party automation | Growing or multi-channel stores | Automated | Paid |
Manual CSV import
This method means exporting an order report from Shopify Analytics, formatting it to match QuickBooks fields, and entering it as a journal entry. It’s free, but fee calculations are on you, and one mapping error can distort your entire P&L. It works for a handful of orders per week, and most sellers outgrow it quickly.
Shopify Connector by QuickBooks
Shopify Connector is a native app in the QuickBooks App Store. To set it up:
- Open QuickBooks Online.
- Go to the Apps menu, search for Shopify Connector by QuickBooks.
- Authorize the connection, and configure your account mapping.
Each Shopify order becomes a separate QuickBooks transaction, which is useful for detailed reporting, but it can create thousands of entries that make month-end reconciliation cumbersome and doesn’t automatically break out Shopify Payments fees.
Third-party automation tools
Such automation tools pull each payout from Shopify, break it into sales, fees, refunds, and taxes, and post either per-transaction records or a clean summary to QuickBooks. That entry matches the actual bank deposit, which is what makes reconciliation fast and reliable.
Companies using third-party automation with Shopify and QuickBooks can save a lot of time on reconciliation, cut bookkeeper costs, and achieve a high reconciliation accuracy across all sales channels.
How to set up automated Shopify-to-QuickBooks sync
For businesses past the very early stage, automation is the approach that scales. Synder is an accounting automation tool that syncs ecommerce and payment data from Shopify and 30 other platforms directly into QuickBooks Online, handling multi-gateway stores, automatic fee categorization, and real-time reconciliation in one place.
Here’s how the connection works, step by step:
Step 1: Create an account.
Create a free Synder trial account and connect your accounting system first. You’ll be guided through setting up an Organization for your QuickBooks Online company.
Step 2: Provide your business details.
Fill in the information about your business in the setup flow and hit Next step.

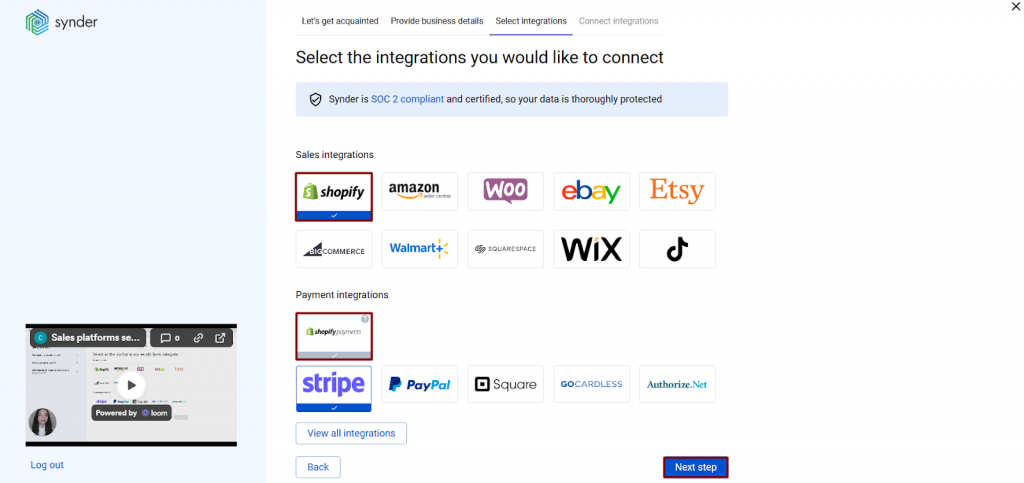
Step 3: Select the platforms you’d like to integrate.
Click View all integrations to see all available platforms and select all the services you use to receive payments. You can connect them all right away or skip some and add them later, but connecting every payment source upfront ensures Synder can recognize and sync every transaction.
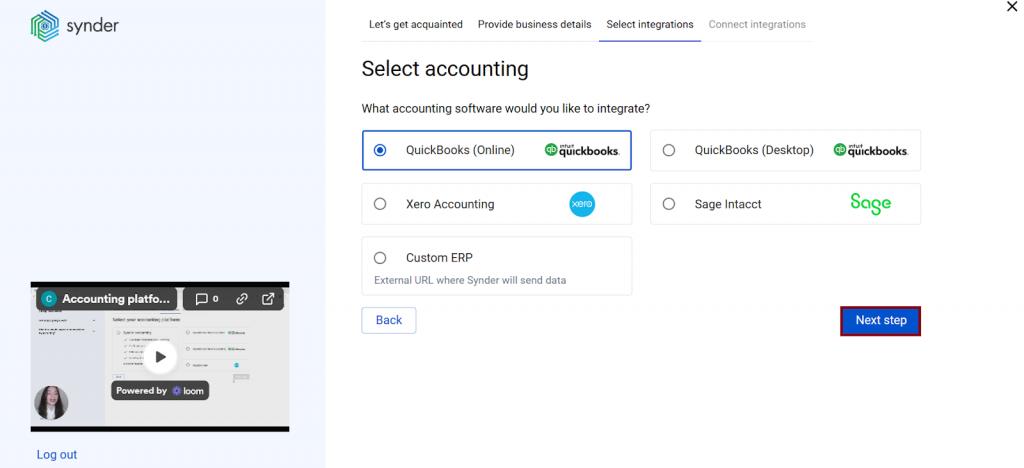
Step 4: Connect your accounting platform.
Select your QuickBooks Online company and click Connect.
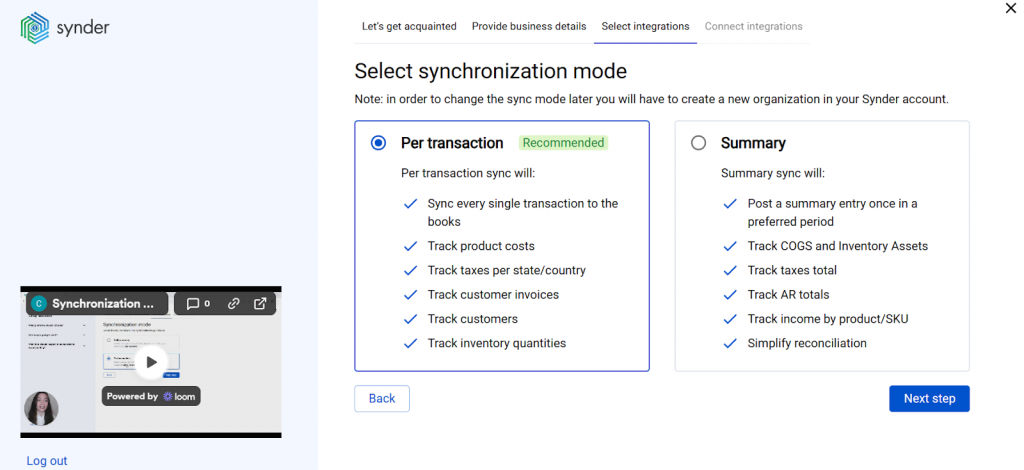
You’ll be prompted to select your sync mode: Per Transaction (each sale recorded individually with full customer and product detail) or Summary Sync (one aggregated journal entry per platform per day, month, custom period, or payout) – better suited for high-volume stores.
Step 5: Connect your Shopify store.
Open a separate browser tab and log in to the Shopify store you want to connect. If you have admin rights, click Connect in Synder. You’ll be redirected to Shopify’s installation page. Click Install app to link Synder to your store.

Step 6: Set up the Shopify integration. Choose the account for payouts (typically your Checking account) to enable smooth one-click reconciliation of your Shopify transactions. Hit Continue to finish the configuration.

Once live, Synder syncs continuously with sales, fees, and refunds posted to QuickBooks automatically in the background.
Reconciling Shopify payouts in QuickBooks after the import
Syncing data into QuickBooks is the first half of the job. The second half is reconciling the Shopify clearing account. Here’s how the flow actually works with Synder.
Synder routes all Shopify activity through a dedicated Shopify clearing account in QuickBooks. Every sale, fee, and refund posts there first. When Shopify Payments sends a payout, Synder records a transfer from the clearing account to your Checking account. As a result, the clearing account balance zeroes out, and the deposit matches your bank feed exactly.
Want help setting up clean reconciliation for your Shopify store? Book a Synder demo and walk through the workflow for your specific setup.
How Shopify clearing account reconciliation works
- Record every Shopify sale, fee, and refund to the Shopify clearing account.
- Capture Shopify Payments payouts as transfers to your Checking account.
- Zero out the clearing account once payouts are received and recorded.
How to verify your Shopify reconciliation
To confirm that reconciliation is correct, compare these two numbers:
- Shopify Payments total from Shopify’s Finance Summary report
(Analytics → Reports → Finance Summary, filtered to your reconciliation period) - Shopify clearing account balance in QuickBooks
If you accept additional payment methods (for example, Afterpay) alongside Shopify Payments, include those amounts in the total. When both figures match, your Shopify clearing account is fully reconciled.
Common Shopify-to-QuickBooks issues and how to fix them
Even with a solid setup, a few problems come up consistently when syncing Shopify to QuickBooks Online.
1. Payout doesn’t match the bank deposit – almost always a gateway separation or timing issue.
What to do: Give each processor: Shopify Payments, PayPal, Stripe, its own clearing account in QuickBooks, and verify that your integration tool’s time zone matches Shopify’s to avoid day-boundary discrepancies. With Synder, each payment gateway gets a dedicated clearing account by design, and the organization time zone setting in Synder can be matched to Shopify’s to prevent any date-boundary gaps.
2. Sales tax appears incorrectly or is missing – QuickBooks Online US doesn’t support tax codes in journal entries, and tax needs to post directly to a Sales Tax Payable liability account.
What to do: For multi-state sellers, create state-specific payable accounts and map by shipping address region. Synder handles this through its Group by region setting in the mapping tab, which automatically splits tax liability by state based on the shipping address in each transaction.
3. Duplicate transactions – typically caused by two integrations running simultaneously, or a historical import overlapping with live auto-sync.
What to do: Synder has a built-in duplicate detection feature that automatically identifies transactions already synced to QuickBooks and prevents them from being posted again, so in most cases, this issue is avoided entirely. If duplicates do appear, use Synder’s rollback feature to undo the duplicate syncs cleanly. It removes the transactions from QuickBooks without touching the original data in Shopify, so you can re-sync from a clean slate.
4. The sync stalls when authorizing your Shopify account – usually an OAuth token expiry
What to do: Re-authenticating the connection in your integration settings resolves it. If a historical import fails, check whether the date range exceeds your plan’s history limit.
Importing Shopify sales to QuickBooks: the bottom line
Getting Shopify sales into QuickBooks reliably requires choosing the right sync method for your volume, mapping accounts so fees and taxes land in the right places, and setting up a reconciliation flow that matches every Shopify payout to your bank statement. Manual CSV works at the very start, the native Shopify Connector handles simple per-order tracking, and automation tools cover the full picture: fees, taxes, multi-gateway payouts, and bank reconciliation in one continuous workflow.
When everything flows cleanly, you get financial statements you can actually trust: faster month-end closes, cleaner tax filings, and the ability to make real business decisions without first spending hours verifying your numbers.
FAQ
How do I enter Shopify sales into QuickBooks Online?
You can enter Shopify sales manually via CSV export, through the free Shopify Connector by QuickBooks (available in the QuickBooks App Store), or with an automation tool like Synder that syncs sales, fees, and taxes automatically. The right method depends on your transaction volume and reconciliation needs.
How do I integrate Shopify with QuickBooks?
Open QuickBooks Online, go to Apps, and search for Shopify Connector by QuickBooks. Authorize the connection, choose how far back to pull data, and configure your account mapping. For multi-gateway stores or automated payout reconciliation, a third-party tool like Synder provides deeper functionality than the native connector alone.
How do you match imported Shopify sales to payouts received in the bank?
Shopify pays in batches, not per order, so individual sales never directly match your bank deposit. Route all Shopify activity through a clearing account in QuickBooks. When the payout arrives, it transfers from the clearing account to your checking account, matching the bank feed entry and zeroing out the clearing balance.
Can you link Shopify directly to Intuit (QuickBooks)?
Yes, Intuit’s native Shopify Connector is available free in the QuickBooks App Store. For more advanced needs like multi-gateway fee categorization, per-transaction detail, or automated reconciliation, third-party automation tools offer significantly more control over how data is recorded.
Can I import a CSV file from Shopify into QuickBooks?
Yes. Export an order report from Shopify Analytics and import or manually enter it into QuickBooks. This gives you full control but requires you to calculate Shopify fees separately and map each field correctly. It’s practical only for very low-volume stores. As order count grows, the time cost and error risk make it difficult to sustain.