
- What is the Colorado Retail Delivery Fee?
- How Synder handles the Colorado Retail Delivery Fee
- Identify which scenario applies
- Case A: Fee remitted by the marketplace
- Case B: Fee NOT remitted by the marketplace
- Conclusion
This article explains how Synder records the Colorado Retail Delivery Fee in your accounting software. Specifically, you will learn what determines how the fee appears in your books and how to adjust it if needed.
The guide covers both scenarios: when the marketplace remits the fee and when it does not. However, it does not explain how to file or pay the fee manually outside of Synder.
Use this article if:
- You sell and ship goods to customers in Colorado.
- You notice Retail Delivery Fee or Retail Delivery Fee Withheld in your synced transactions.
- You want to understand why Synder posts the fee to different accounts.
- You need to change how the fee appears in your books.
After reading this, you will:
- Understand why this fee shows up as a separate line item in your transactions.
- Know whether Synder treats it as income or as a withheld amount.
- Know how to adjust the account Synder uses for reporting.
What is the Colorado Retail Delivery Fee?
On July 1, 2022, Colorado introduced a retail delivery fee of $0.27 on all deliveries by motor vehicle to a location in Colorado. Importantly, this fee applies whenever the delivery includes at least one item of tangible personal property subject to state sales or use tax.
The retailer or marketplace facilitator that collects sales or use tax on the goods must also collect and remit this fee. As a result, this applies even when a third-party carrier handles the delivery.
In other words, the Colorado Retail Delivery Fee works like a tax. However, unlike most sales taxes, it uses a fixed amount rather than a percentage. Therefore, Colorado charges $0.27 on every qualifying order shipped to the state, regardless of the order total.
How Synder handles the Colorado Retail Delivery Fee
Because the Colorado Retail Delivery Fee uses a fixed amount of $0.27 per delivery, accounting systems cannot process it as a standard sales tax line. Consequently, Synder handles this fee differently from regular taxes.
When Synder detects this fee in a transaction, it creates a separate non-taxable line item. How this line item appears in your books depends on how the marketplace handled the fee.
Identify which scenario applies
There are two possible scenarios. The key difference depends on whether the marketplace collects and remits the fee on your behalf.
Case A: Fee remitted by the marketplace
In this case, you will see an item named Retail Delivery Fee Withheld in the synced transaction.
What happens:
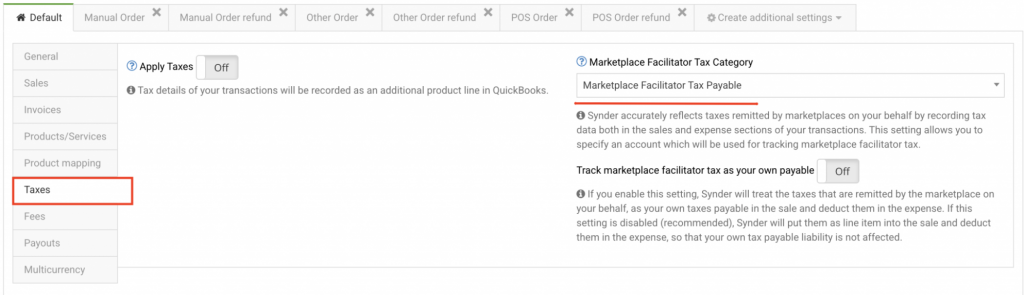
- Synder posts the fee to the Marketplace Facilitator Tax account (which you configure in your Taxes settings).
- Additionally, Synder creates an offsetting expense entry to balance the transaction.
Result:
- No liability remains in your books for this fee.
- Synder treats it similarly to other marketplace-remitted taxes.
Case B: Fee NOT remitted by the marketplace
In this case, you will see an item simply named Retail Delivery Fee (without “Withheld”).
What happens:
- Synder posts the fee to the income or assigned account from your Products and Services settings.
- Because the marketplace did not withhold the fee, Synder does not create an offsetting entry.
Result:
- The fee stays in your books as a liability you must remit yourself.
- For more accurate reporting, you may want to recategorize this to a liability account.
Conclusion
To summarize, how the Colorado Retail Delivery Fee appears in your books depends on whether the marketplace remits it on your behalf:
- If the marketplace remits the fee, Synder records it as withheld and offsets it automatically. As a result, no liability remains in your books.
- If the marketplace does not remit the fee, Synder records it as a regular line item. Therefore, you remain responsible for paying it.
If you need to change the account where Synder posts this fee, you can adjust it in your settings under Products and Services or Taxes, depending on which scenario applies to you.
Reach out to the Synder Team via online support chat or email with any questions — we are always happy to help!