

- How Reconciliation Works
- How to reconcile Stripe transactions (Automated)
- How to reconcile PayPal transactions (Assisted)
- How to reconcile other integrations (Manual)
- Balance reconciliation
- Understanding your results
- How Synder matches transactions
- Managing your reconciliations
- Limitations & Important Notes
Synder’s Transaction Reconciliation tool helps Summary Sync users verify that the transaction-level data Synder stores matches their payment platform records before summaries sync to the books.
Use this guide if:
- You use Summary Sync and want to validate data before syncing
- You want to catch missing, mismatched, or failed transactions before summaries are created
- You want to confirm that the data inside Synder is complete enough to build accurate summaries
Don’t Use If:
- Using Per-Transaction Sync (use this guide instead)
- You need to reconcile your books, profit and loss, or bank statements inside the accounting platform
Why this matters: Summary Sync creates journal entries in your books from the individual transactions fetched from your platforms. Because the accounting platform does not store those individual transactions one by one, Synder instead compares your payment platform data to its internal transaction-level records.
How Reconciliation Works
Transaction Reconciliation compares:
- Payment platform data
- Synder’s transaction-level source data (used for summaries)
Important:
- This workflow validates transactions before they appear on your ledger. In Per Transaction Sync, users usually compare platform records against the transaction-level entries Synder already synced to accounting. However, in Summary Sync, that is not the main use case, because once Synder groups transactions into summary lines, the books no longer keep a clean transaction-by-transaction trail.
- Sync status does not change the reconciliation result. The comparison checks whether the payment platform data matches the transaction-level source data Synder holds. As a result, the answer stays the same whether Synder has already synced the related summary or not.
- The main goal is to detect data gaps before sync. If transactions are missing, mismatched, or failed at the source-data level, you want to catch that before those transactions are grouped into summaries. That gives you time to investigate before the summary is built or synced.
Why Timing Is Critical
Run Transaction Reconciliation before summaries sync. That way, Synder has already validated the data reaching your books.
Pre-sync validation saves time because it helps you avoid rebuilding summaries later and searching for issues after the sync has already happened.
Prerequisites
Before you start, confirm the following:
- Payment platform connected to Synder
- Summary Sync configured
- Know your validation period
- Ideally, the related summaries have not been synced yet
Supported Platforms
| Platform | Automated | Assisted | Manual |
|---|---|---|---|
| Stripe | ✅ | ✅ | ✅ |
| PayPal | ❌ | ✅ | ✅ |
| Shopify | ✅ | ✅ | ✅ |
| Amazon | ✅ | ✅ | ✅ |
| All other integrations | ❌ | ❌ | ✅ |
How to reconcile Stripe, Shopify and Amazon transactions (Automated)
For Stripe, Synder fully automates the reconciliation. Specifically, it downloads both the Stripe data and your accounting file without any manual steps.
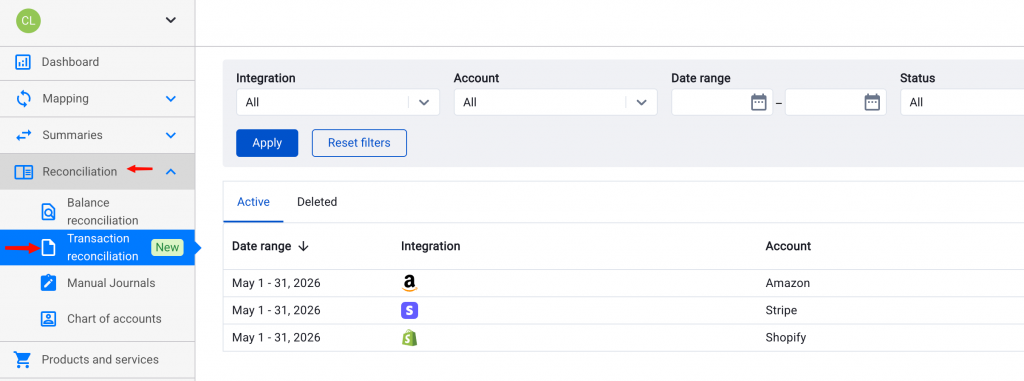
- Go to Reconciliation → Transaction Reconciliation in the left sidebar.
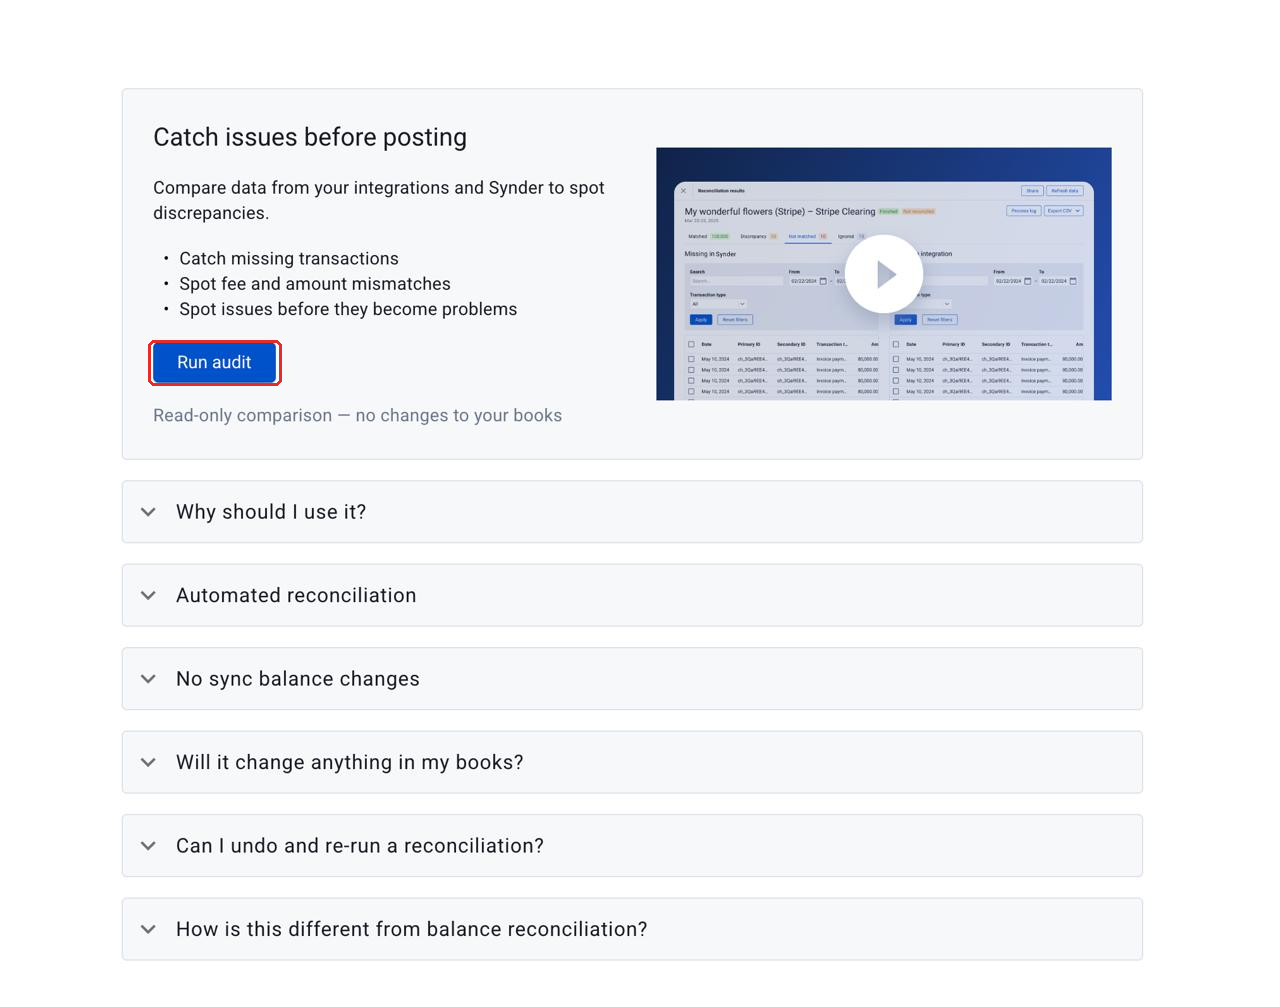
- If this is your first reconciliation, click “Run audit” on the welcome page. Otherwise, click “Run reconciliation” in the top-right corner.
- Next, set the date range for the period you want to reconcile. Note: you cannot select today’s date — the payment platform may not have finalized today’s transactions yet.
- Under Synder, Synder pre-selects your connected accounting platform. Set the Import method to “Automated”.
- Under Integration, select Stripe as the payment platform.
- Select the Account to reconcile for Stripe transactions.
- Set the Integration Import method to ”Automated”.
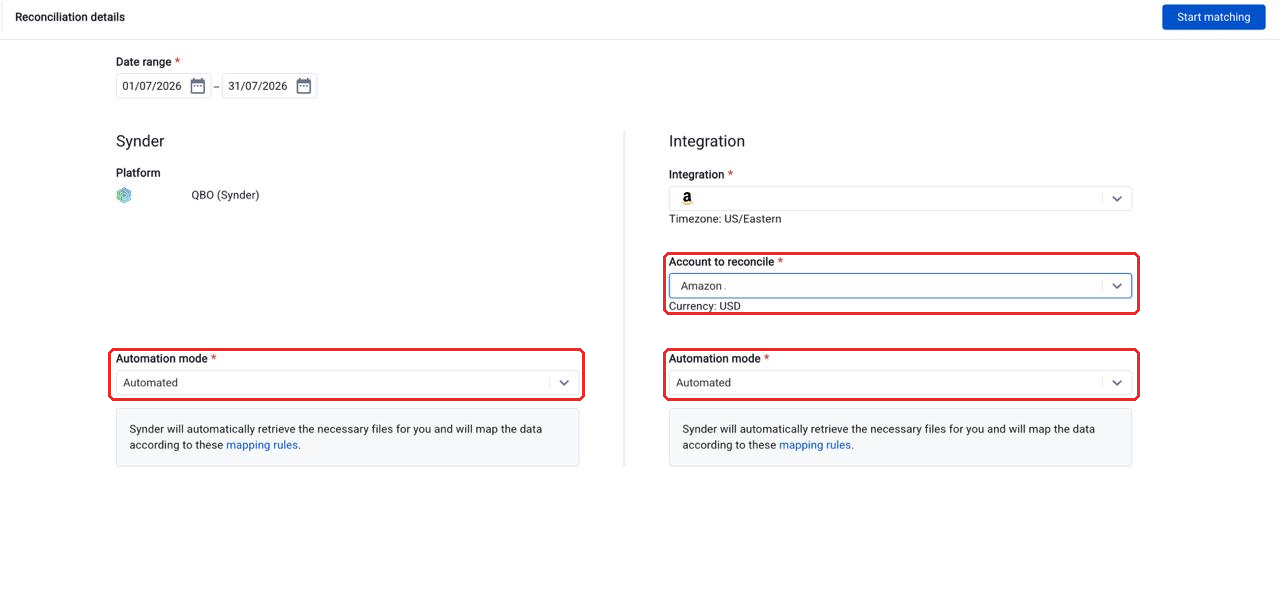
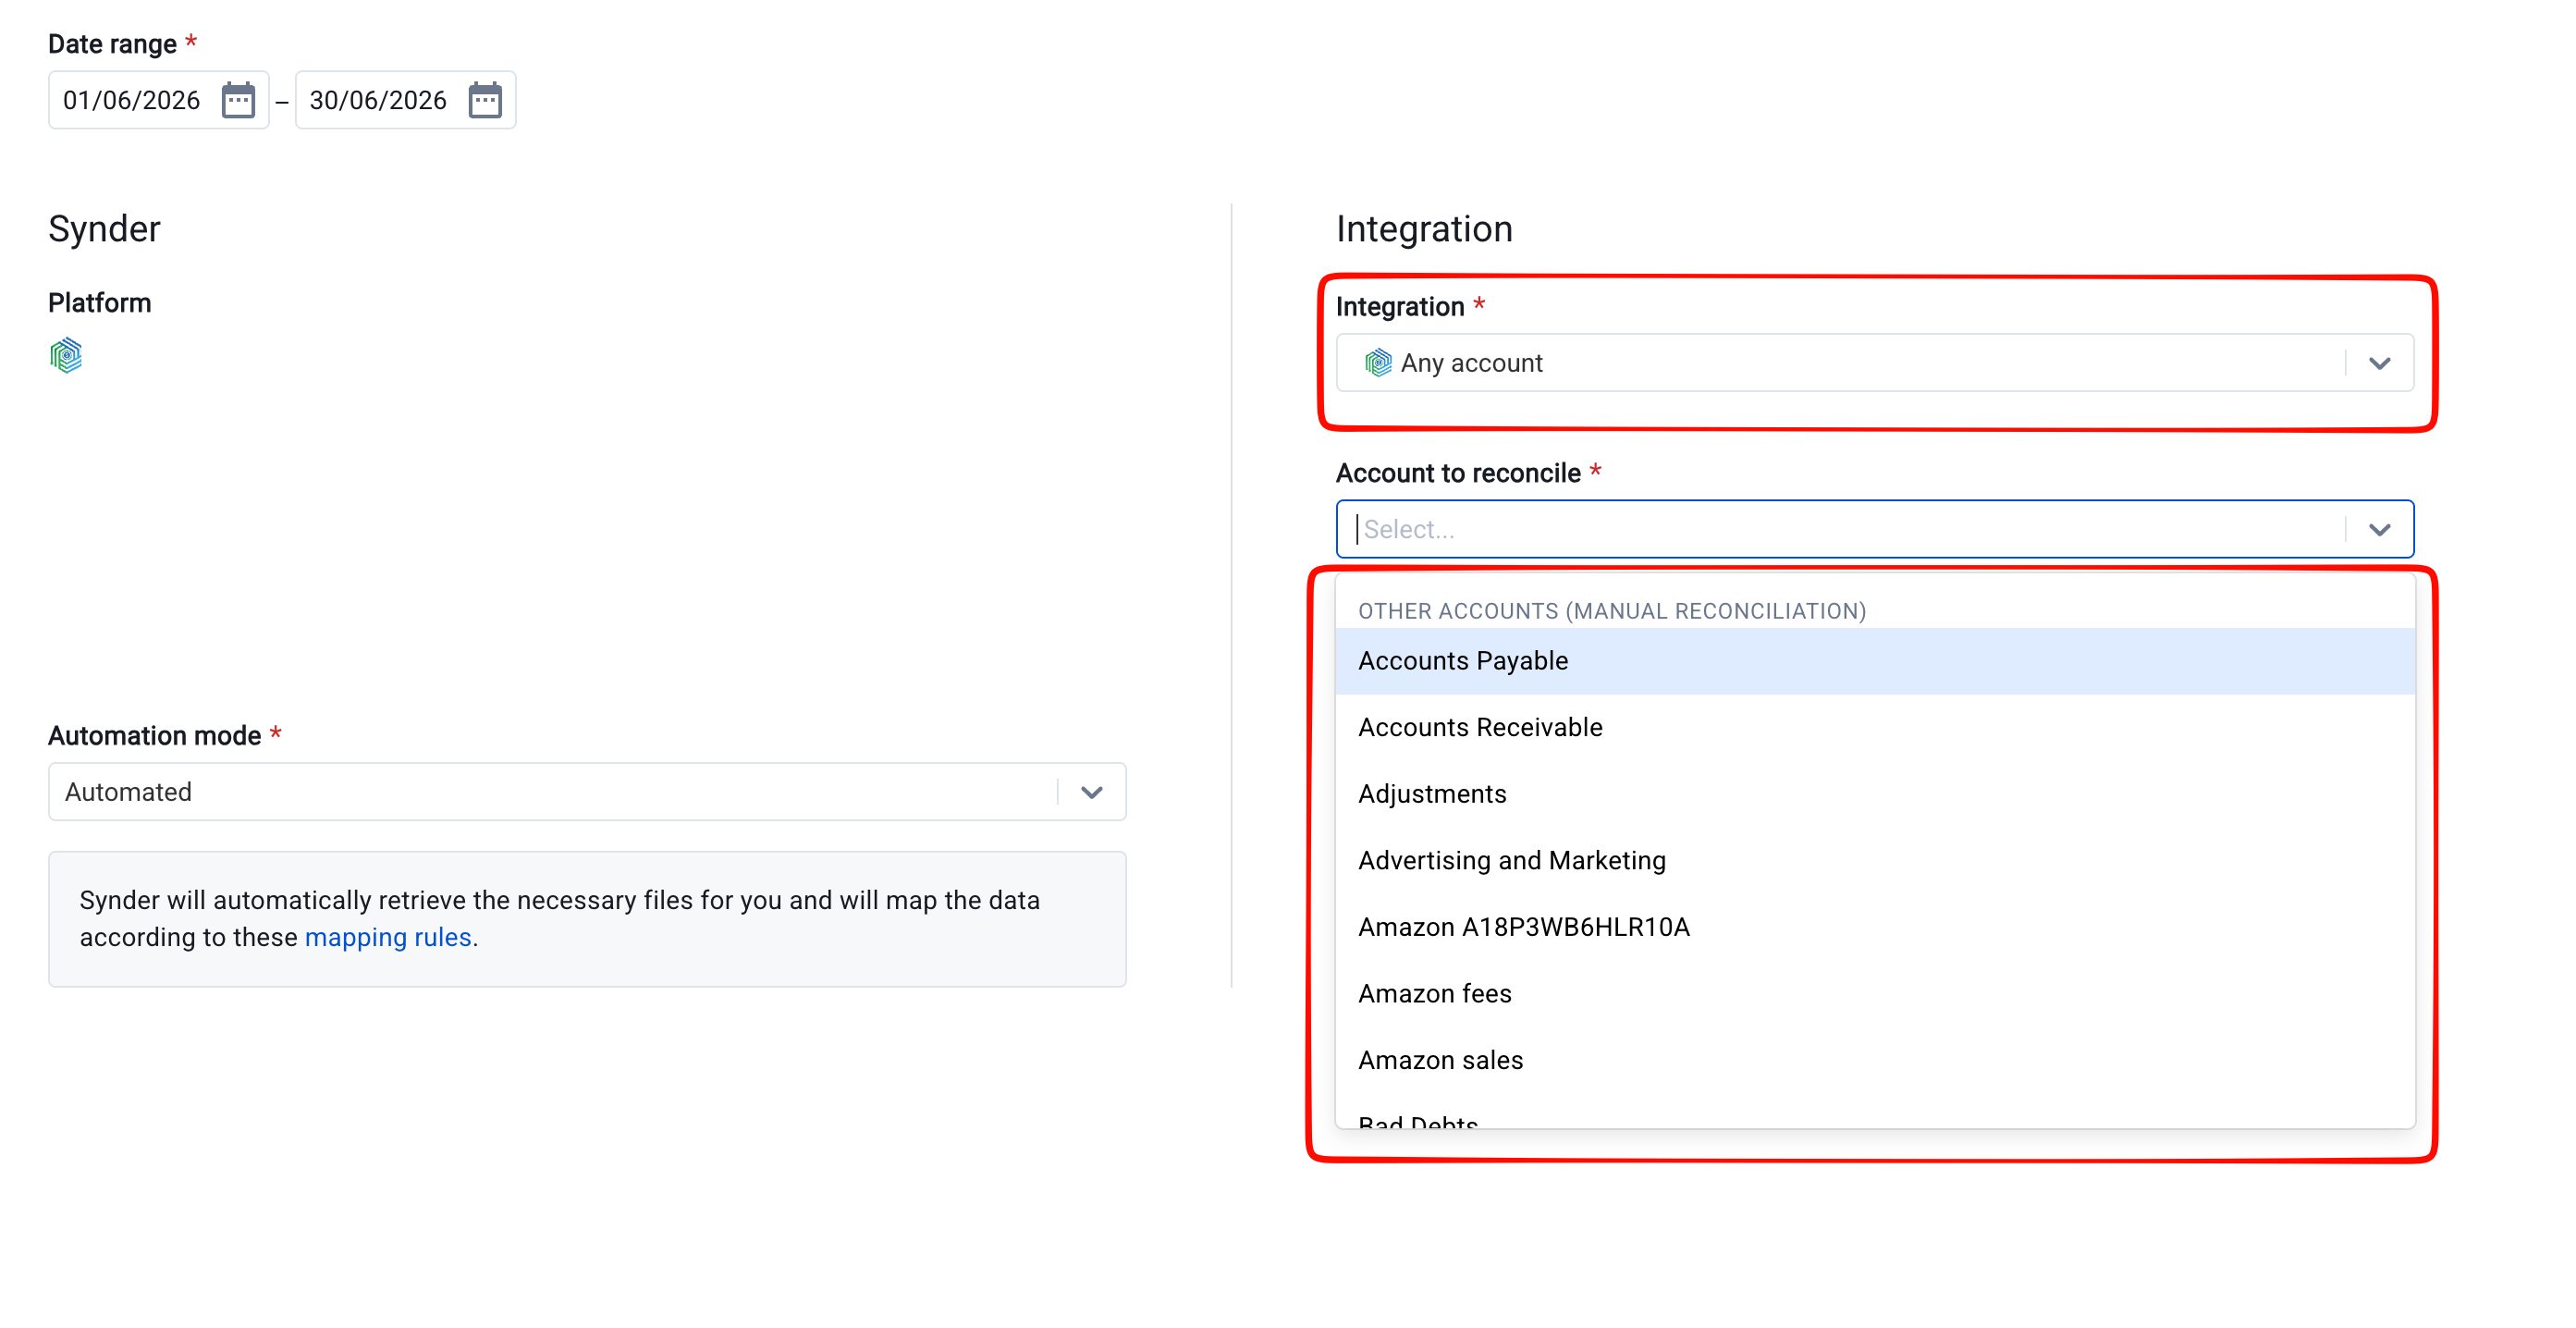
Note: You’ll also see an “Any account” option in the Integration dropdown. This covers accounts that are not associated with a specific integration. To learn how to reconcile these, see the Manual reconciliation section below.
- Finally, click “Start matching” in the top right corner
- Synder downloads the needed reports from your integration automatically. It also pulls your clearing account details from QuickBooks Online. This process may take a few minutes to an hour, depending on transaction volume.
- Once processing is complete, you will see your results. See “Understanding your results” below.
Platform notes:
Amazon — in multicurrency setups, a small number of payouts synced in pre-converted currency may appear as unmatched. This is expected behavior, not an error.
Shopify — reconciliation covers the Shopify Payments clearing account only. This does not include other payment gateways like manual orders or POS with external payment methods. Those order types (POS, Manual, and Other orders) reconcile in Manual mode instead — see How to Reconcile Any Integration Manually.
How to reconcile PayPal transactions (Assisted)
PayPal does not support automatic report downloads, so you need to upload your PayPal report manually. After that, Synder handles everything else.
- Go to Transactions → Transaction Reconciliation in the left sidebar.
- Click “Run reconciliation” (or “Run audit” if this is your first time).
- Set the date range for the period you want to reconcile.
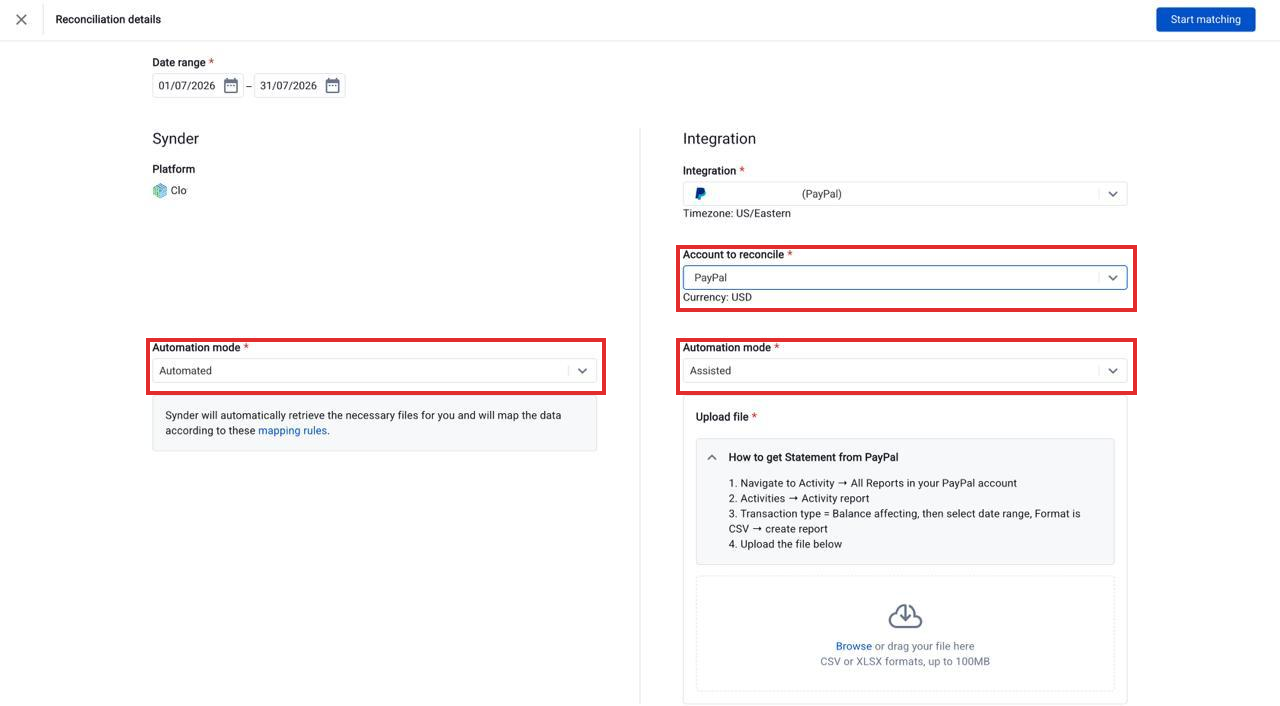
- Under Synder, set the Import method to “Automated” (Synder will pull this file automatically).
- Under Integration, select PayPal.
- Select the Account to reconcile for PayPal transactions.
- Set the Integration Import method to “Assisted”.
- You will see instructions for which report to download. Follow these steps:
- Log in to your PayPal account.
- Navigate to Activity → All Reports.
- Go to Activities → Activity report.
- Set the transaction type to “Balance affecting”.
- Select the date range to match your reconciliation period.
- Set the format to CSV, then click Create report.
- Then, upload the downloaded file to Synder using the file upload area.
- Click “Start matching”.
- Synder then normalizes both files, maps the columns, and runs the comparison automatically.
- Once processing is complete, go ahead and review your results.
How to reconcile other integrations (Manual)
Reconciling a platform that only supports manual mode — Square, WooCommerce, eBay, Etsy, Clover and others? See our full walkthrough: How to Reconcile Any Integration Manually in Synder.
To reconcile an account that is not tied to a specific integration, select “Any account” from the Integration dropdown — it sits at the bottom of the list. This option shows all accounts in your books under Manual mode, with no integration bound. Additionally, Manual mode works for any integration that doesn’t support Automated or Assisted modes. If you have a transaction report in CSV or XLSX format from any payment platform, you can upload it and Synder will run the comparison. This includes platforms like Square, WooCommerce, and HubSpot, as well as any other account you want to reconcile as long as you can export a transaction file from it.
- Go to Transactions → Transaction Reconciliation.
- Click “Run reconciliation”.
- Set the date range.
- Under Synder, set the Import method to “Automated” (or “Manual” if you want to upload your own accounting file too).
- Under Integration, select your payment platform.
- Set the Integration Import method to “Manual”.
- Upload your CSV or XLSX file (up to 100 MB).
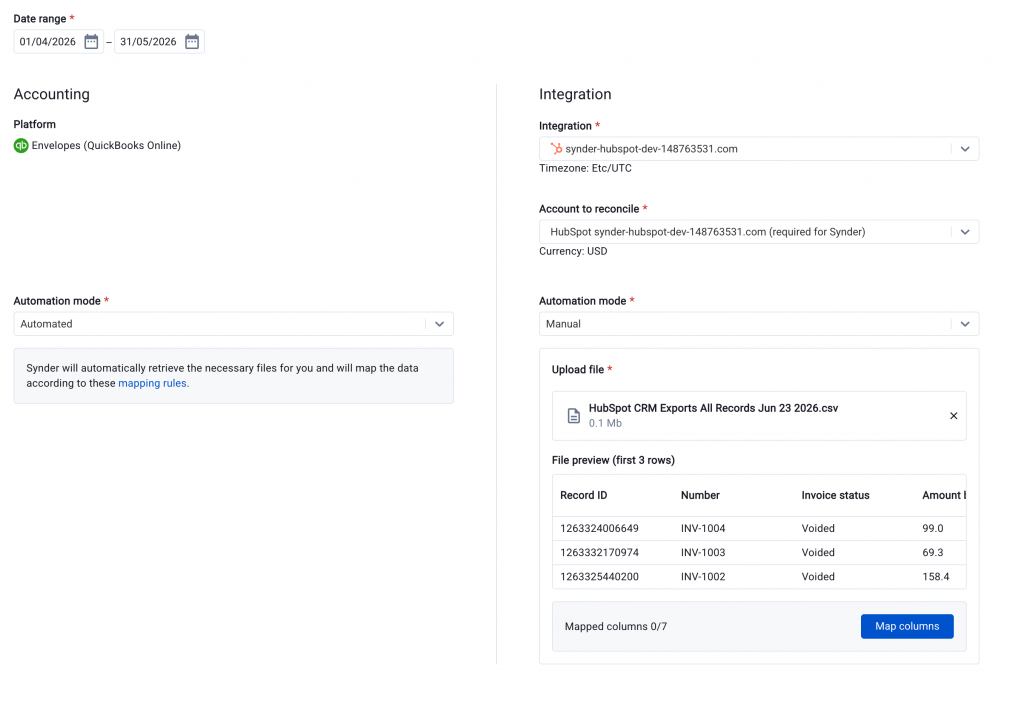
- Click “Map columns”. You will see a list of fields — some are mandatory (Primary ID, Amount, Date) and others are optional (Secondary ID, Transaction type, Description, Currency).
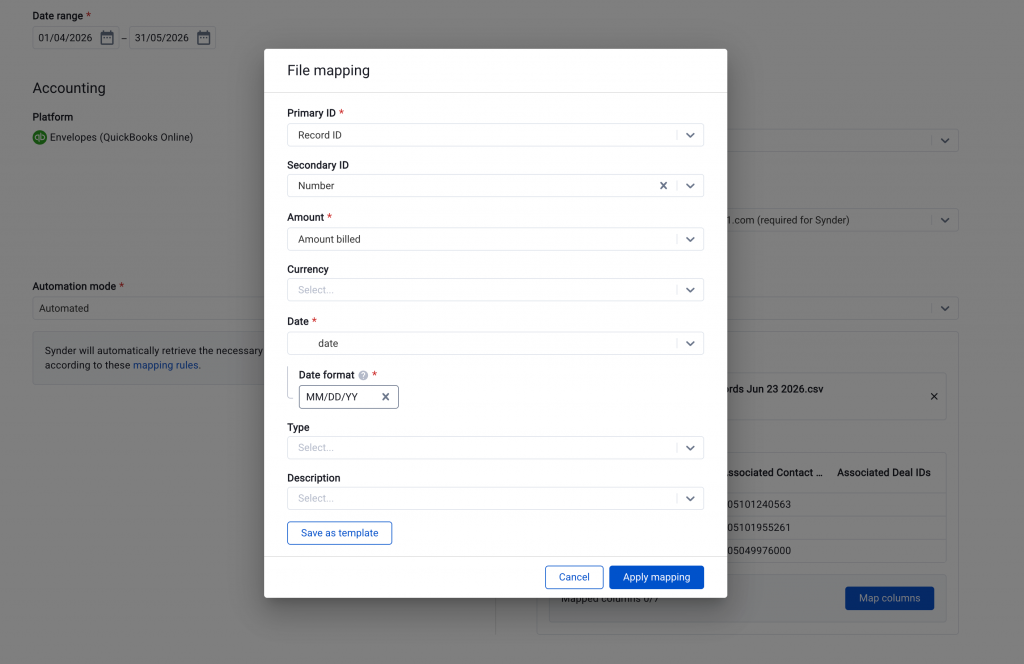
- Map each required field to the corresponding column in your file.
- Optional: Save your mapping as a template so you can reuse it for the same integration in the future.
- Click “Apply mapping”, then “Start matching”.
- Review your results.
Balance reconciliation
Before you dig into the individual results, Synder shows a balance summary at the top of the reconciliation screen. It checks whether your accounting balance moved by the amount your transactions add up to — a quick, one-line health check on the whole period.
It compares the accounting beginning balance, the change from your synced transactions (the calculated ending balance), and the accounting ending balance, and flags any Difference between them. If the Difference is zero, the period is balanced. If it isn’t, Synder points you to the Discrepancy and Missing source tabs to review the transactions behind the gap.
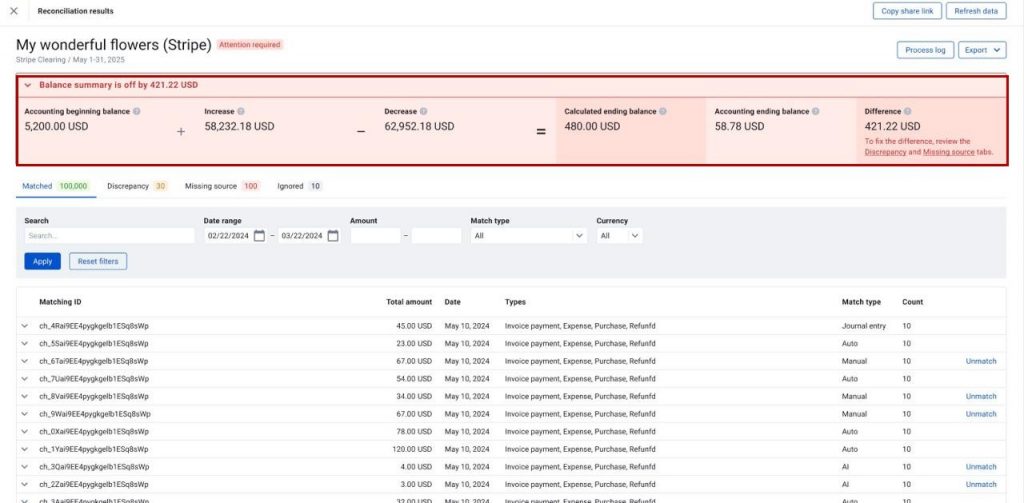
For a full walkthrough of the balance summary — reading the numbers, what a non-zero Difference means, and where the balances come from — see Balance Reconciliation in Transaction Reconciliation.
Understanding your results
After the comparison is complete, Synder organizes your results into four tabs:
Matched
These transactions appear in both sources with matching IDs and amounts. As a result, they are fully reconciled. No action needed.
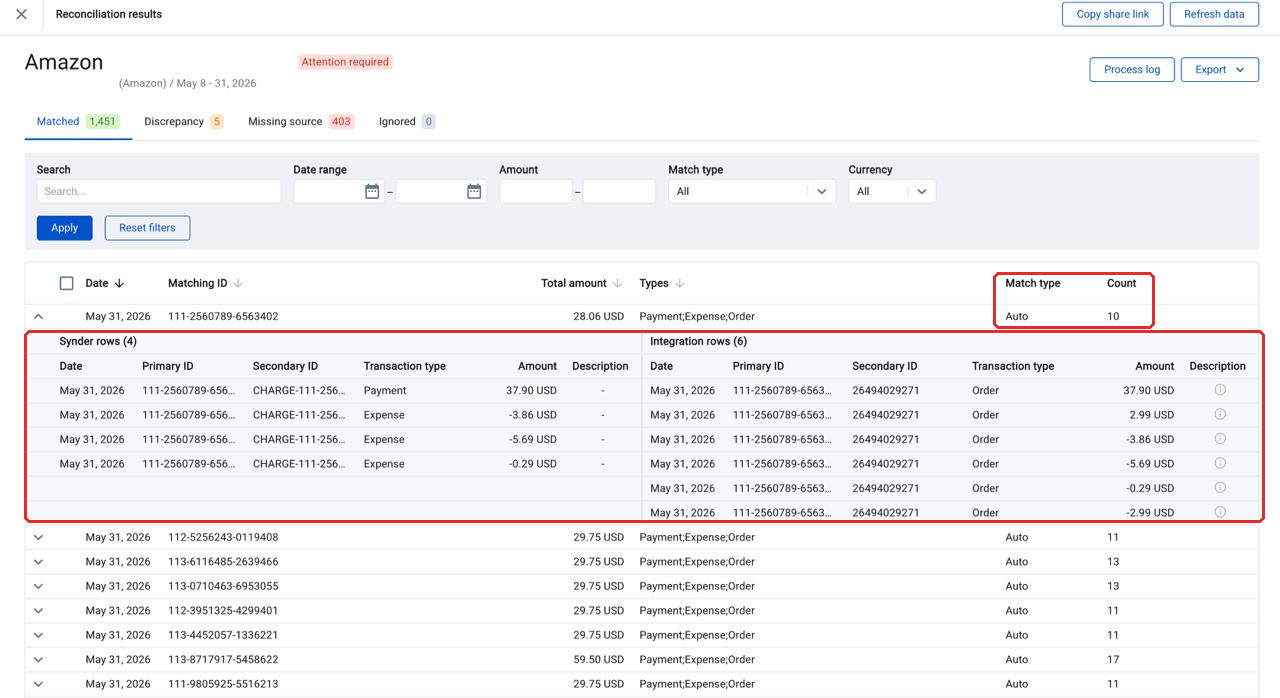
Each row is one match, not one transaction. Matching ID is the identifier Synder matched on, Total amount is the net amount of the match, Types lists the transaction types involved on both sides, Match type shows how the match was made — Auto, Assisted or Manual — and Count is how many rows make up the match, counting both sides together.
Expand any row to see the underlying entries split into Synder rows and Integration rows, each with its Date, Primary ID, Secondary ID, Transaction type and Amount.
The two sides often hold different numbers of rows, and that is normal — each side records the same order in its own way. For example, one Amazon order totalling 28.06 USD is held in Synder as 4 rows: a Payment of 37.90 USD and three Expense rows of -3.86, -5.69 and -0.29 USD. Amazon’s own report holds 6 rows for the same order, including a +2.99 and a -2.99 that cancel each other out. Both sides net to the same 28.06, so the match is correct — and Count reads 10, the two sides added together.
Discrepancy
These transactions matched by ID, but the amounts differ. Therefore, review them to understand the cause. For instance, common reasons include partial payments, currency differences, or fee adjustments.
Missing source
Synder could not find these transactions in the opposite source. Therefore, the tab splits into two sections:
- Missing in Synder — transactions that exist in the payment platform but are not in Synder’s transaction-level data. For example, the import may have skipped them, a filter may have excluded them, or they may fall outside your import date range. These matter most: if a transaction is not in Synder’s data, it will not be included in a summary.
- Missing in integration — transactions in Synder’s data that were not found in the payment platform report.
Additionally, each section has its own search, date range, amount and currency filters to help you investigate.
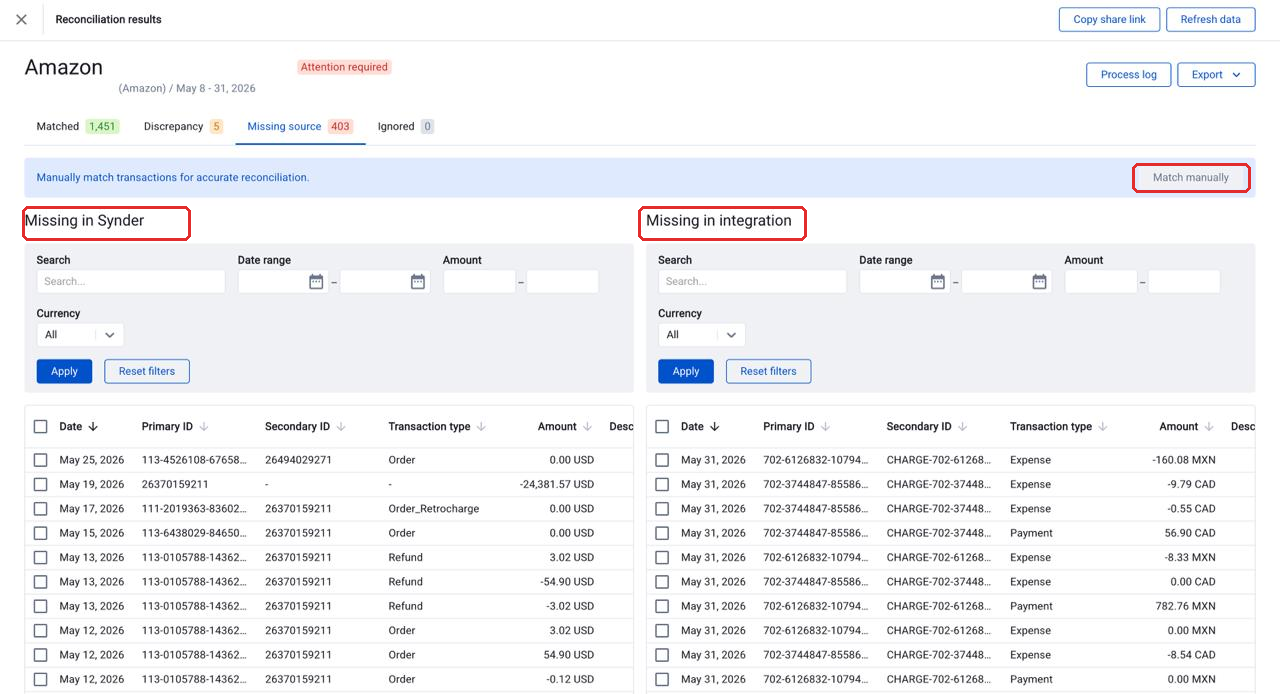
Can’t resolve an unmatched transaction automatically? If you know a transaction in one source corresponds to an entry in the other, you can pair them manually and keep a full audit trail. See How to Use Manual Matching in Transaction Reconciliation.
Ignored
These are transactions you manually marked as ignored. Generally, use this tab for known or non-material discrepancies.
To move transactions here, tick them in the Discrepancy or Missing source tab. A bar appears showing how many you’ve selected and their combined total — click Ignore to move them all at once, or Clear all to start over. Missing in Synder and Missing in integration each keep their own separate selection.
You can un-ignore transactions at any time and they return to their original category.
How Synder matches transactions
Synder runs a three-pass comparison based on transaction IDs:
- Pass 1: Primary ID (Synder) ↔ Primary ID (Platform)
- Pass 2: Primary ID (Synder) ↔ Secondary ID (Platform)
- Pass 3: Secondary ID (Synder) ↔ Secondary ID (Platform)
When Synder finds a match, it groups all related rows by that ID. Then it compares the total amounts. If the totals match, the group goes to Matched. However, if the totals differ, it goes to Discrepancy. Finally, if Synder finds no match after all three passes, the transaction goes to Missing source.
Important: Synder does not use transaction dates for matching. Instead, it matches on IDs and amounts only.
Managing your reconciliations
The main Transaction Reconciliation page lists all your reconciliations. In addition, you can filter them by integration, account, date range, and status.
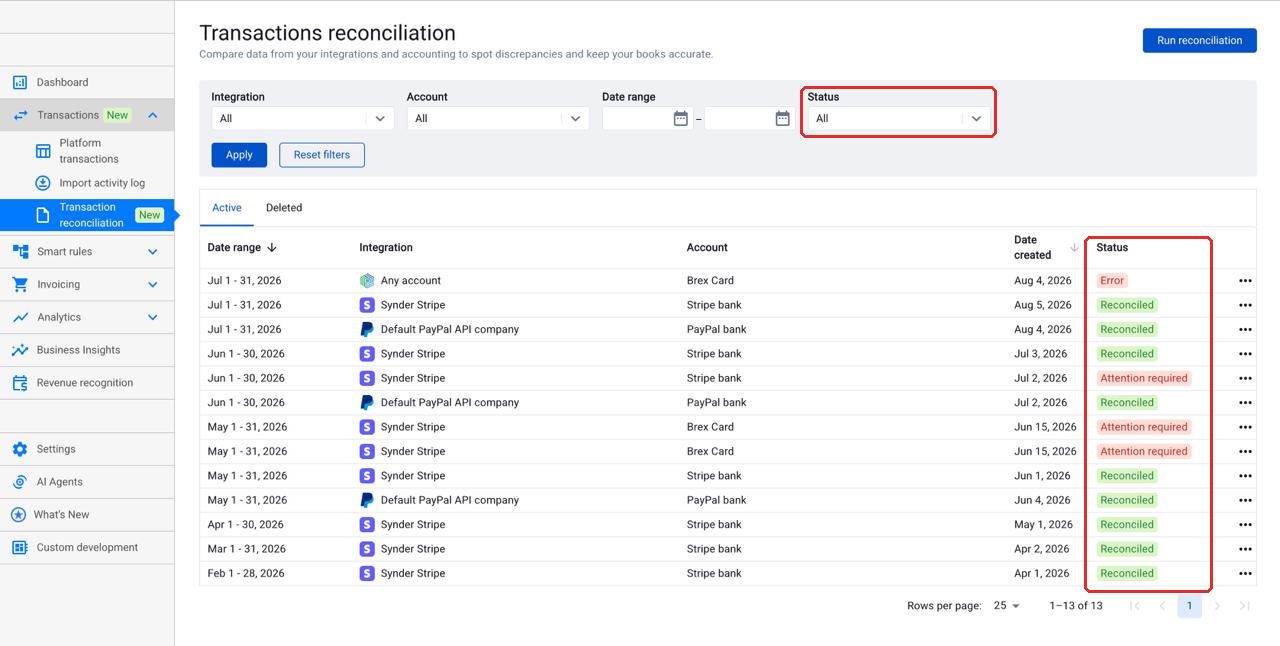
Each reconciliation shows:
- Date range — the period covered
- Integration — which payment platform. Shows Any account if you reconciled an account that isn’t tied to an integration.
- Account — which account was reconciled
- Date created — when the reconciliation was run
- Status — one combined status showing where the reconciliation stands
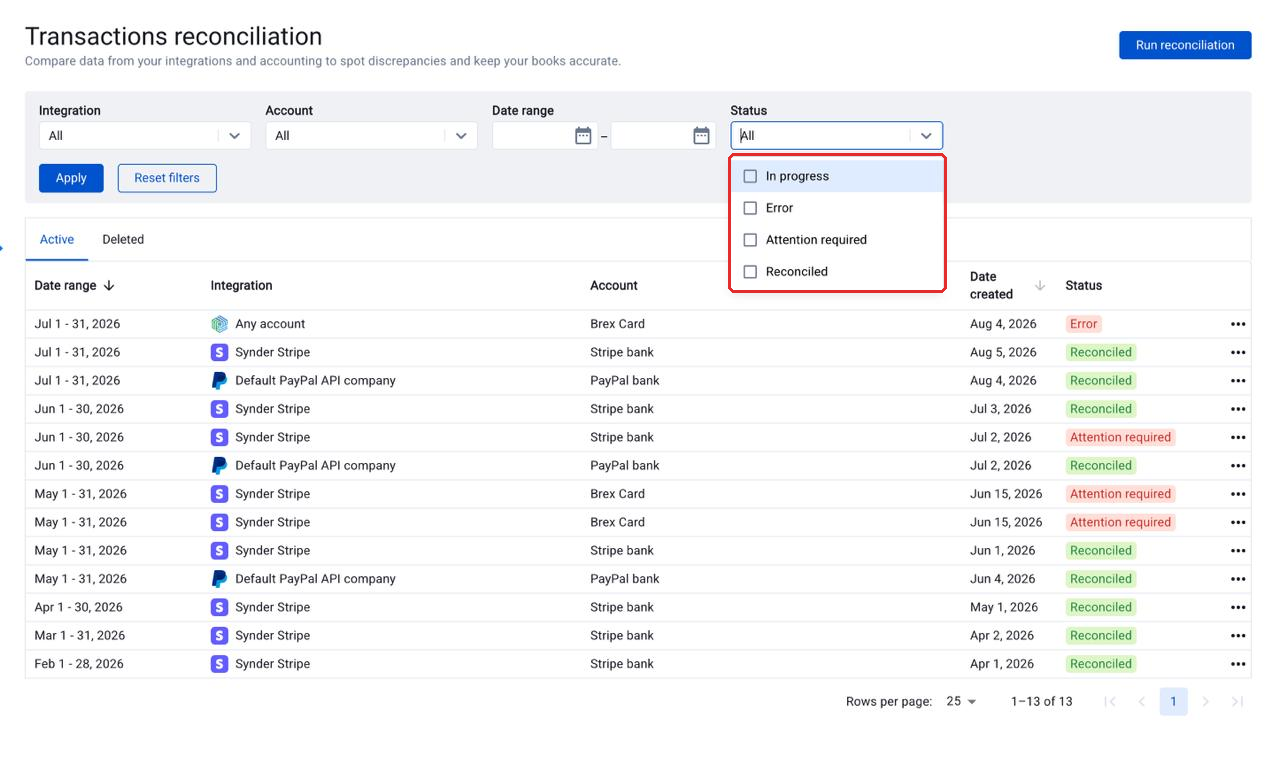
The status values are:
- In progress — Synder is still building the reconciliation
- Error — the reconciliation couldn’t be completed. Open it to see which step failed and why.
- Attention required — the reconciliation finished, but transactions still need your attention in Discrepancy or Missing source
- Reconciled — nothing is left to resolve
Use the Status filter above the list to narrow what you see. You can select more than one status at a time.
Following a reconciliation as it runs
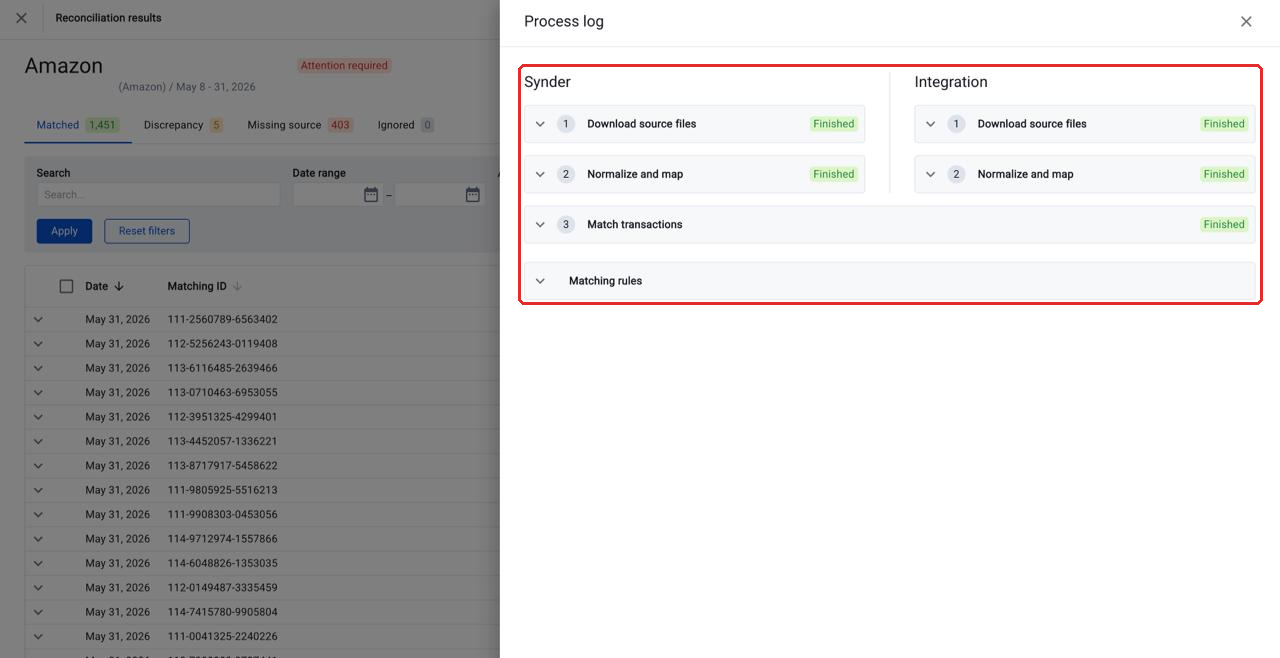
When you start a reconciliation, Synder shows a process log with the work split into two columns — Synder and Integration — so you can see how far each side has got: Download source files, Normalize and map, then Match transactions. A Matching rules section at the bottom shows the rules applied. You can reopen the log at any time with the Process log button.
If a step fails, the reconciliation stops there and the log explains why. The error names the file, the row, the column, the value it couldn’t read and the reason — plus how many other rows have the same problem, so you know the size of the fix before you start. You can download the source file straight from the log, correct it, and run the reconciliation again.
Refreshing your results
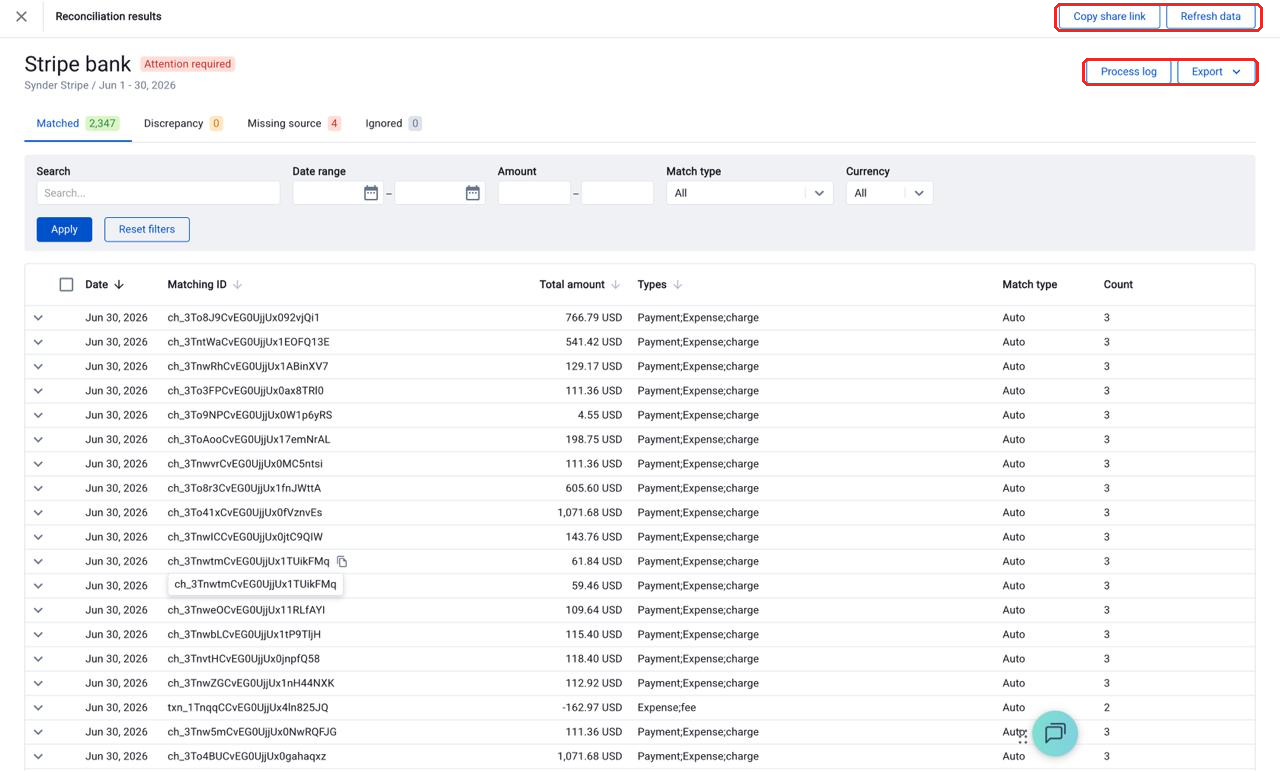
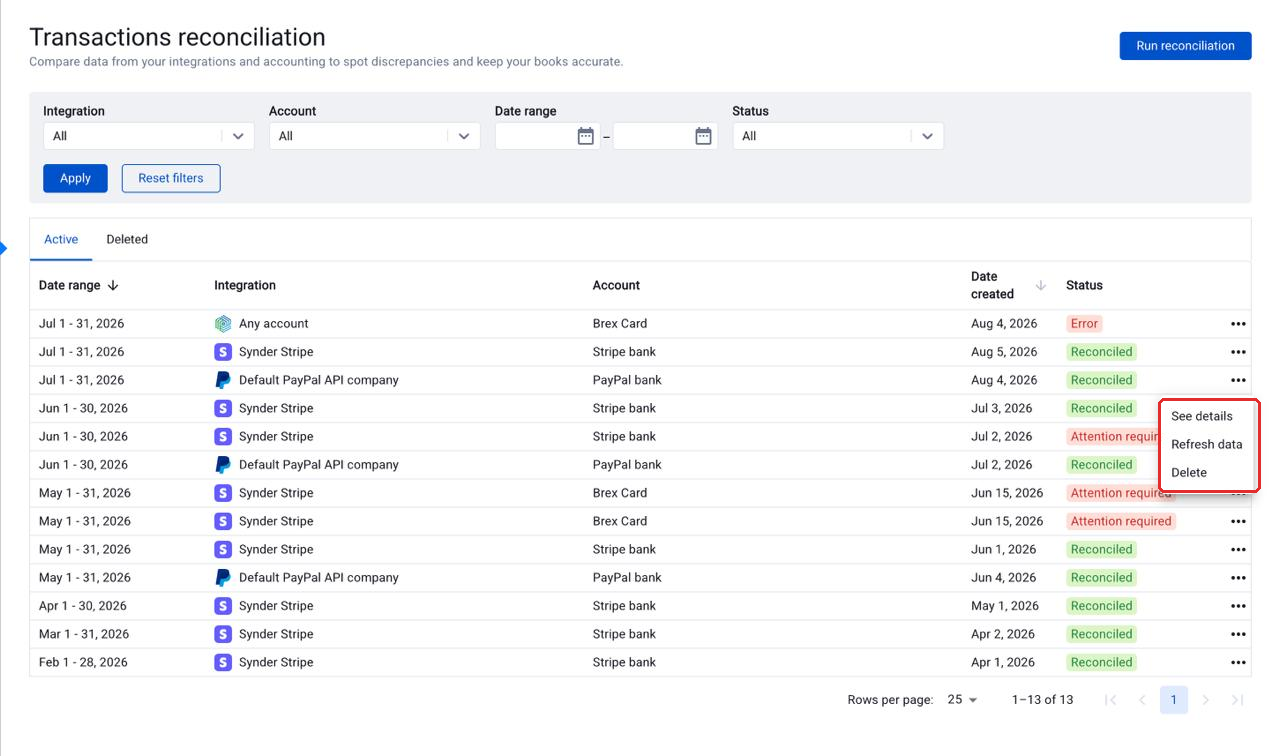
Sometimes you make changes in your accounting software after running a reconciliation. For example, you might sync missing transactions. In that case, use Refresh data — you’ll find it in the top bar when a reconciliation is open, and in the three-dot menu on the list page. Specifically, it re-downloads only the accounting file without pulling data from the payment platform again. This saves time and replaces your previous results with updated ones.
Deleting and cloning reconciliations
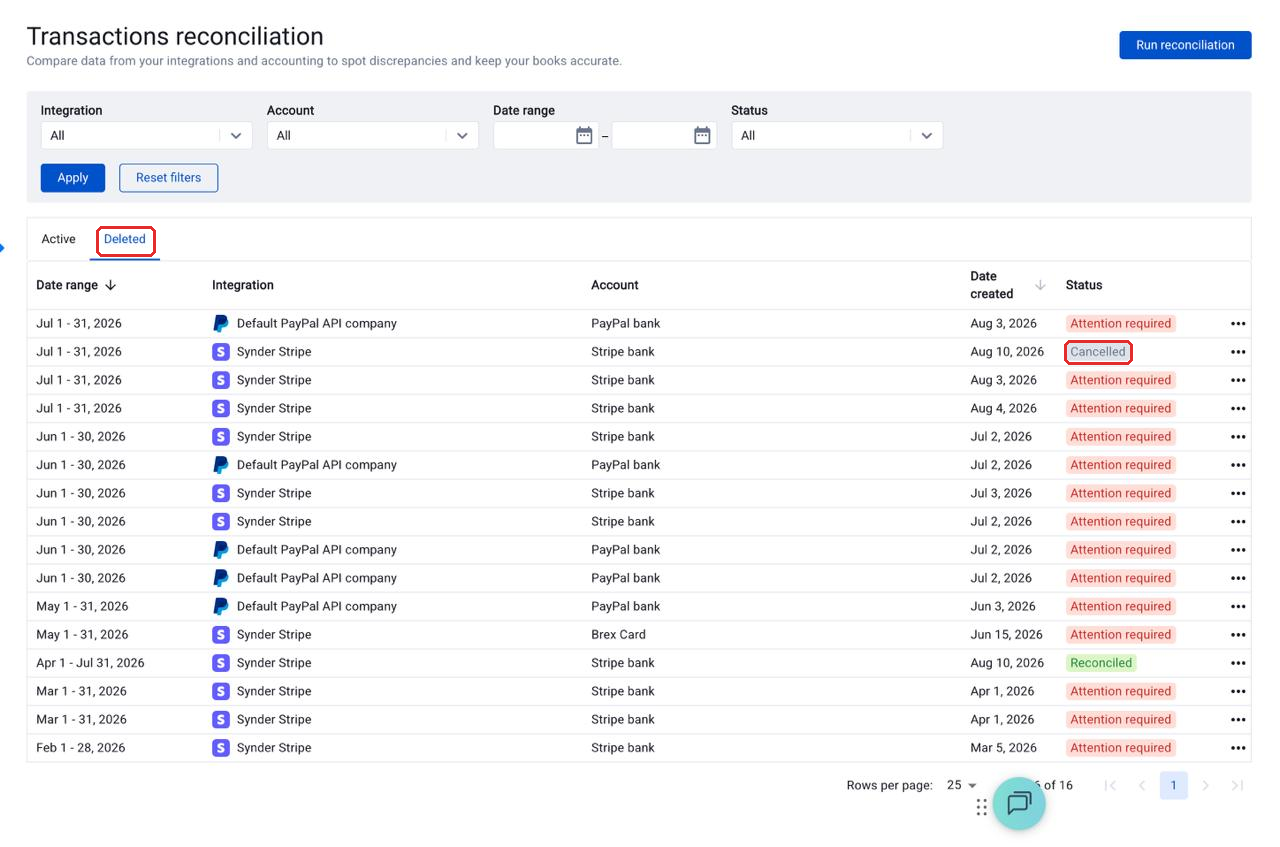
To remove a reconciliation, click the three-dot menu on the list page and select Delete. Deleted items move to the “Deleted” tab, where you can still view results. Furthermore, you can clone a deleted reconciliation. This creates a new one with the same settings pre-filled. If you delete a reconciliation while it is still running, it moves to Deleted with a greyed-out Cancelled status.
Sharing a reconciliation
Click Copy share link in the top bar to copy a direct link to the reconciliation. Anyone you have added to your Synder organization can open that link and land straight on this exact reconciliation.
Exporting results
Click the “Export” button on the results page to download your data. You can export each tab separately — Export matched, Export discrepancy, Export missing source or Export ignored. Alternatively, use “Export all” to get a 4-tab Excel file with all categories.
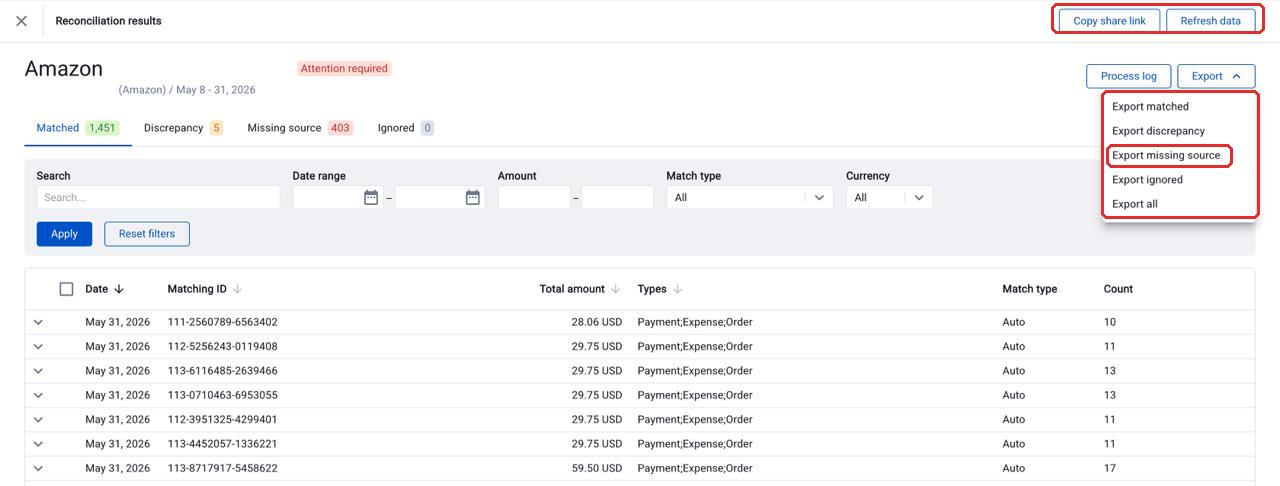
In addition, you can download normalized and mapped source files from the Process Log.
Limitations & Important Notes
- In Summary mode, reconciliation compares the data Synder imported (not your accounting ledger) against the payment platform. Therefore, a “Reconciled” result does not confirm Synder synced the data correctly to your books. If Transaction Reconciliation shows “Reconciled” but you see discrepancies in your accounting software, first check that your summaries synced and your account mapping is correct. If the issue persists, contact Synder support with the specific differences so we can investigate and guide you through the mapping.
- Reconciliation periods cannot overlap for the same clearing account.
- Stripe and Shopify automation may take up to an hour for large date ranges.
- For PayPal and other integrations, you must upload reports manually — Synder does not offer automatic download for these platforms.
- Synder automatically excludes certain PayPal transaction types, such as Currency Conversion and Account Holds. This prevents false discrepancies.
- Synder matches based on IDs and amounts only. In other words, it does not compare transaction dates.
- For multi-currency accounts, make sure the currency in your payment platform report matches your accounting records.
- You cannot select today’s date for a reconciliation period. The payment platform may not have finalized today’s transactions yet.
- Synder marks a period as “Reconciled” only when nothing is left unresolved in the Discrepancy and Missing source tabs. Transactions you have ignored count as resolved.
FAQ
Should I run Transaction Reconciliation before or after syncing summaries?
A: Before syncing summaries, whenever possible. That is the safest workflow for Summary Sync users, because it lets you catch missing or mismatched source data before it is grouped into summary lines. If you wait until after sync, fixing the issue becomes more complicated and may require rebuilding, rolling back, or adjusting summaries.
What exactly am I comparing in Summary Sync?
A: You are comparing the payment platform data with the transaction-level source data stored in Synder. This is the data Synder later uses to build summaries. In other words, the tool helps you confirm that the source data inside Synder is complete and accurate before you sync the summary to your books.
If the summary is already synced, can I still use Transaction Reconciliation?
A: Yes, but it is harder to act on the result. Once the summary is already synced, you may need to identify which summary was affected, determine whether more than one summary was impacted, and then decide whether to rebuild it, roll it back, or correct the issue with an adjusting entry.
If I find missing transactions, can I fix them myself?
A: Sometimes you can fix obvious setup issues on your own, such as selecting the wrong date range or uploading the wrong file. However, if the problem is caused by failed, missing, or incomplete source data in Synder, users often need help from Synder Support to investigate and resolve it properly.
Does sync status itself affect the reconciliation result?
A: No. This workflow is a data completeness check, not a sync-status check. In other words, whether Synder has already synced the related summary does not change whether the underlying transaction-level data matches the payment platform data.
Can I undo an ignored transaction?
A: Yes. Go to the Ignored tab and un-ignore it. It moves back to its original category.
Reach out to Synder Team via online support chat or email with any questions you have – we are always happy to help you!
