
Synder supports synchronization of all payouts from Amazon, both regular and those related to Amazon Pay. In this guide, we will explore how to accurately split Amazon FBA and Amazon Pay summaries using Synder’s Summary Sync mode.
- What’s Included: Each day, Amazon Pay transactions and their related payouts are included in the daily summary just like any other Amazon transactions.
- Limitations: Due to restrictions in the Amazon API, Amazon Pay transactions will not show up in the per-payout summaries.
- Alternative Handling: Instead, these transactions are summarized separately on a daily basis. Please note that the payouts connected to Amazon Pay sales are not included in these daily summaries.
Recommendation: To keep your financial records accurate, we recommend tracking Amazon Pay payouts in your accounting system. You can do this by:
- Setting up the appropriate banking rules, or
- Manually entering the payouts.
This approach will help ensure you have a complete picture of your finances.
Although these payouts will go to the same account, the sales might be sent to different clearing accounts if chosen during the mapping process. This setup could cause discrepancies in your financial reports, so it’s important to carefully map sales and payouts in Synder.
We will demonstrate how to accurately manage and split Amazon FBA and Amazon Pay summaries using Synder’s Summary Sync mode, focusing particularly on account mapping and configuration in QuickBooks Online to achieve the desired result.
Setting up accounts in QuickBooks Online
For this use case, we recommend configuring QuickBooks Online with a top-level clearing account and specific sub-accounts for Amazon Seller Central and Amazon Pay. Follow these steps to configure your accounts in QuickBooks Online.
How to create sub-accounts for Amazon transactions
- Sub-account 1 – Amazon Seller Central
- Click on “Chart of Accounts”.
- Click “New” to create a new account.
- Name the account “Amazon Seller Central Clearing“.
- Select “Is sub-account” and choose “Amazon Clearing (Synder)” from the dropdown.
- Click “Save” and “Close”.

- Sub-account 2 – Amazon Pay
- Repeat steps 1-2 above.
- Name the account “Amazon Pay Clearing“.
- Select “Is sub-account” and choose “Amazon Seller Central Clearing” from the dropdown.
- Click “Save” and “Close”.
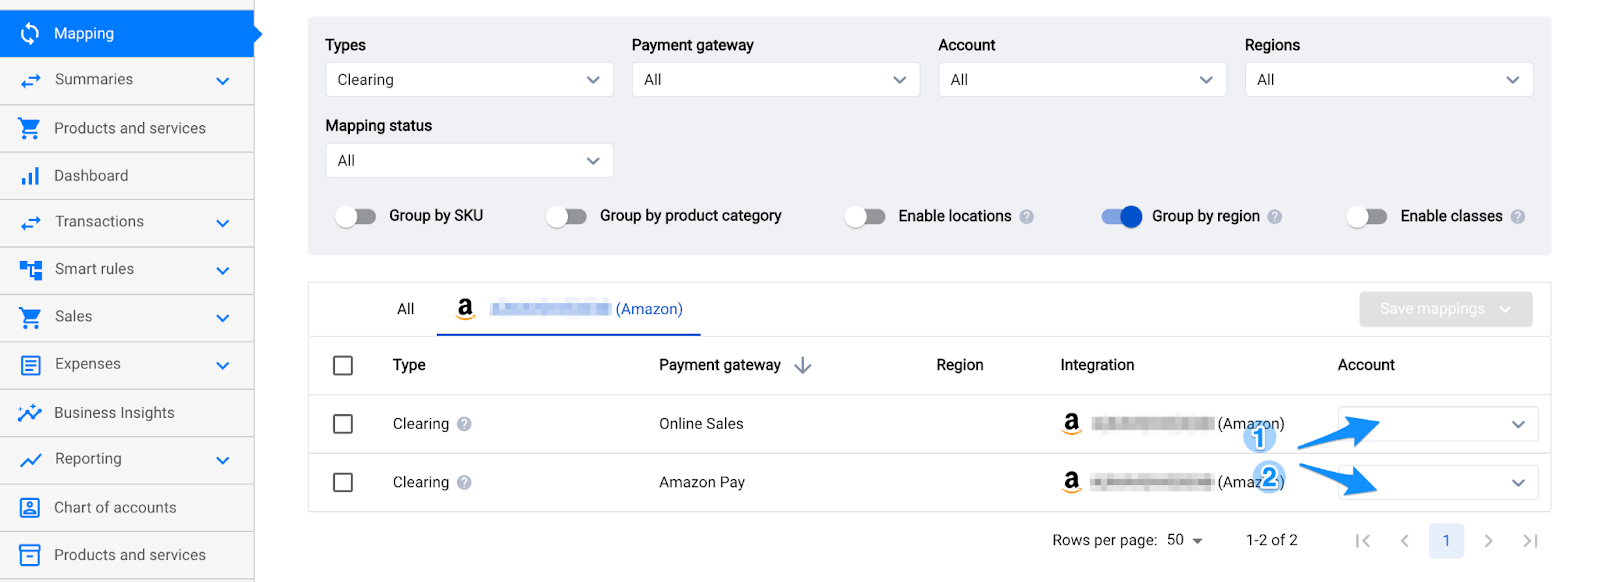
Configuring Amazon integration mapping in Synder
In the Mapping tab within Synder, select the Amazon integration, where you can specify which transactions should be routed to specific clearing accounts.
- Amazon Seller Central transactions should be mapped to “Amazon Seller Central Clearing“.
- Amazon Pay transactions should be mapped to “Amazon Pay Clearing“.
This configuration allows you to view the total for all three accounts (the top-level and both sub-accounts) in one place in QuickBooks Online. Although the individual accounts will record their respective transactions, with this setup you make sure the top-level Amazon Clearing account is always reconciled and free of discrepancies.
By following these steps, you can ensure that your Amazon-related financial data is neatly organized and accurately reflected in QuickBooks Online.
Reach out to Synder Team via online support chat, phone, or email with any questions you have – we are always happy to help you!