
- For US QuickBooks
- Option 1: Manual Groups
- Option 2: Enable Group by region
- For Non-US QuickBooks (Canada, UK, AU, NZ, etc.)
- Option 1: Tax Tracking Enabled
- Option 2: Tax Tracking Disabled
- Important notes
- FAQ
This guide explains how to configure sales tax tracking in Synder Summary Sync when posting summaries to QuickBooks Online (US and non-US versions).
Use this guide if:
- You use Summary Sync in Synder.
- Sales tax must appear correctly in QuickBooks.
- You use QuickBooks Online (US, Canada, UK, AU, NZ, etc.)
The configuration depends on your QuickBooks region.
For US QuickBooks
QuickBooks Online (US) does not allow tax codes in journal entries. Synder posts sales tax amounts directly to Sales Tax Payable liability accounts.
If you collect tax in multiple states, configure one of the following:
- Manual Groups
- Group by region
Option 1: Manual Groups
Use Manual Groups for granular mapping based on custom conditions.
You can filter transactions by:
- ZIP code
- City
- Customer
Set up mapping groups according to your required conditions.
Example manual group based on Shipping City
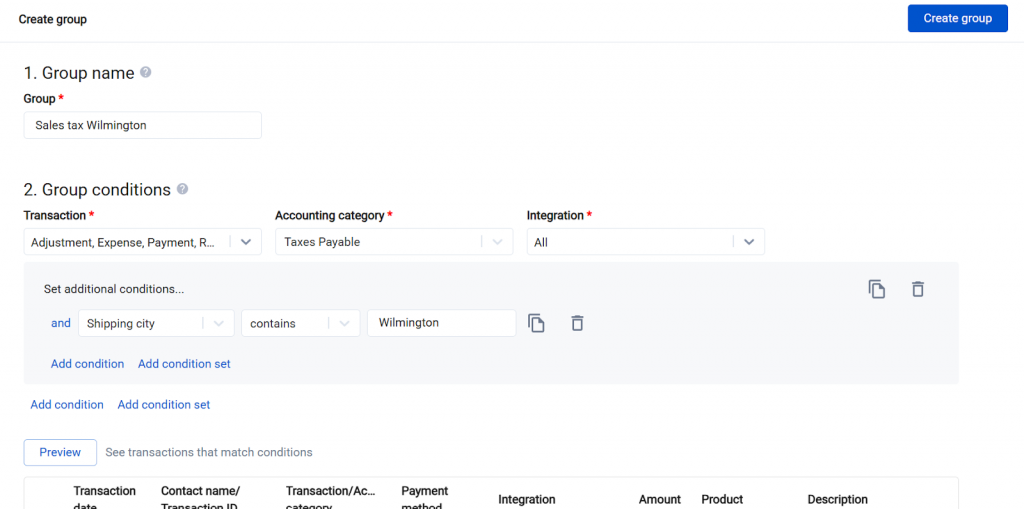
Note: Choose “Taxes Payable” under the accounting category to create the manual group specifically for tax mapping.
For more details on creating the mapping group, refer to this guide.
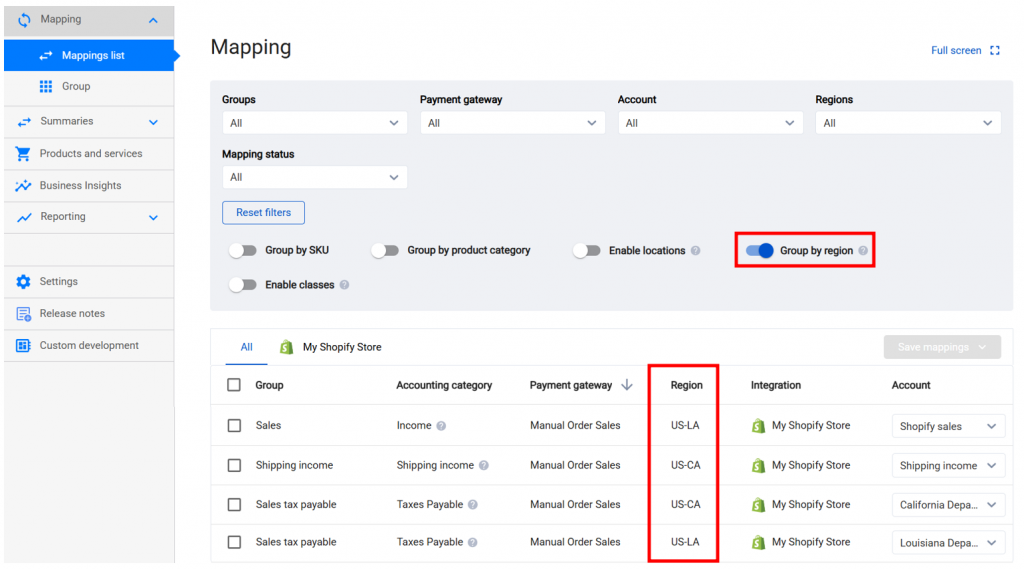
Option 2: Enable Group by region
Use this option to split tax by state automatically.
- Click on the Mapping dropdown in the left-side menu.
- Click the Mappings list.
- Enable Group by region.
- Assign a dedicated Sales Tax Payable liability account for each state.
- Save changes.
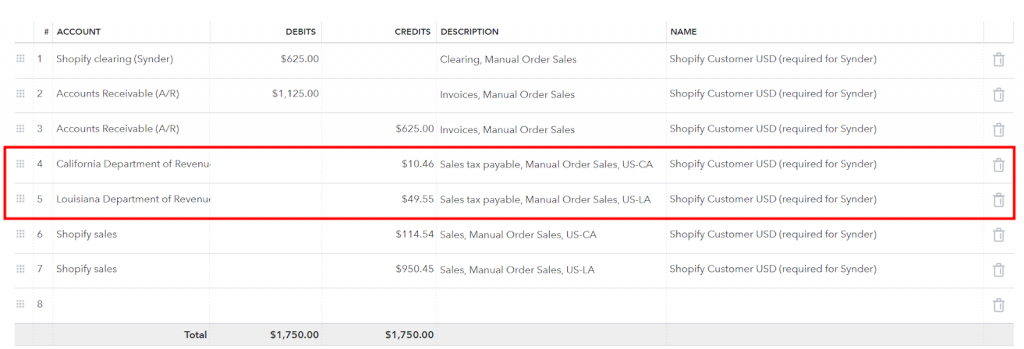
With this configuration, Synder will:
- Use the shipping address to determine the region.
- Post tax amounts directly to state-specific liability accounts.
- Split tax correctly if multiple states appear in one summary.
All newly generated summaries will reflect the updated mapping. Rebuild the existing summaries to reflect the updated mapping. Refer to this guide on how to rebuild.
Example Journal Entry with regional mapping
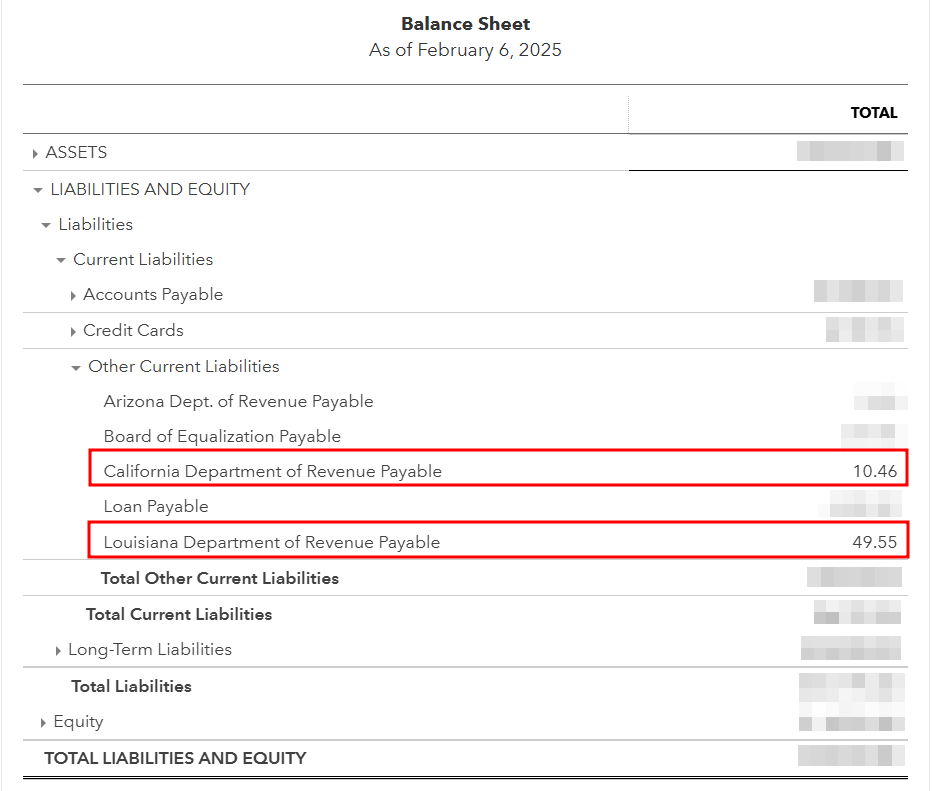
Balance Sheet view
Tax amounts appear under Other Current Liabilities.
Note: Enabling Group by region also groups Sales, Refunds, Shipping income, and other mapping lines by region.
For Non-US QuickBooks (Canada, UK, AU, NZ, etc.)
Non-US QuickBooks allows tax codes in journal entries. When tax tracking is enabled, Synder adjusts how entries are created in QuickBooks.
For each tax amount, Synder creates:
- A Taxable Sales Amount line with the mapped tax code.
- An Offsetting line with the zero-rated tax code.
This ensures that:
- Taxable revenue is reported correctly.
- Tax appears in QuickBooks tax reports.
- Income or tax amount is not overstated.
And gives you the ability to choose one of the following configurations:
- Option 1 — Tax tracking enabled
- Option 2 — Tax tracking disabled
Option 1: Tax Tracking Enabled
Use this setup if you want tax to appear in QuickBooks Tax Reports.
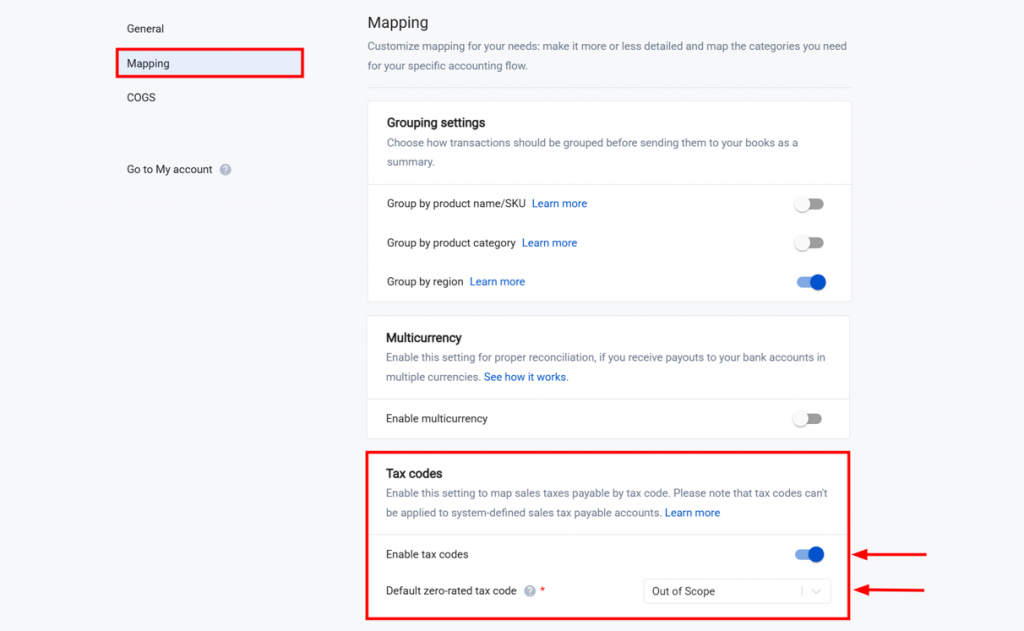
Step 1: Enable Tax Codes
- Go to Settings.
- Move to the Mapping tab.
- Scroll down to Tax codes.
- Enable tax codes.
- Assign a default zero-rated tax code.
The default zero-rated tax code is used as a fallback zero-rated tax for non–sales tax payable mapping lines. This allows Synder to apply the tax calculation logic for the summary mode
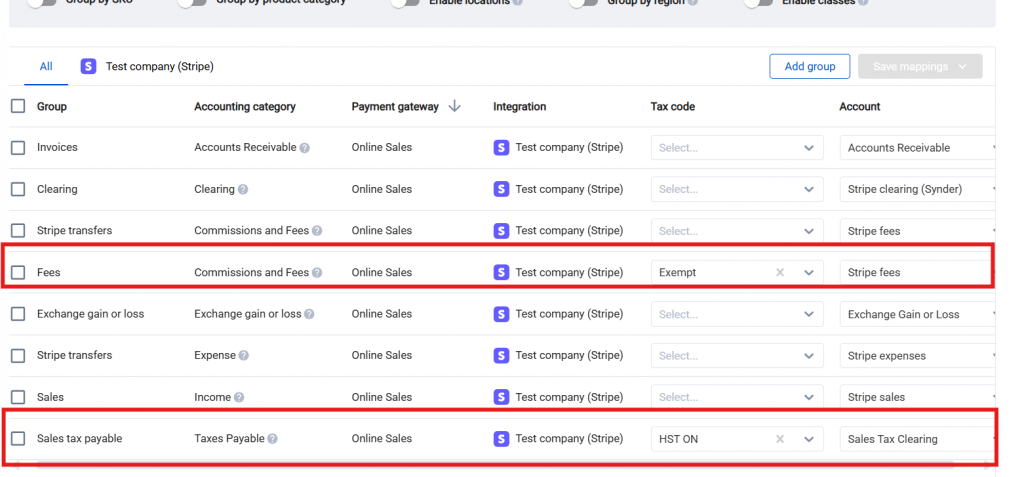
Step 2: Assign Tax Codes to Mapping Lines
- Open the Mappings list from the left-side menu.
- Assign tax codes to Sales Tax Payable lines.
- Map Sales Tax Payable lines to preferred accounts.
- Recommended account type: Income → Other income (e.g., “Sales Tax Clearing”).
Note: QuickBooks Online does not allow
- Assign zero-rated tax codes to the rest non-tax lines.
- Save changes.
Important Rules
- Tax codes can be applied only to “Sales Tax Payable” mapping lines.
- All non–Sales Tax Payable lines must have a zero-rated tax code.
- If no zero-rated tax code is selected, Synder uses the default zero-rated tax from Settings.
New summaries will reflect the tax codes. Rebuild the existing summaries to reflect the updated mapping. Refer to this guide on how to rebuild Summaries.
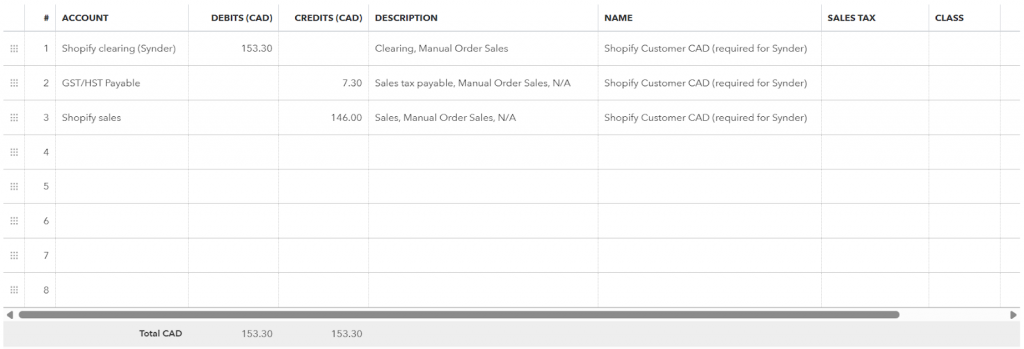
What You’ll See in the Journal Entry
Example:
- Item total: 146 CAD
- Tax (5% GST): 7.30 CAD
- Total: 153.30 CAD
Synder:
- Creates account lines mapped to the Sales Tax Payable line.
- Applies tax codes.
- Keeps income unchanged.
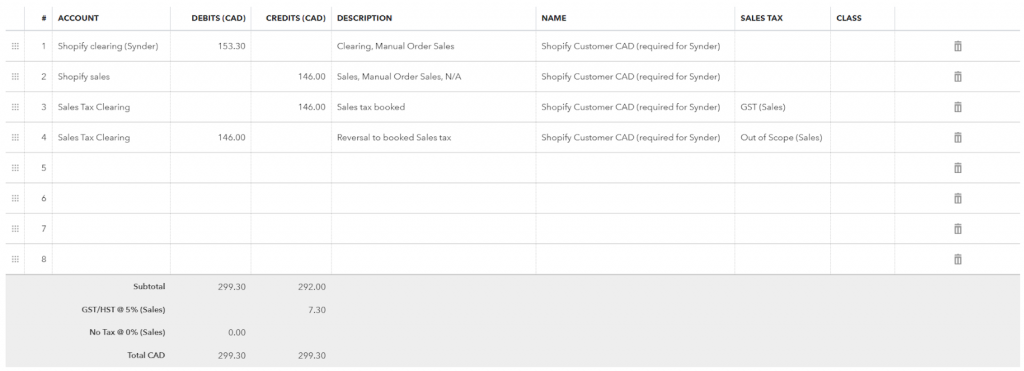
- Ensures tax appears in Tax Reports.
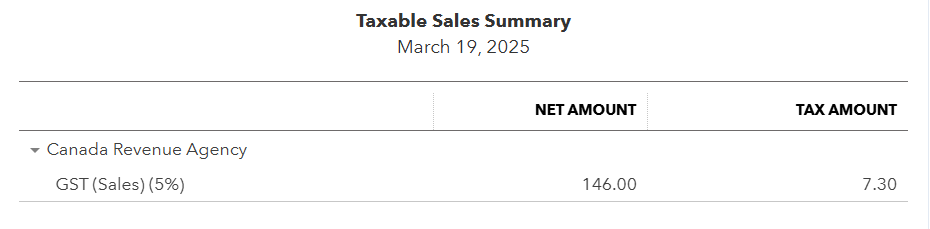
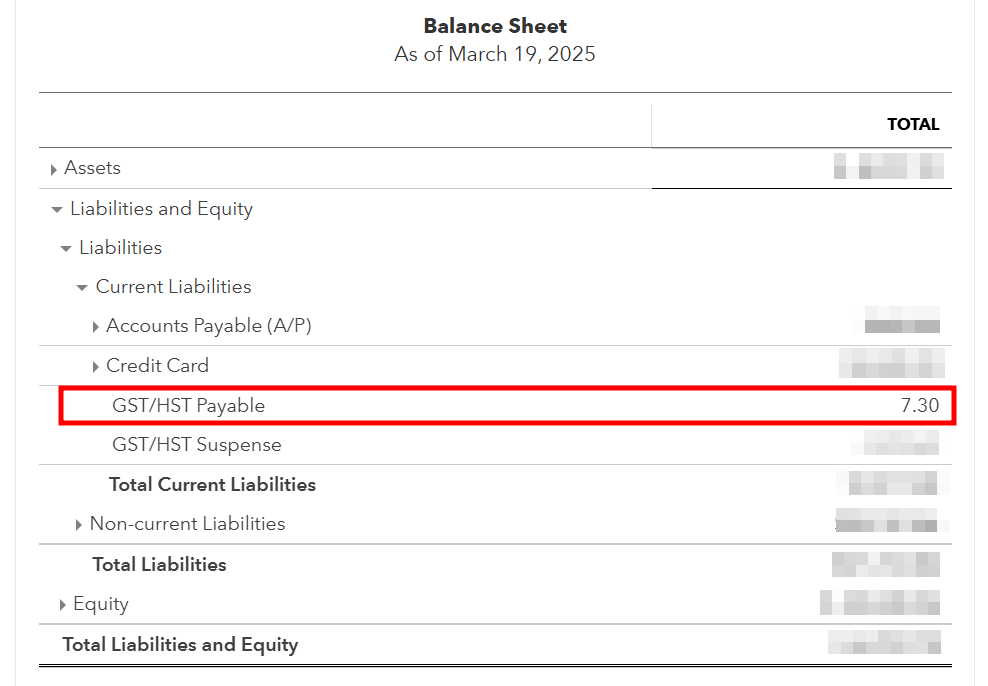
Balance Sheet view:
- Tax appears under the selected liability or clearing account.
Option 2: Tax Tracking Disabled
Use this setup if tax reporting in QuickBooks is not required and only liability balances must be recorded.
Tax tracking is disabled by default. With this feature disabled:
- Synder posts the total tax directly to the Sales Tax Payable (liability) account.
- Recommended account type: Current Liabilities.
- No tax codes are applied.
- Tax will NOT appear in QuickBooks Tax Reports.
- The balance sheet still reflects tax owed correctly.
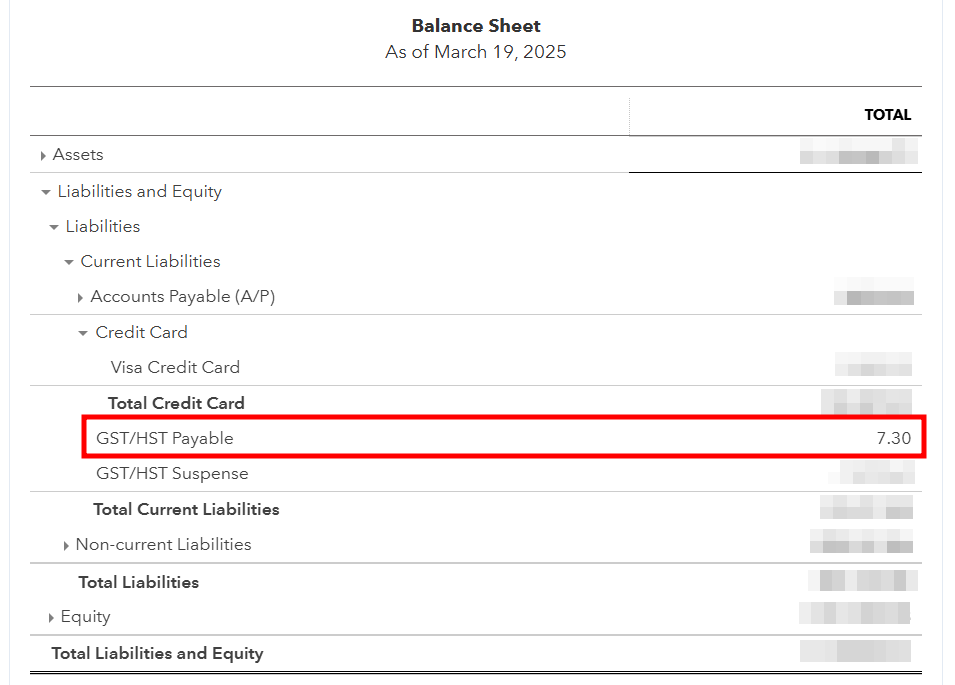
Example Journal Entry (Tax Tracking Disabled)
Balance Sheet reflecting the correct tax owed
Important notes
- For Multi-State Mapping, enable Group by region or use the Groups feature for more granular mapping. Refer to this guide for step-by-step instructions on how to set up mapping groups.
After enabling Group by region, you may encounter the following regions:
- “Unknown” – Missing or unrecognized state/country information. Use the manual groups feature to assign taxes to such mapping lines based on other available conditions in transactions.
- “N/A” – No shipping address is available (e.g., for adjustments).
- Do NOT select system-generated tax liability accounts when you have Tracking Taxes enabled (like GST/HST Payable). QuickBooks does not allow tax codes on them and sync will fail.
- Tax codes on expenses are not supported on Summary sync. Consider one of the following options:
- Account for taxes on expenses manually. Synder records total fees in synced journal entries. Calculate tax separately based on the applicable percentage.
- Use the per-transaction synchronization mode to apply taxes to expenses/fees. Refer to this guide to understand how Synder handles taxes on fees in this sync mode.
FAQ
- I don’t see the desired tax code in the dropdown to choose. Why?
This can happen if the tax code is not set up in QuickBooks. Create the tax code in QuickBooks first. Then select it in the Synder mapping. - Why do my summaries fail with the error message “Cannot assign tax code on the Sales Tax account”?
Synder attempted to apply a tax code to a system-generated tax liability account (for example, GST/HST Payable).
QuickBooks does not allow tax codes on these. Map taxable sales amounts to a non‑payable clearing account (recommended: an Income: Other income account, such as “Sales Tax Clearing”) to avoid failure. - Why don’t my taxes appear in QuickBooks tax reports?
If Tax Tracking is disabled in Synder, no tax codes are applied to summary lines. Taxes will not appear in QuickBooks Tax Reports. Enable tax tracking in Synder if tax reporting in QuickBooks is required.
Reach out to Synder Team via online support chat or email with any questions you have – we are always happy to help you!