
Overview:
How to onboard with Synder if you don’t have a bank account in or connected to your books
How to set up fully automated reconciliation (after onboarding)
How fully automated synchronization works
To start the process of automating your books and simplifying the reconciliation process, you need to create a Synder account, connect your accounting company and payment platforms.
Total automation works this way: Synder records all the sales, fees, refunds, etc. to the Clearing account (automatically created in your Chart of Accounts), and when the payout/settlement/transfers happens in your payment processor, Synder can see it and record a transfer for exactly the same amount decreasing your clearing account and increasing your checking account. This way you have your checking account reconciled against your bank perfectly.
How does synchronization work without a bank account connected to your books?
Case 1: You don’t have any bank accounts in your accounting system.
This may happen if you’re just starting with your books and have a brand-new account.
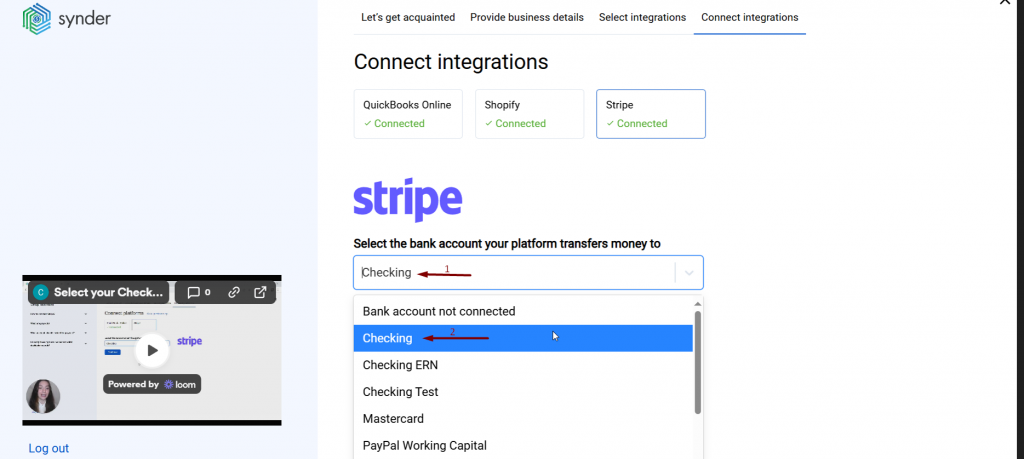
In this case, you can always create an account first in your books and then select it in Synder. In order to select the checking account in such cases, follow the steps below:
- Go to your accounting system (QuickBooks, Xero)
- Open Accounting → Chart of Accounts in your books
- Create NEW account with type “Bank”
- Get back to Synder, refresh the page, and select your newly created account in Synder.
If for some reason you don’t want to do this for now, the good news is that you can still use Synder. In this case, once setting up your Synder account, select the option “Bank account not connected”. You will see a warning:
Warning! Synchronization of Payouts\Settlements will be skipped. Your reconciliation flow will be more manual without enabling them, as Synder will not be able to account for them. Learn more here
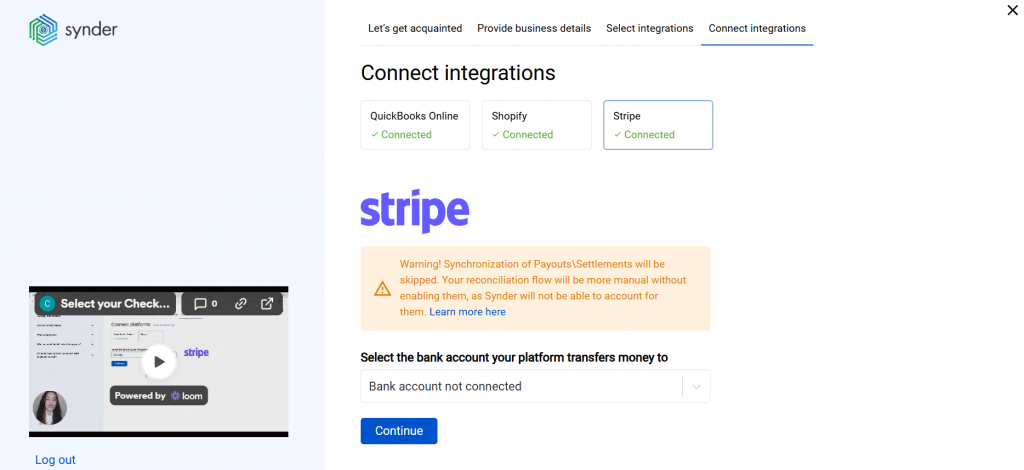
Important: In this case, Synder will not synchronize payouts/settlements to your books. You will also be able to see it in Synder Settings, the “Payouts processing” setting will be disabled. However, everything other than payouts (including your sales, fees, refunds, etc.) will go through seamlessly and will be stored on your clearing account in the Chart of Accounts.
In this case, you are to record transfers manually from clearing to your checking account. Or, depending on your flow, you may just reconcile the clearing account against the payment processor itself. We recommend discussing such settings with your accountant and our support team. The recommended way of using Synder is to select your checking account here and have automated reconciliation.
Case 2: You have your checking account setup in your books, but the bank is not connected to it.
You can still use Synder successfully. We recommend selecting your checking bank account even if you don’t have the bank connected, however this will require you to manually reconcile your checking account using your bank statement.
In this case, Synder will still import all your sales, fees and refunds (to your clearing account), as well as payouts (to your checking) and all the other transactions for full reconciliation of your online payment processors and sales channels.
You can connect your bank and set up full reconciliation later in settings (read next chapter to learn more about it).
How to set up fully automated reconciliation?
If you have selected the option “Bank account not connected” during the onboarding to Synder you can easily re-setup your account later.
In order to set up fully automated 1 click reconciliation, you have to connect your bank to your books. QuickBooks and Xero have plenty of guides on how to do this. Follow the steps below to set up automated reconciliation:
1) Connect your bank to your books (google for the guidelines specific to your accounting platform and your bank).
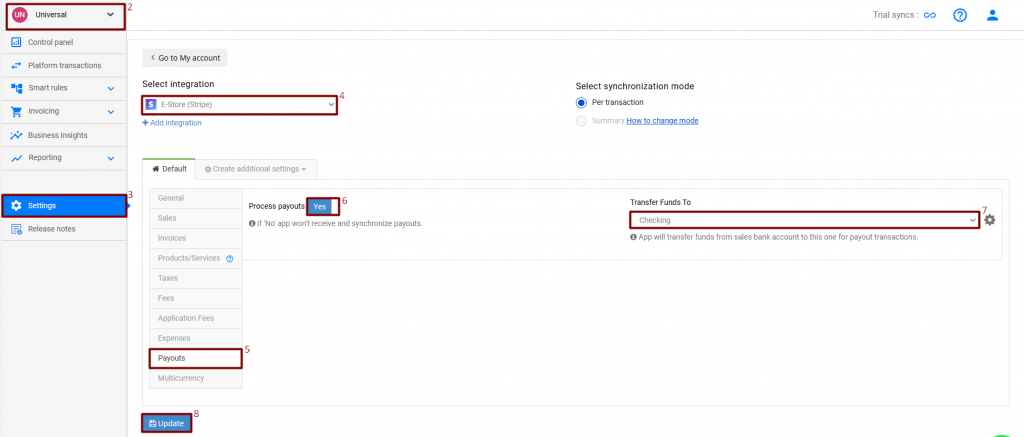
2) Log into your Synder account (selecting the needed organization if you have several).
3) Go to the Settings tab on the left-side menu.
4) Select the required platform in the Integration dropown.
5) Go to Payouts tab.
6) Enable “Process payouts” (can be also called “process transfers/settlements”) and select the Checking account you have connected your bank to.
7) Click Update.
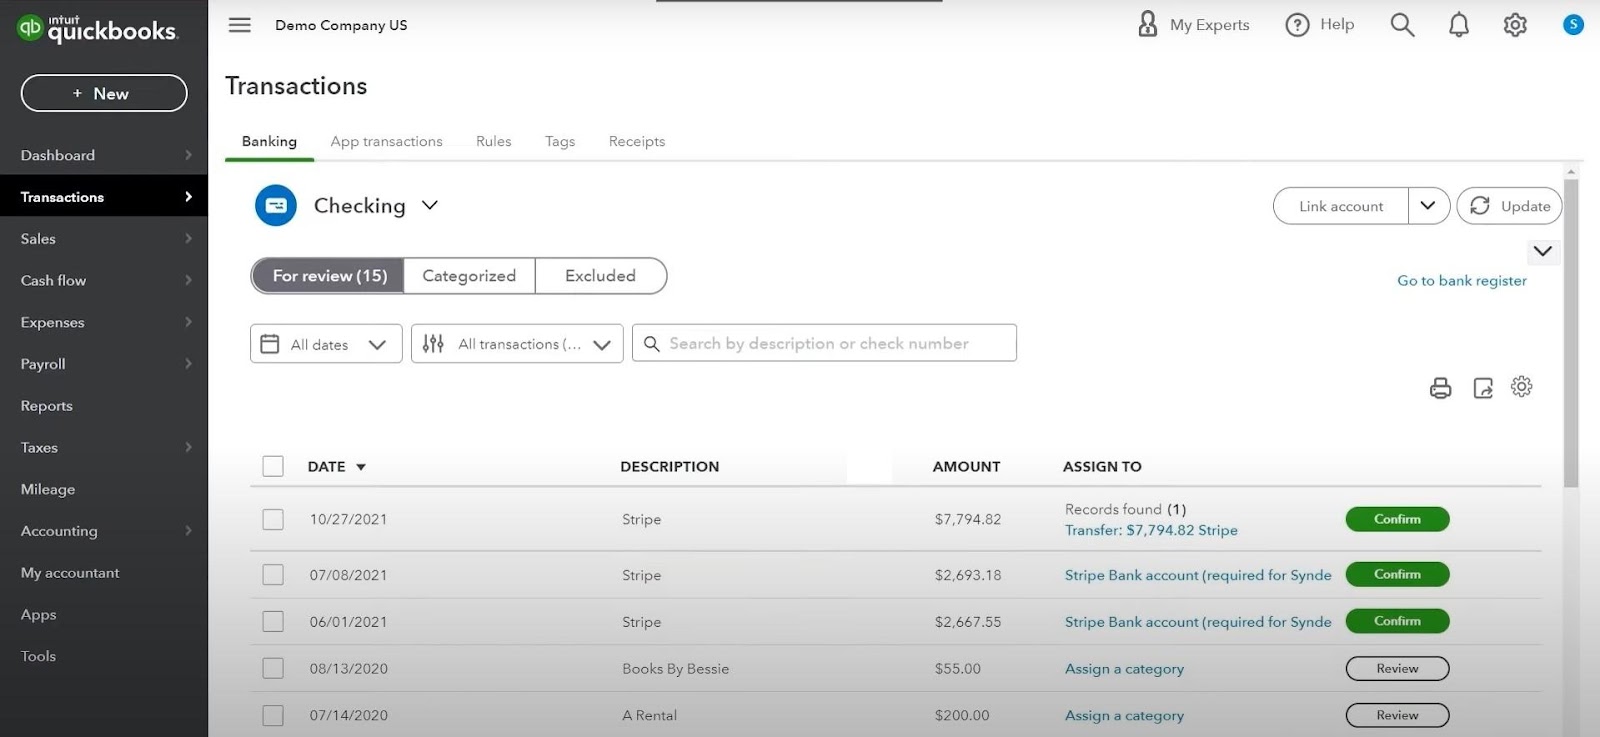
Selecting your Checking account in Payout settings of Synder, you will get reconciliation-ready matches of payouts and deposits in your For Review list in QuickBooks Banking, thus reducing the reconciliation process to 1 final click: your personal check on already imported and matched data.
Here is an example of QuickBooks Online 1 click reconciliation.
Just hit “Confirm” or “Match” for the transfers imported by Synder and your checking is fully reconciled!
Note 1: Reconcile your eCommerce transactions in QuickBooks Online
Note 2: Reconcile eCommerce sales in Xero Accounting (Shopify integration)
Note 3: How to connect, sync and reconcile data to QuickBooks Desktop
Reach out to the Synder team via online support chat, phone, or email with any questions you have – we’re always happy to help you!