
1. Why am I seeing this warning?
If you’re seeing the following warning message, this article is for you:
Settings conflict
The “Automatically Apply Credits” setting in QuickBooks Online is enabled and conflicts with Synder. Please disable it to prevent discrepancies.

The banner appears because:
- QuickBooks Online’s Automatically apply credits toggle is ON.
AND, at least one of these situations applies to your setup:
- Synder’s setting Sync unpaid (open) invoices is ON
- Synder’s setting Apply payments to unpaid Invoice/Bill transactions is ON
- You sync invoices/orders and their respective payments via Synder
Important: Please refer to the FAQ section for specific exceptions.
Synder keeps the credit-to-invoice-to-payment chain intact for every transaction it syncs from your sales channels. When QuickBooks Online’s “Automatically Apply Credits” setting is ON, QuickBooks Online will spot any existing unapplied credit (credit memo or customer payment) and instantly use it to close the new invoice that Synder just created for that same customer.
The moment the invoice arrives in QuickBooks, it consumes the available credit. This means Synder can’t link the payment to the invoice, so the payment won’t sync. This can throw off your cash balance and create a discrepancy in your Clearing Account, meaning Synder’s records and your QuickBooks Online balances won’t match up.
2. How to turn off “Automatically apply credits”
- Sign in to QuickBooks Online as an admin.
- Click ⚙ Gear ▸ Account & Settings.
- Choose Advanced in the left sidebar.
- Scroll to Automation and click ✏️ Edit.
- Toggle Automatically apply credits to OFF.
- Click Save, then Done.
That’s it—no other settings need to change.
3. Fixing records that were already mismatched
Option A: Roll back and resync in Synder
Using Synder’s Rollback function, you can delete affected transactions and resync them correctly into your books once you switch off the QuickBooks Online Automatically apply credits setting.
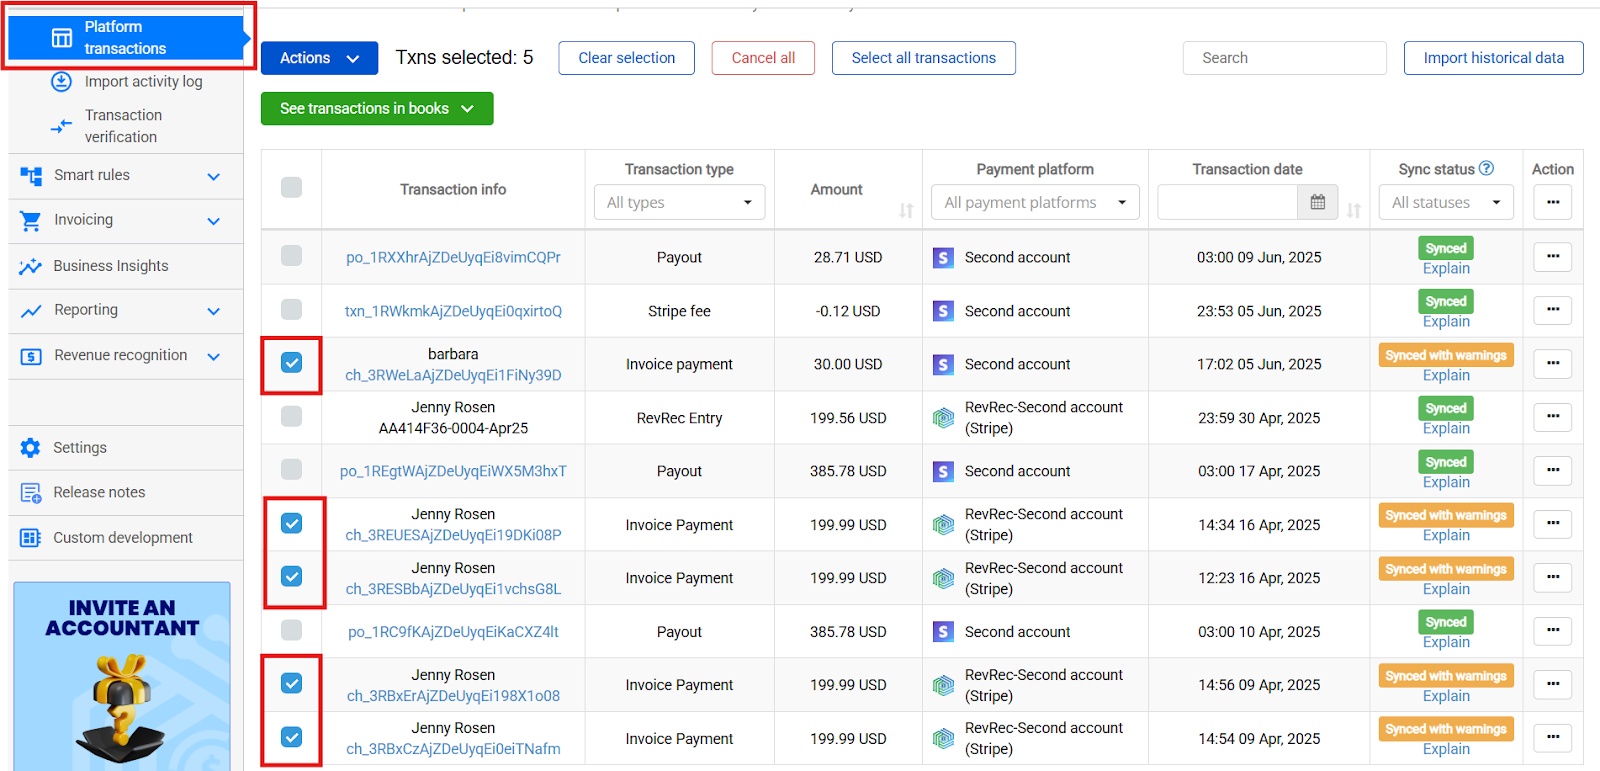
First, you need to select the transactions affected by the settings conflict. To do that, go to Platform Transactions. Since this setting conflict applies to your sales transactions, you need to roll them all back and then resync them.
Note: You can exclude fees and payouts from the rollback/resync, as they are not affected by the setting conflict.
- Once you have determined which transactions you want to roll back, select all that apply.
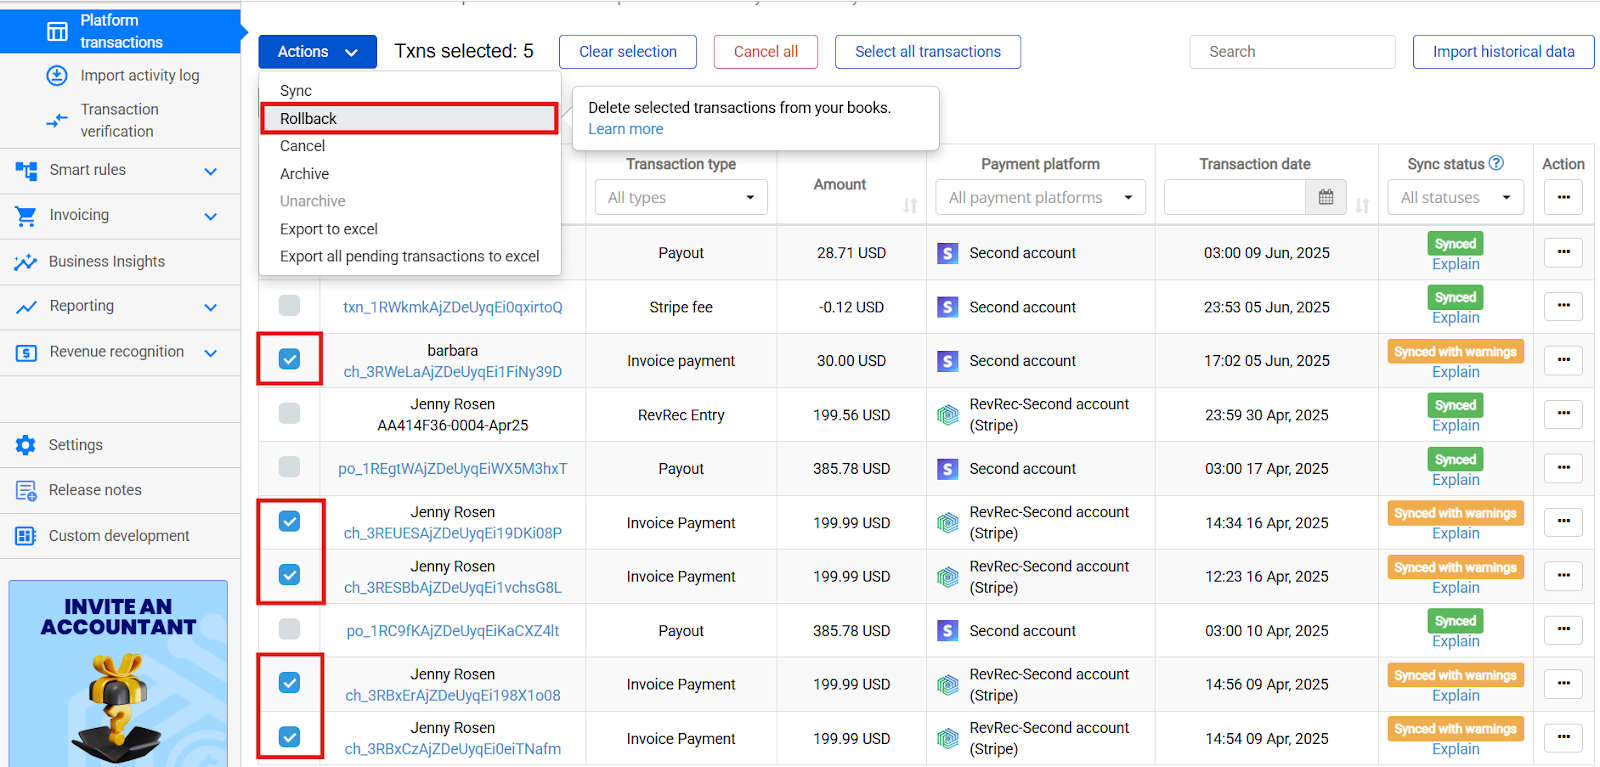
2. Then, click Actions->Rollback to delete them from your books.
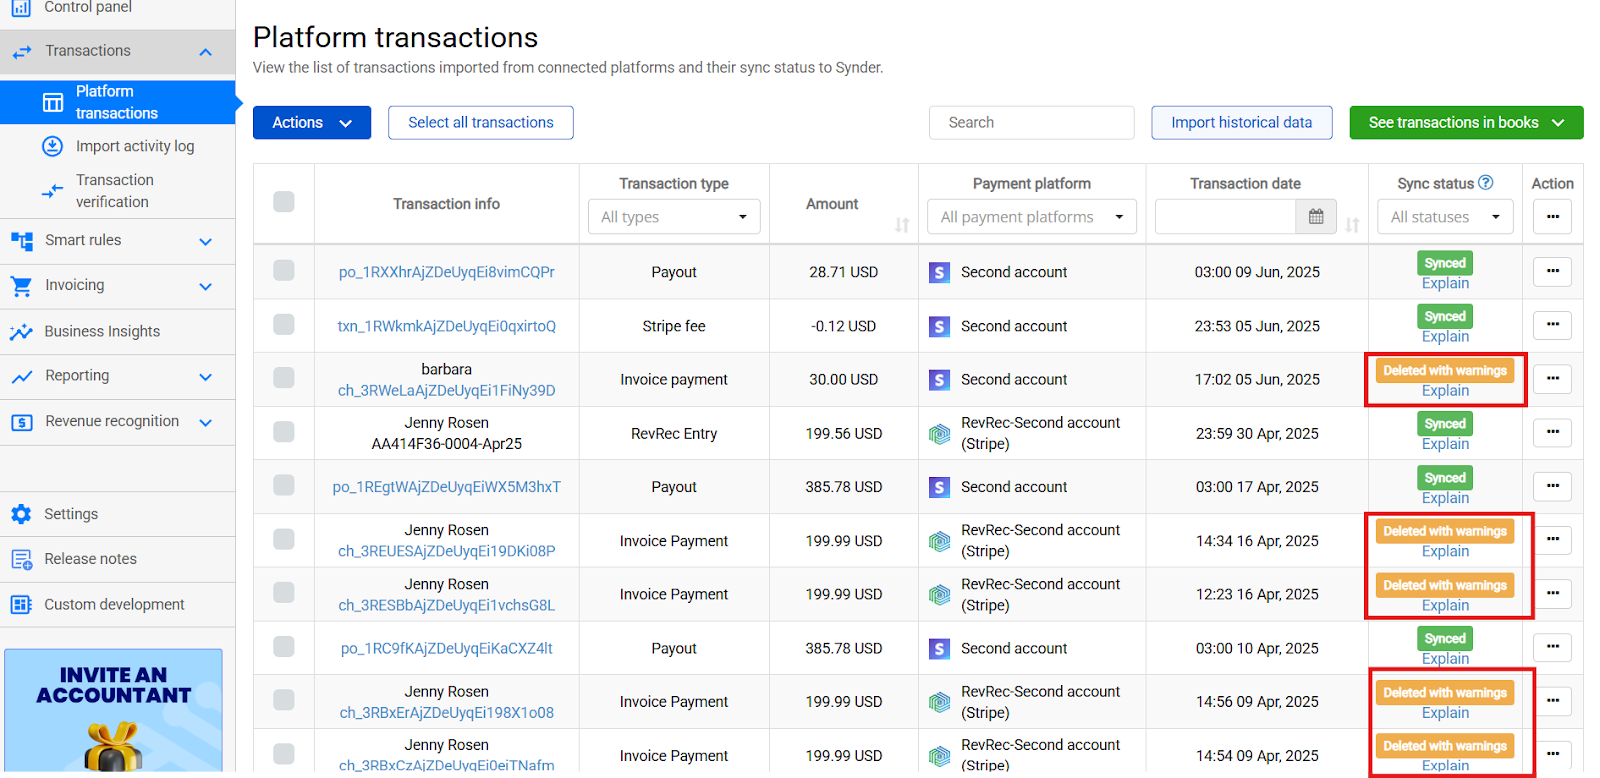
3. After Synder has completed deleting the transactions, you will be able to see that the sync status has changed to Deleted or Deleted with warnings. This confirms that these transactions are no longer in your books.
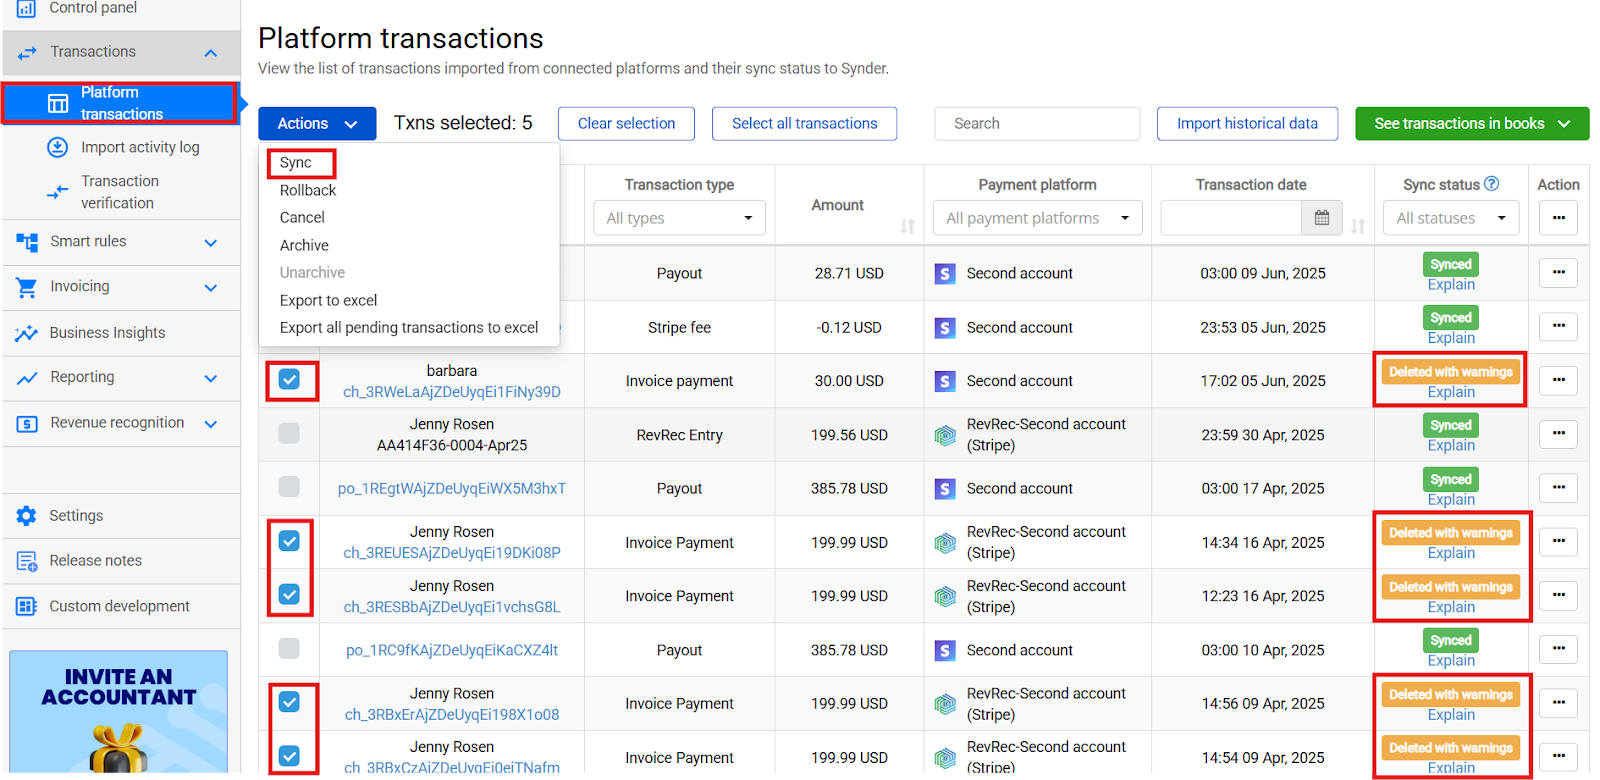
4. Last but not least, you can now sync transactions back into your books. But first, make sure that you switched off the “Automatically apply credits” setting in QuickBooks Online. Simply select all transactions that you just rolled back and sync them to the books.
Result:
Once transactions are synced back to the books, Synder will close created invoices with corresponding payments, making the Clearing Account balance correct. At the same time, any credit notes or payments QuickBooks had automatically applied will now be left unapplied.
Option B: Manually unapply credits in QuickBooks Online
Detach an auto-applied credit memo from the wrong invoice.
- Open the affected invoice.
At the top, you’ll see it marked as Paid, and just below the balance, there’s a blue link that says Payment (—) or Credit Memo (—). - Drill into the payment record.
Click that blue link. A Receive Payment window opens, and you’ll see the credit memo listed on its first line. - Void (or Delete) the payment record.
Scroll to the bottom, choose More ▾ → Void (or Delete) and confirm.
Tip: Void keeps a record for your audit trail, while Delete removes it completely. Either option will unapply the credit.
What it does: it removes the behind-the-scenes “payment” QuickBooks created when it auto-applied the credit, so the credit memo becomes Unapplied and the invoice reopens.
- Save & close the payment window. The invoice now shows Open.
- Apply the credit to the right invoice.
Open the correct invoice → click Receive Payment → tick the credit memo → Save.
Note: For many invoices, go to Sales ▸ All Sales ▸ Filter = Payments, tick the unwanted payments, and choose Batch actions ▸ Delete (or Void) to free multiple credit memos at once.
4. FAQ
When can I leave QuickBooks Online’s “Automatically Apply Credits” ON and still use Synder without issues?
Here are the scenarios when you can leave the setting ON:
1.If Synder syncs only payments/deposits while invoices already exist in your books (for example, they are created manually or by other third party apps). Here, Synder syncs only one part of the pair—the payment part, so there is no conflict.
2. If you only sync invoices through Synder while you get payments via other means into QuickBooks Online, (for example, through bank feed or third party apps). Similarly as above, Synder syncs only one part of the pair. This time, this is the invoice part, so there is no conflict.
3. If you have other workflows that rely on this QuickBooks setting and turning it off would create more issues. In this case, simply leave it ON. Synder will flag any affected transactions with a “Synced with warnings” status, letting you spot and correct those entries whenever it’s convenient.
Does this setting affect Summary Sync?
No, Summary Sync uses journal entries, so the setting never triggers.
Reach out to Synder Team via online support chat, phone, or email with any questions you have – we’re always happy to help you!