
- What is a mapping group?
- How to create a mapping group
- How to map a new group
- How to disable a group
- What are the default groups?
- Important notes
- FAQ
This guide explains what a mapping group is in Synder Summary Sync, how groups control summary lines, and how to create, prioritize, map, or disable them.
Use this guide if:
- You are using Synder summary sync mode.
- You want to customize how transactions are categorized.
- You want to separate specific transactions based on a set of conditions and map them to different accounts.
- You want to change the group priority.
- You want to create or disable a group.
Don’t use this guide if:
- You need instructions to rebuild summaries after creating, adjusting, reprioritizing, or disabling groups.
→ Use the guide on How to rebuild summaries instead.
What is a mapping group?
A mapping group is a rule that determines which transaction lines appear in your summaries (journal entries or invoices) and how lines are separated for mapping.
Groups filter transaction data based on conditions such as transaction type, accounting category, integration, description, memo, amount, and other available fields.
Each transaction line is assigned to one group only, based on priority order.
Example: Use manual groups to split platform fees
You start with one default group for all platform fees. But if you want to break down your platform fees into different categories and map them accordingly, you can set up more groups based on the description of other parameters.
Once the groups are set up, you can rebuild your summaries and map the new lines to the appropriate accounts.
How to create a mapping group
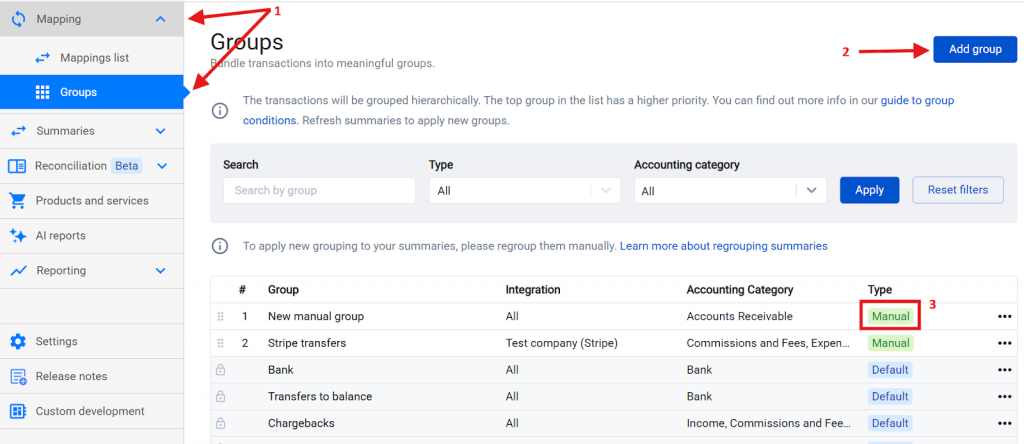
Step 1: Open Groups
- Click on the Mapping dropdown on the left-side menu.
- Click on Groups.
- Click Add group.
Manual groups are labeled as Type: Manual.
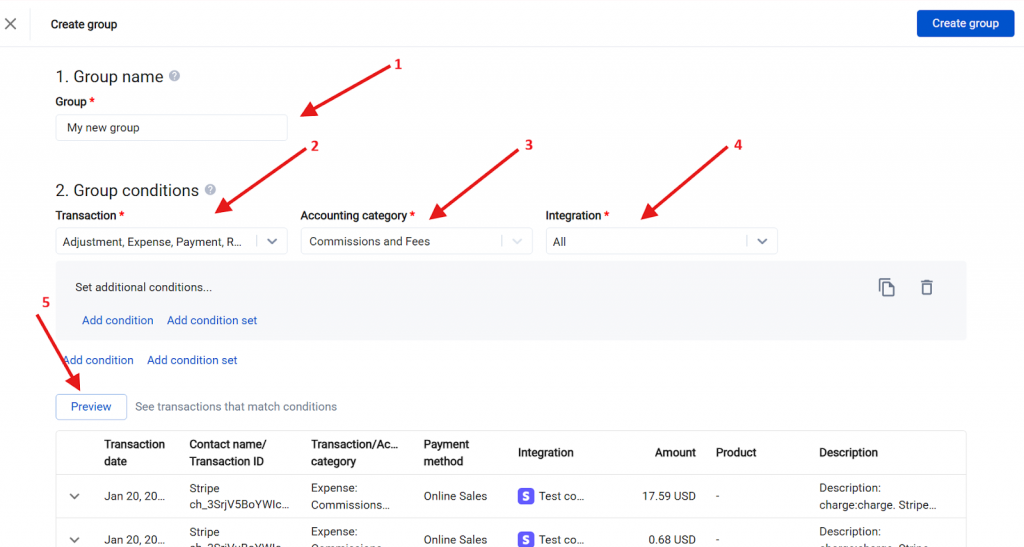
Step 2: Define main group conditions
Each group includes the following fields:
- Group (name):
- Enter a clear, descriptive name.
- The name appears in mapping and summaries.
- Renaming updates the mapping immediately.
- Existing summaries require Rebuild to reflect the new name.
- Transaction:
Defines the transaction type coming from the platform.
- Sale – Any sales (Invoices, orders) will appear under this group.
- Payment – If your platform generates invoice payments, payments themselves will display under this type.
- Refund – Platform refunds (not chargebacks)
- Expense – Platform fees, expenses, negative chargeback amounts
- Adjustment – A fallback group for all other transaction types, e.g., payouts, fee reversals, chargeback returns etc.
Tip: If you are unsure about which transaction type to select, choose “All Transactions” and use other fields (like description or amount) to filter for the records you need.
- Accounting category
- You can select one accounting category per group.
- You can select one accounting category per group.
- Integration
- Integration dropdown lists all your connected integrations.
- If you want to have certain groups specific to a particular integration, select it from the list.
- Preview
- Click “Preview” to see which transaction lines fall under your selected parameters.
- Preview displays line-level data exactly as shown in the Register table (Summaries → Register)
- If the preview is empty, you either have to adjust the Group conditions or import more data from the platform
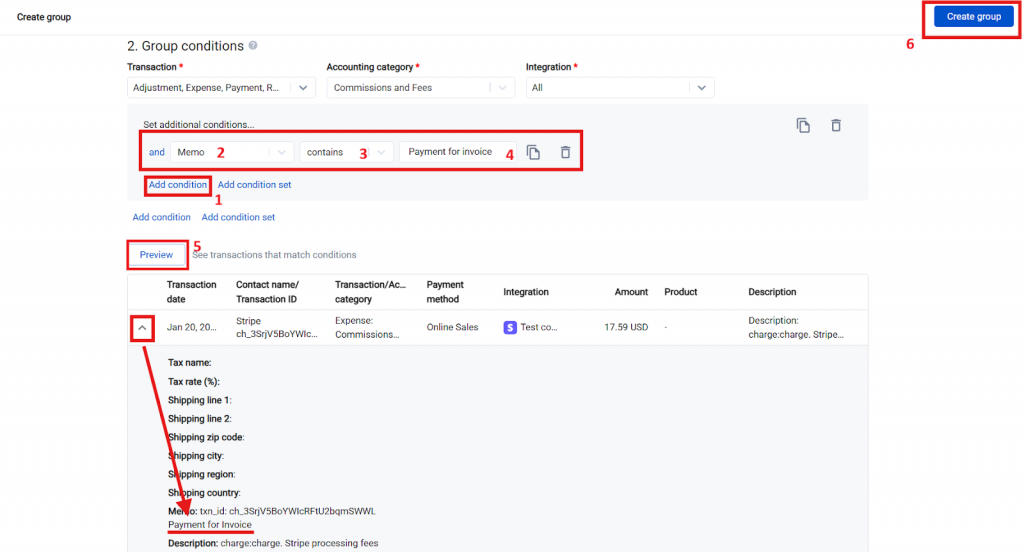
Step 3: Define additional conditions
You can add more detailed conditions based on the available data by following these steps:
- Click Add condition.
- Select the desired value from the dropdown (description, memo, address, etc.)
- Choose the operand (“contains”, “equals to”, etc.)
- Enter the desired value.
- Use Preview to confirm the needed transactions fall under the group.
- Click Create group.
Step 4: Add condition groups (optional)
If the needed transactions can not be filtered out using only one condition, you can add multiple conditions or condition sets to build the groups that match your specific criteria.

After completing these steps, your new group is ready! You can now preview your Mappings list and map the group to the desired account.
How to map a new group
- Click on the Mapping dropdown on the left-side menu.
- Click on the Mappings list.
- Locate a new group.
- Map it to the desired account.
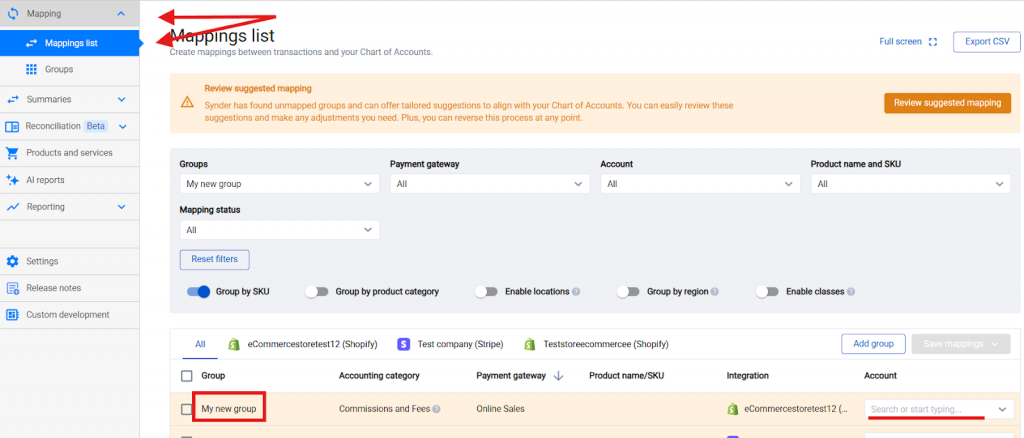
That’s it! The new group will affect all your newly imported transactions and newly generated summaries.
Note: To update existing summaries, you need to rebuild them. Use this guide on How to rebuild summaries.
How to disable a group
In order to disable the group, follow the steps below:
- Access Groups from the left-side menu.
- Click the three-dot menu next to the group.
- Select Disable group
After following these steps, the group will no longer be assigned to any new transactions. If you want to remove the group from your existing summaries, you will need to rebuild them (learn more here).
What are the default groups?
When you connect an account to Summary Sync, default groups are created automatically:
- You cannot edit or delete default groups.
- You can always create new manual groups to override the default ones.
- If no manual group matches a transaction line, it falls into a default group.
- Groups apply in priority order (top to bottom).
Check the list of default groups below:
| Group name | Group conditions |
| Bank | Grouping: transaction = ANY (e.g. Transfer); Accounting category = Bank; amount > 0. |
| Clearing | Grouping: transaction = ANY (e.g. Payment, Expense); Accounting category = Clearing |
| Discounts | Grouping: transaction = ANY; Accounting category = Discounts |
| Exchange gain or loss | Grouping: transaction = ANY; Accounting category = Exchange Gain or Loss |
| Expenses | Grouping: transaction = ANY; Accounting category = Expenses |
| Chargebacks | Grouping: transaction = Expense, Adjustment (Expense, Deposit); Accounting category = Income NEW and Commission and Fees + NEW and Deferred Revenue + Line description contains: “chargeback withdrawal” or “chargeback reversal” (should it be available for old users?) |
| Fees | Grouping: transaction = ANY; Accounting category = Commissions and Fees |
| Gift card liability | Grouping: transaction = ANY; Accounting category = Gift Cards |
| Invoices | Grouping: transaction = ANY; Type = Accounts Receivable (for this type the Transaction table will not show any lines) |
| Inventory assets | Grouping: transaction = ANY; Type = Inventory (for this type the Transaction table will not show any lines) |
| Refunds | Grouping: transaction = ANY; Accounting category = Income |
| Recognized revenue | Grouping: Transaction = Adjustment; Accounting category = Income and Integration = RevRec, Amount >=0 |
| Recognized Revenue Refunds | Grouping: Transaction = Adjustment; Accounting category = Income and Integration = RevRec, Amount <0 |
| Sales | Grouping: transaction = Sales (e.g. Invoice, Sales Receipt); Accounting category = Income |
| Sales tax payable | Grouping: transaction = ANY; Accounting category = Taxes payable |
| Shipping income | Grouping: transaction = ANY; Accounting category = Shipping income |
| Tax withheld by marketplace | Grouping: transaction = ANY; Accounting category = Taxes Paid |
| Unapplied cash payment income | Grouping: transaction = Payment (e.g. Payment); Type = Unapplied cash payment income |
| Customer Balance | Grouping: transaction = ANY; Accounting category = Customer Balance Liability |
| Deferred Revenue | Grouping: transaction = ANY; Accounting category = Deferred Revenue |
| Tips | Grouping: transaction = ANY; Accounting category = Tips income |
| Transfer to balance | Grouping: transaction = Adjustment (e.g. Transfer); Type = Bank; Amount < 0 |
| Bad Debts | Grouping: Transaction = ANY; Accounting category = Bad Debts |
| Cost of Goods sold | Grouping: Transaction = ANY; Accounting category = Cost of Goods sold |
| Rounding | Grouping: Transaction = ANY; Accounting category = Rounding |
| Uncategorized | Grouping: transaction = ANY; Accounting category = ANY, Integrations = ANY. |
Note: The uncategorized group is assigned only if none of the above groups apply. You can see which transactions are in this group (if any) in the Summaries → Register table.
Important notes
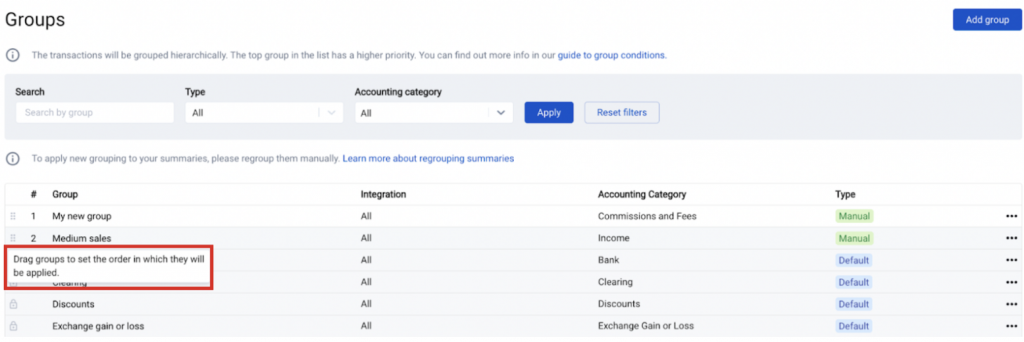
- Groups are applied according to their priority, from top to bottom. To change the group priority, simply drag and drop your manual groups to set the priority order in which the groups will apply to transactions.
- Newly created groups only apply to newly imported transactions/summaries. For already generated summaries, you will have to rebuild them to apply the current group setup.
- If you change account names or turn accounts into subaccounts in your accounting software, these updates won’t automatically appear in the Synder Mapping tab. Summary lines will still sync correctly because Synder uses account IDs, not names. If you’d like the Mapping tab to reflect your current naming structure, you can update the name assigned to groups from the mappings list manually.
FAQ
- How do Mapping Groups work with multiple sales platforms?
By default, all connected integrations are chosen while creating the group. As long as the set conditions are met, the group may apply to several sales platforms. If you need the group to work only for a specific integration, define the needed one in the “Integrations” tab. - Will summaries be synced without creating the manual mapping groups?
Yes! During the account creation, Synder automatically creates the list of default groups, so your basic mapping is ready to go. Add the manual groups if you need further categorization. - I created new groups, but transactions still fall under the default group. Why?
In this case, you will either have to adjust the group conditions or import more data from the platform, as the necessary transaction may not have been imported yet. Always use Preview to check which transaction falls under the group and adjust the conditions accordingly.
Reach out to the Synder Team via online support chat or email with any questions you have – we are always happy to help you!