
- Overview: E-commerce accounting challenges
- How to connect platforms correctly for accurate aggregation
- How Synder aggregates E-commerce data into summaries: Core principles
- What to expect on the Mapping page
- How to reconcile E-commerce summaries
- Important notes
- FAQ
This guide explains how Synder aggregates e-commerce and payment gateway data into summaries, the structure of mapping, and what to expect during reconciliation.
Use this guide to understand:
- How multiple platforms work together in Summary Sync.
- Why do summaries combine or separate integrations.
- How to interpret mapping and standalone gateway summaries.
- What do summary statuses mean.
- How your import settings affect aggregation.
This guide outlines various scenarios demonstrating how Synder processes multichannel data in Summary Sync, using Shopify as the e-commerce platform and Stripe as the payment gateway for illustration. It focuses on behavior and use cases rather than step-by-step instructions.
Overview: E-commerce accounting challenges
E-commerce businesses typically use:
- An e-commerce platform (Shopify, Amazon, WooCommerce, etc.)
- One or more payment gateways (Stripe, PayPal, Authorize.net, etc.)
- A connected accounting system
Each platform stores different pieces of financial data:
- E-commerce platform: Orders, customers, products, taxes, discounts
- Payment gateways: Payments, fees, payouts, chargebacks
For accurate accounting, fully capture and reconcile all sales components. Synder aggregates this data into structured summaries, providing better visibility and easier management.
How to connect platforms correctly for accurate aggregation
For Synder to aggregate ecommerce data properly, connect all platforms involved in your money flow.
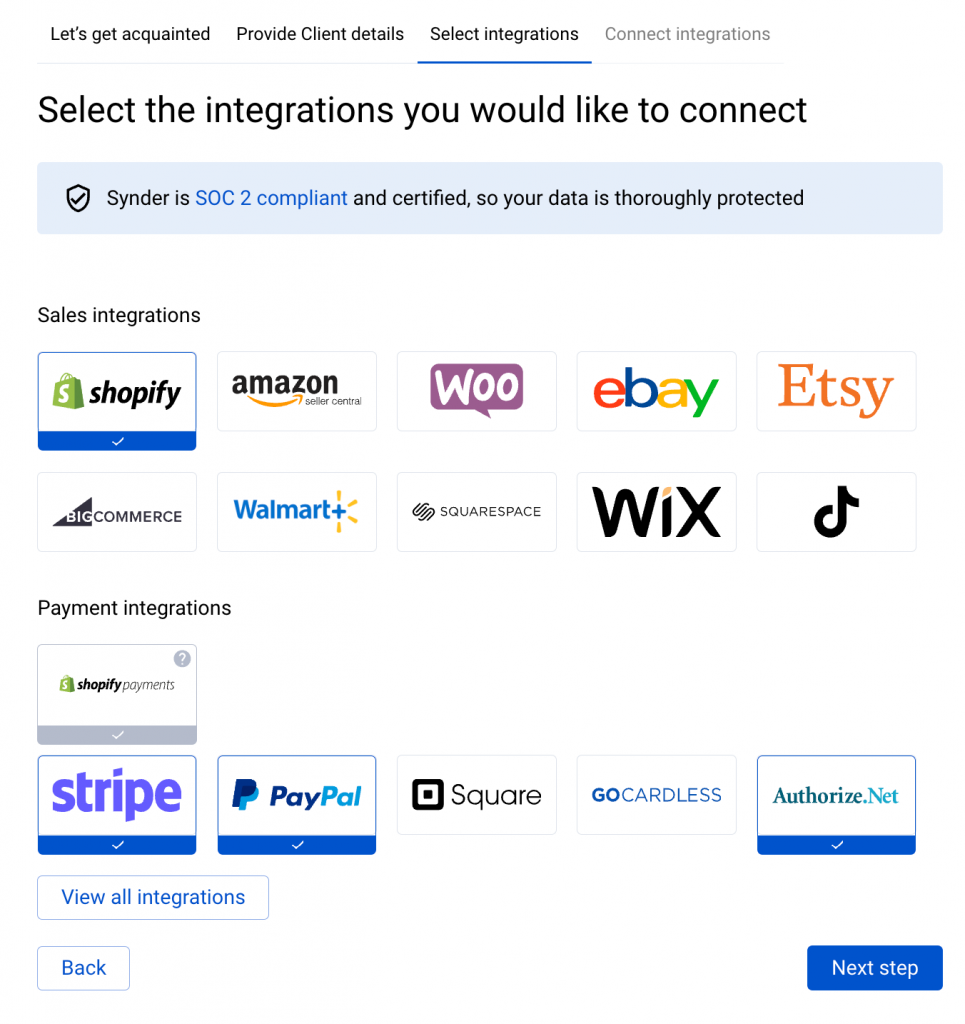
- Selecting integrations during onboarding
During onboarding, select every platform involved in processing your sales and payments (learn more about onboarding steps here).
For example, if you sell on Shopify and accept payments via Shopify payments, Stripe, PayPal, and Authorize.net, connect all of them.
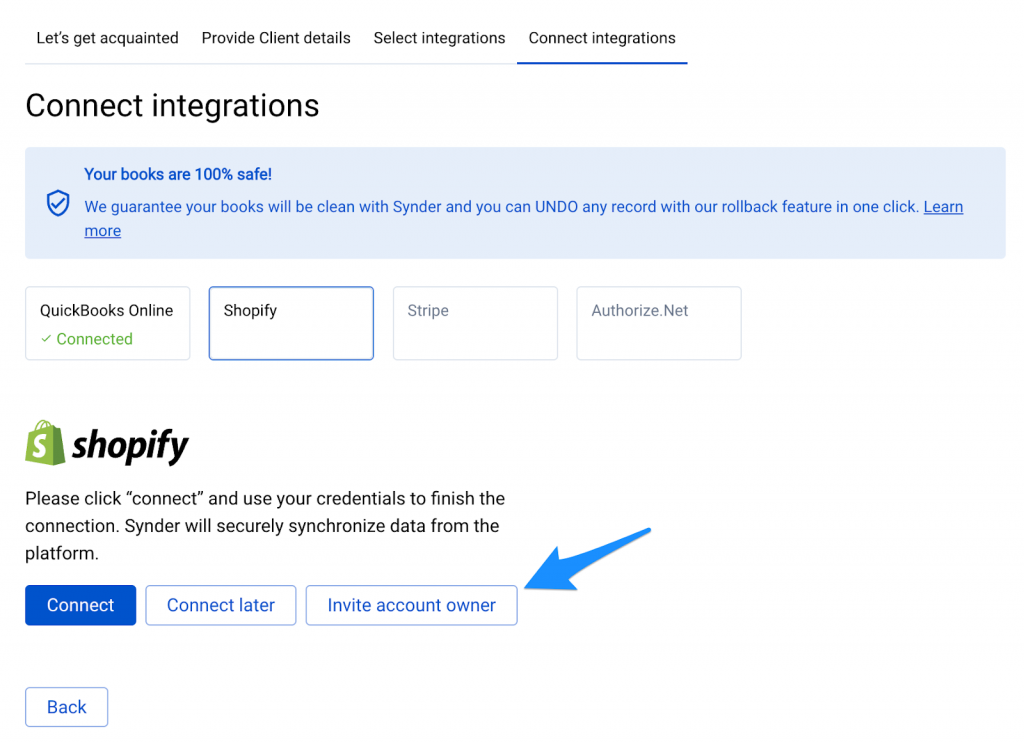
You will need to:
- Log in to each platform
or - Request access from the account owner.
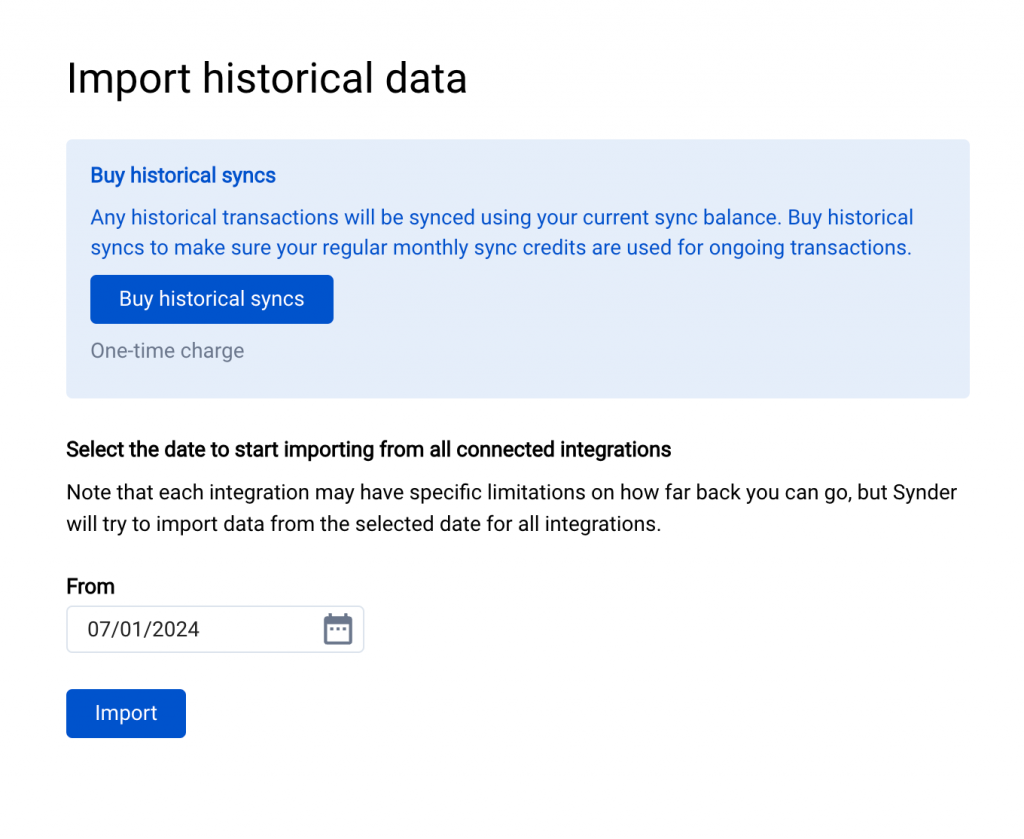
- Choosing the correct import start date
When connecting integrations, Synder asks you to select a “From” date for data import. This date must match across the E-commerce platform/s and all related payment gateways.
Example scenario on why the consistent import date is critical:
- Shopify was connected during the onboarding process on July 1, 2025.
- Stripe was connected later with an import start date on July 5, 2025.
As a result, if Shopify orders between July 1 and 4 were paid via Stripe, they will not be imported. Because of this, you will see discrepancies in your financial reports.
Best practice is to always select the same import start date for e-commerce platforms and their gateways.
What happens if a new gateway connects later
If you connect a payment gateway after onboarding:
- Synder rechecks previously created summaries.
- Some summaries will temporarily change from Fully fetched to Pending / Fetching

This is an expected behaviour – Synder needs some time to process and aggregate it in the best way. During this process, Synder is:
- Reviewing transactions from each platform
- Linking gateway data to e-commerce orders.
- Checking if transactions from gateway platforms are related to e-commerce sales or stand-alone platform transactions that need to be accounted for separately.
- Applying your mapping logic.
- Creating journals for each transaction in the background.
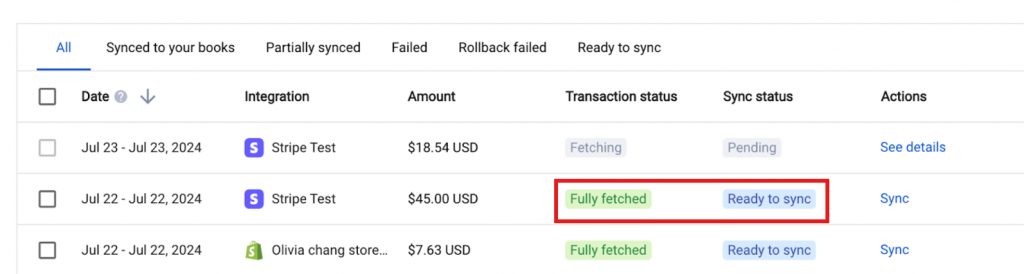
After completion, summaries will change the status to “Fully fetched”, indicating that all available data for that period has been aggregated. At this stage, the summaries are ready for review and synchronization.
How Synder aggregates E-commerce data into summaries: Core principles
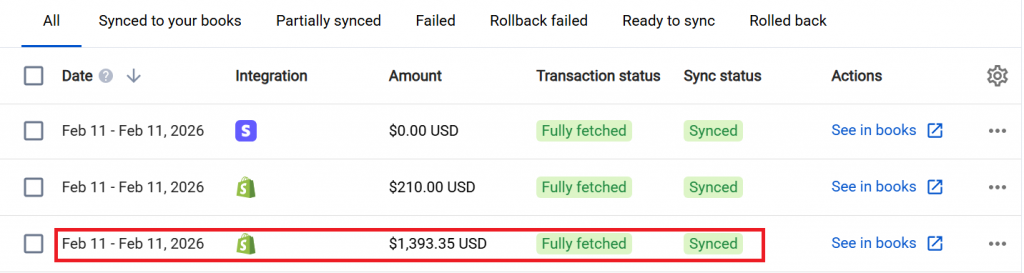
1. E-commerce orders and related gateway payments are included under one summary
When a payment processor (e.g., Stripe) is used exclusively for Shopify orders, Synder aggregates all transactions processed by both Shopify Payments and Stripe into a single summary.
Follow these steps to check and confirm this behaviour:
- Access the “Summaries list” page from the left-side menu.
- Locate a summary from the Shopify integration.
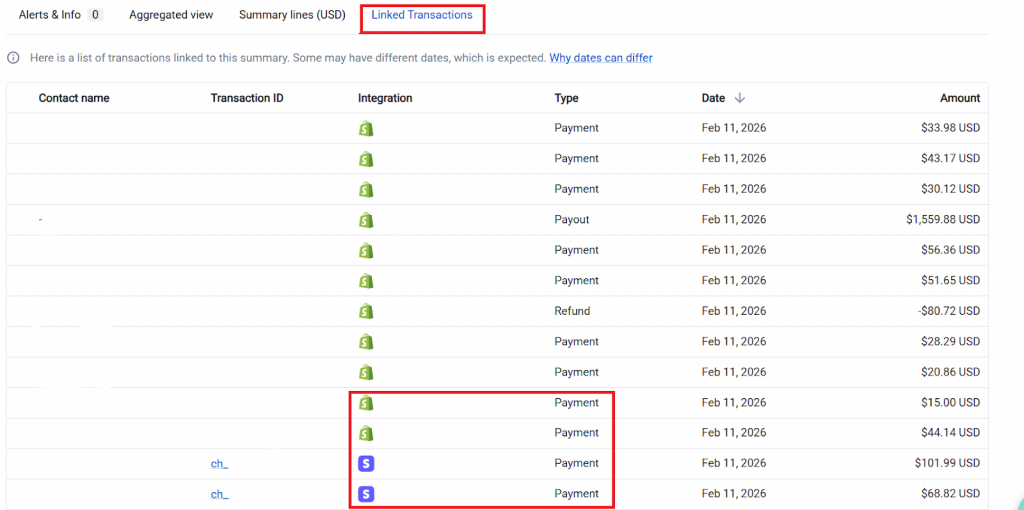
- Click on the summary line to open Summary Preview.
- Scroll down and see the ‘Linked Transactions’ block containing transactions from all payment gateways linked to Shopify sales.
2. Standalone gateway activity is separated
If Stripe is used for Shopify orders as well as non-Shopify transactions (manual payments, invoices, etc.), Synder creates:
- One Shopify summary (with Shopify and Shopify-related Stripe activity)
- One Stripe summary (for standalone Stripe transactions)
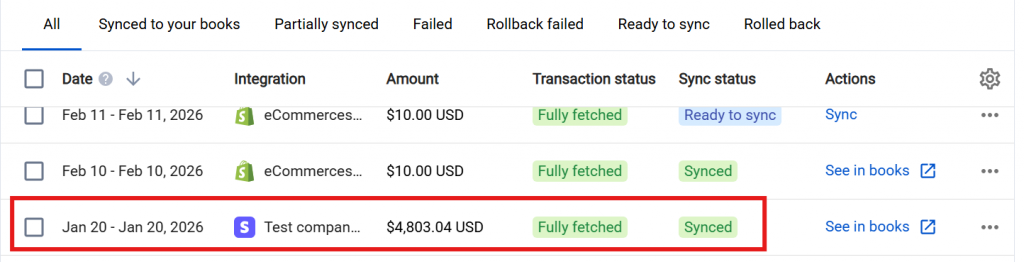
This separation ensures that E-commerce revenue is not mixed with other sales and that financial reports remain accurate.
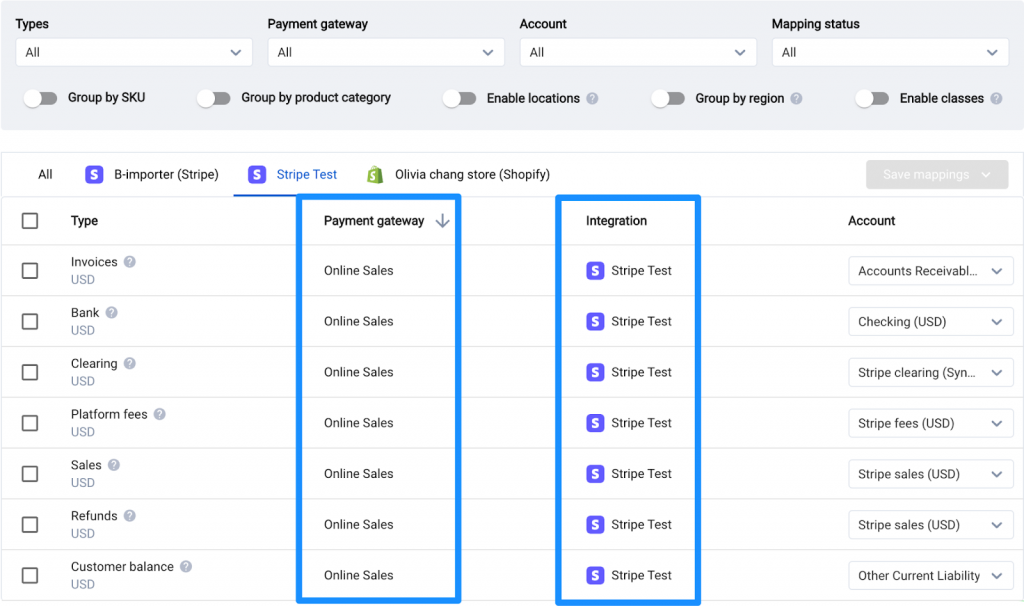
What to expect on the Mapping page
Mapping is an essential part of summary aggregation. It defines the final result of financial data synchronization to your books and ensures accurate reports.
There are two types of integration views in the Mappings list:
- E-commerce integration tab (e.g., Shopify)
This tab includes all E-commerce platform as well as all related gateway mapping lines. Columns:
- Integration → displays the name of the selected e-commerce platform (e.g., Shopify)
- Payment gateway → indicates the name of the related payment gateway(s), e.g. ‘Stripe Test’ in the example screenshot below.
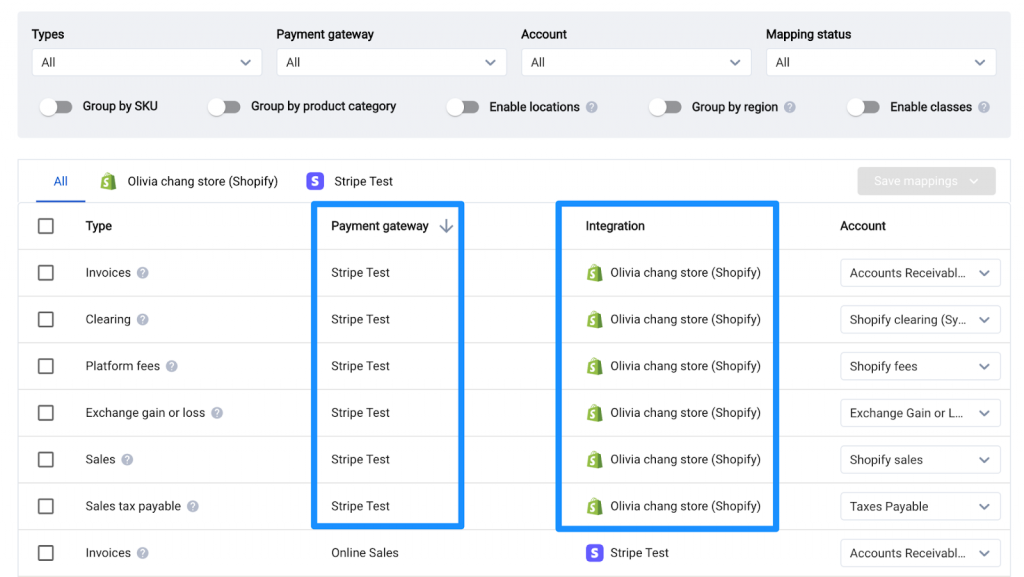
If multiple gateways are used for e-commerce sales, you will see separate mapping lines for each gateway under the e-commerce integration tab.
This allows you to:
- Map Shopify+Stripe differently from Shopify+PayPal.
- Control fee and payment allocation by the gateway.
Note: Synder identifies “Ecommerce vs. Gateway” relations between platforms during data import. If a new gateway starts processing your e-commerce orders, new mapping lines appear automatically.
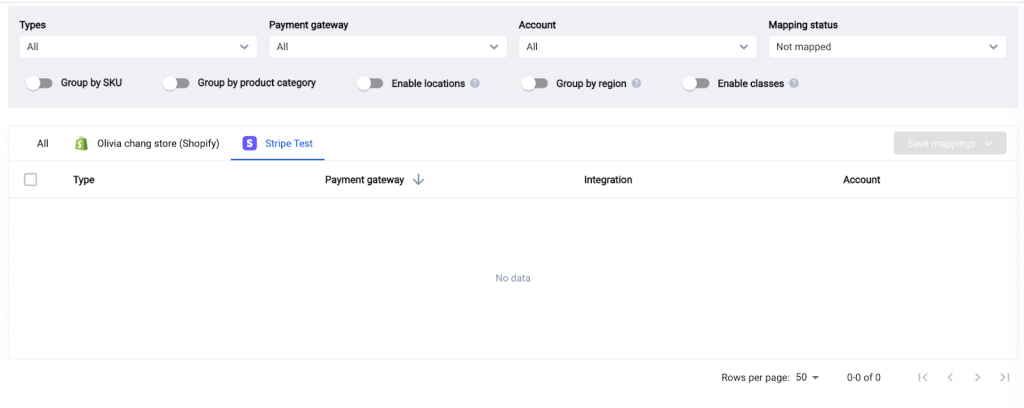
- Standalone gateway integration tab (e.g., Stripe)
This tab appears only if the gateway processes non-ecommerce transactions. Columns:
- Integration → In this case, Synder will display the payment gateway name (e.g., Stripe).
- Payment gateway → Will display Online sales and manual orders, depending on the specifics of the platform.
This helps identify whether the sales data is coming directly from the processor or if it is related to the E-commerce platform sales.
If a gateway processes only e-commerce-related payments, its standalone tab remains empty.
How to reconcile E-commerce summaries
Reconciling your e-commerce summaries is very straightforward with the e-commerce flow.
- Use your e-commerce platform’s financial summary report
(e.g., Shopify Finances Summary).
- Check and verify the sales details such as:
- Total sales
- Gateway breakdown (Finances summary report displays totals split by each payment gateway)
- Verify totals against:
- Synder Summary Preview
- Synced journal entries or invoices
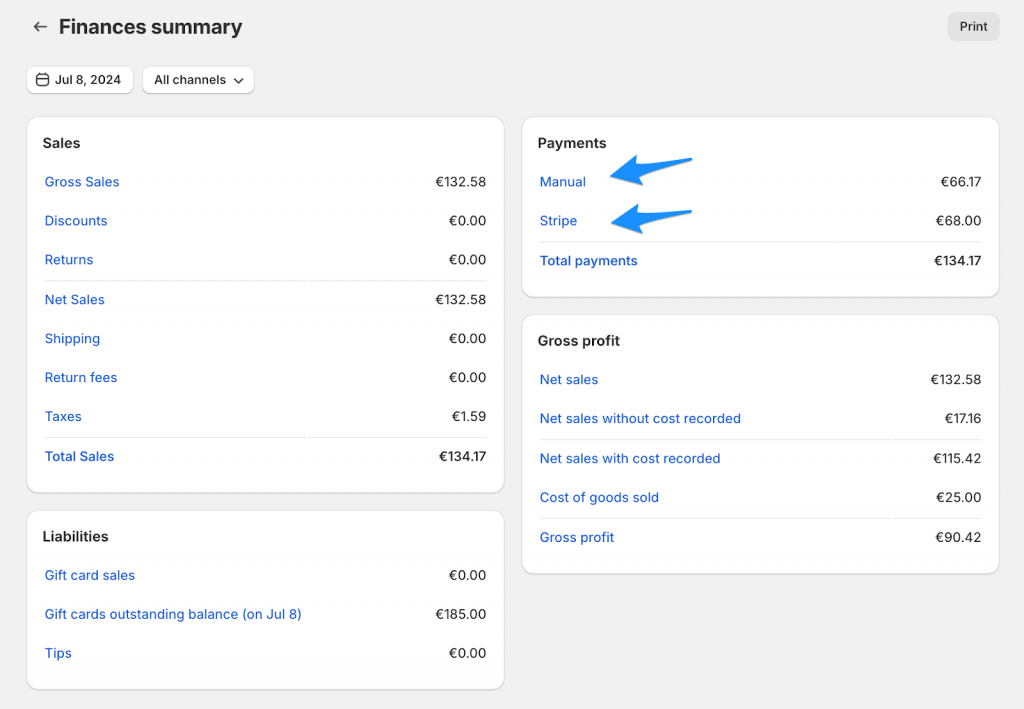
- If your Stripe integration is exclusively used for Shopify sales, there will be only one summary for the day/payout period that encapsulates payments from both platforms.
- If Stripe also processes unrelated payments, expect an additional Stripe summary.

In instances where Stripe handles various payments from different platforms, refer to the Stripe balance summary report to compare and reconcile these figures.
Note: It’s important to exclude the Stripe payments of E-commerce orders in your Stripe report so the number can be reconciled against Synder’s Stripe summary for the day.
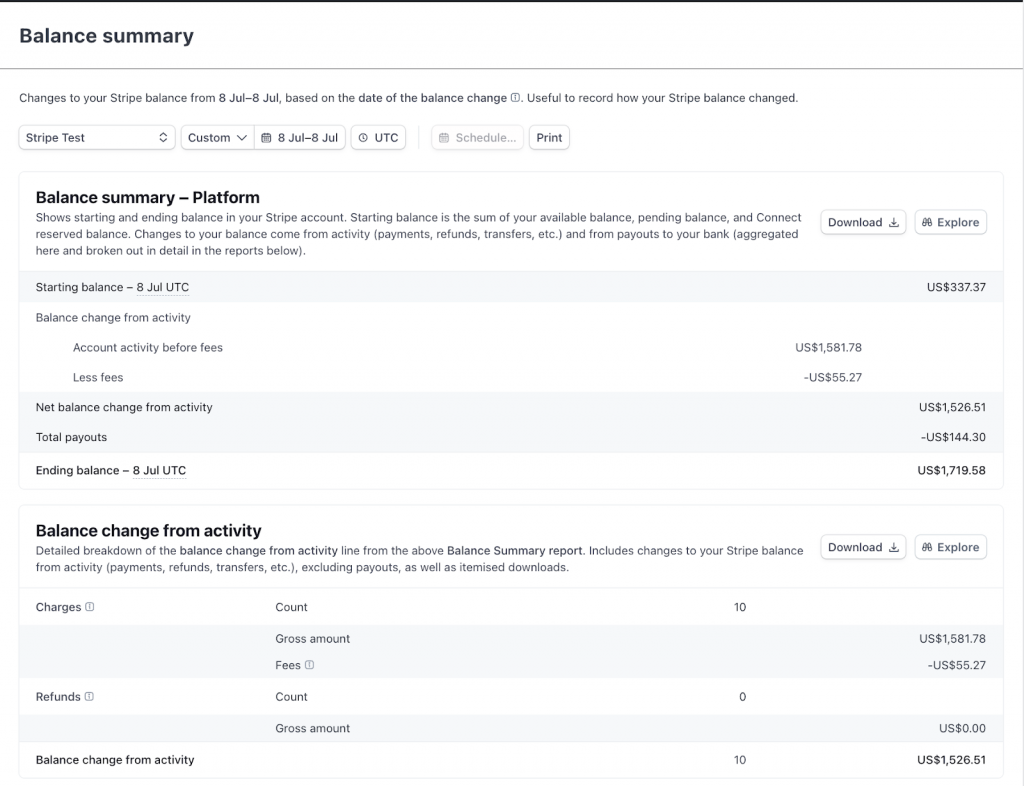
For a step-by-step Stripe summary reconciliation guide, please refer to this article.
Important notes
- In Synder, summaries having Pending/Fetching status are expected. This status indicates that Synder is actively fetching and aggregating the data. This process can take up to 24 hours. Check back in a few hours or the next day to see if the summaries are ready.
- If an e-commerce payment is processed through a gateway that Synder connects to directly, you must connect both platforms. For example, if a Shopify order is paid via PayPal and PayPal isn’t connected, the order will be missing from the day’s summary.
- You may receive a notification, “There’s been a problem with the proper forming of some of your E-commerce summaries”. Please refer to this guide to make sure your summaries are created correctly.
FAQ
- Why do my Shopify sales look correct, but my Stripe payout doesn’t reconcile?
This usually means Stripe is processing both e-commerce and non-ecommerce transactions. Synder separates these into different summaries, so only the ecommerce-related Stripe activity is included in the Shopify summary. - Why do my summaries change from Ready to sync to Fetching status after I connect another payment gateway?
When you connect a new gateway and initiate import, Synder re-evaluates previously created summaries to cross-check if any transaction is related to an E-commerce order. If there are such transactions, Synder will need to rebuild some summaries. During this time, summaries may appear as Pending/Fetching. - After connecting another payment gateway, will Synder update already synced summaries?
No, Synder will not make any change to the already synced data. If you need the data within the summary to be adjusted, you need to rollback the summary, rebuild, and sync again.
Reach out to Synder Team via online support chat or email with any questions you have – we are always happy to help you!