
- Overview
- Amazon clearing account reconciliation flow
- If your clearing account does not reconcile
- When to reach out to support
- Best practices for ongoing reconciliation
Overview
Synder syncs sales, refunds, payouts, and fees from Amazon. Depending on your configuration, transactions are recorded in your accounting platform as individual entries or summarized journal entries.
This guide explains how to:
- Identify the starting and ending balance of your Amazon account
- Reconcile your clearing account
- Compare Amazon and accounting data to identify discrepancies
QuickBooks Online is used as an example. The same reconciliation approach applies to other supported accounting integrations.
Use this guide if:
- You use Amazon with Synder
- Your clearing account does not reconcile or zero out automatically
- You want to verify that Amazon and accounting records match
After completing the steps, your Amazon clearing account will reconcile with sales, payouts, and fees reflected accurately in your books.
Amazon clearing account reconciliation flow
To reconcile your Amazon clearing account, compare its ending balance with Amazon’s ending balance for the same period.
Here’s how you can find the Amazon balance by downloading the Custom Unified transactions report:
- Navigate to Amazon → Payments.
- Open Reports Repository.
- Apply the following filters:
Account types: All (unified report)
Type: Transaction - Select the required time period and click request.
- When the report is ready, click Download.
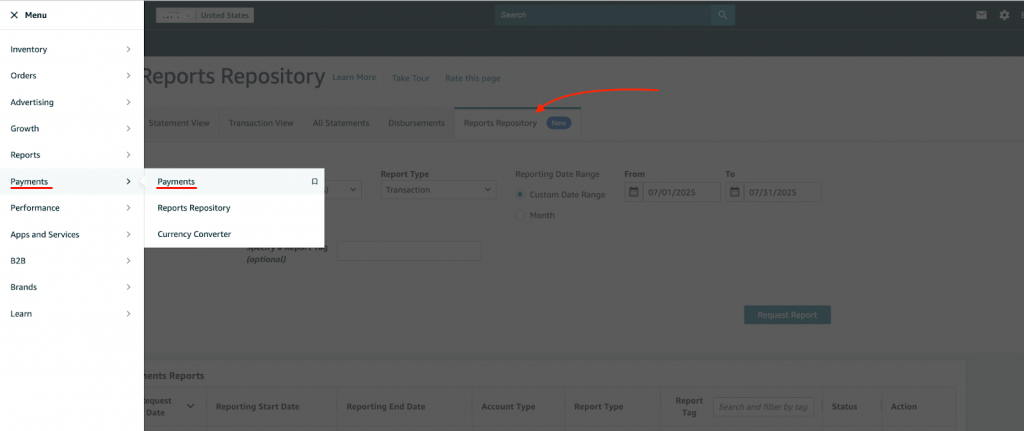
- Open the Excel file and calculate the sum of the Total column.
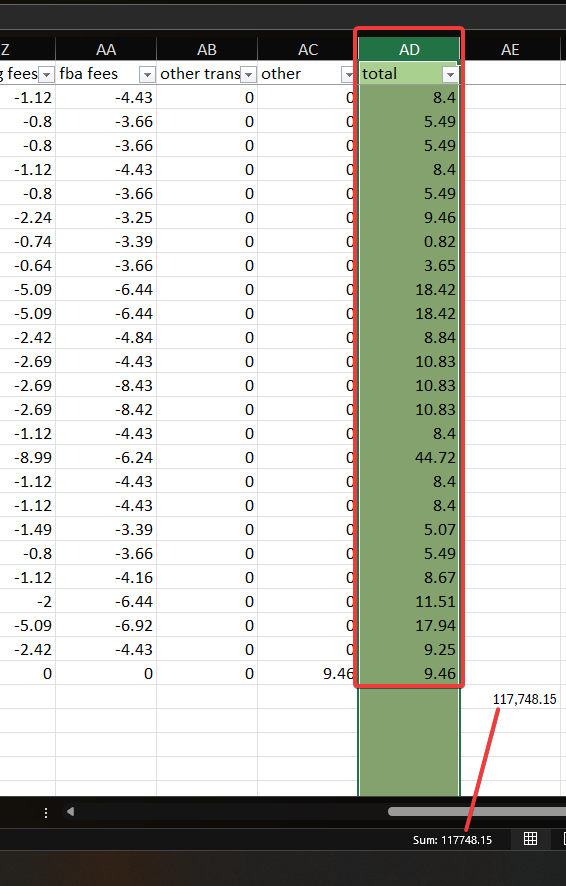
The result is the Amazon ending balance for the reconciliation period.
Next, compare this amount with the ending balance from your clearing account report in QuickBooks Online for the same date:
- Navigate to Reports → Standard Reports.
- Select Balance Sheet.

- Select column display to Months.
- Locate the Amazon clearing account for the reconciled month.
- Subtract the previous month’s balance.
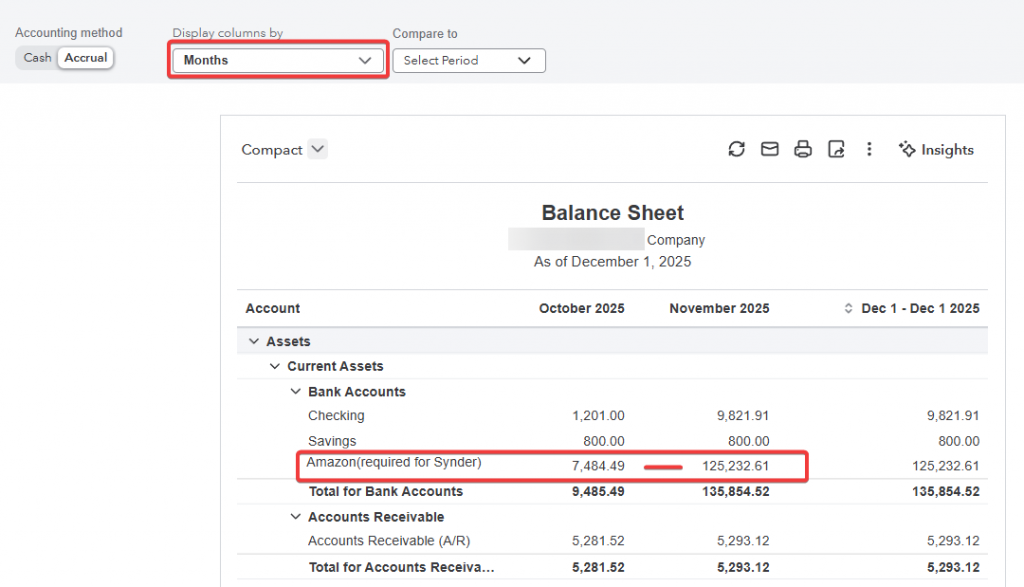
The result is the clearing account balance for the selected period.
The amounts you will see in the QuickBooks Online clearing report will match your Amazon Custom Unified transactions report amount, meaning the reconciliation was successful. Congratulations!
If your clearing account does not reconcile
If the balances between your Amazon and Quickbooks report don’t match, it’s often caused by unsynchronized transactions. Follow the steps below to make sure that Synder has successfully synced your Amazon data.
- Go to Synder and filter transactions by status. Make sure that all the transactions within your reconciliation period are in statuses: Synced or Skipped on the Platform transactions page.
All the other statuses indicate that the transaction is not in your books or needs additional checking. As long as such transactions are present, your books won’t reconcile. - Make sure you are comparing the right numbers (sales might not equal cash, for example). It’s important to use the right numbers for reconciliation and comparison.
- If your platform was disconnected within the reconciliation period, make sure you run a Historical Import on the Platform transactions page to retrieve any missing transactions.
If after that your balances still don’t match, follow the steps below to identify discrepancies by comparing Amazon and QuickBooks Online data in Excel.
Step 1: Download required reports
You should already have a report from Amazon if you’ve followed the main reconciliation flow. If not, please download it by following the steps above.
We will also need a report of the Amazon clearing account from your accounting software.
Important: Download only released transactions, not deferred ones, as deferred transactions won’t appear in settlement reports until released.
Follow this link to find the exact steps on how to generate a clearing account report in QuickBooks Online
Note: If your QuickBooks clearing account has tens of thousands of transactions, it might not download the full dataset. After downloading one of the reports above, check for data completeness. If the report is missing data, try the alternative download method.
Step 2: Prepare your Excel data for comparison
How to prepare your Amazon report
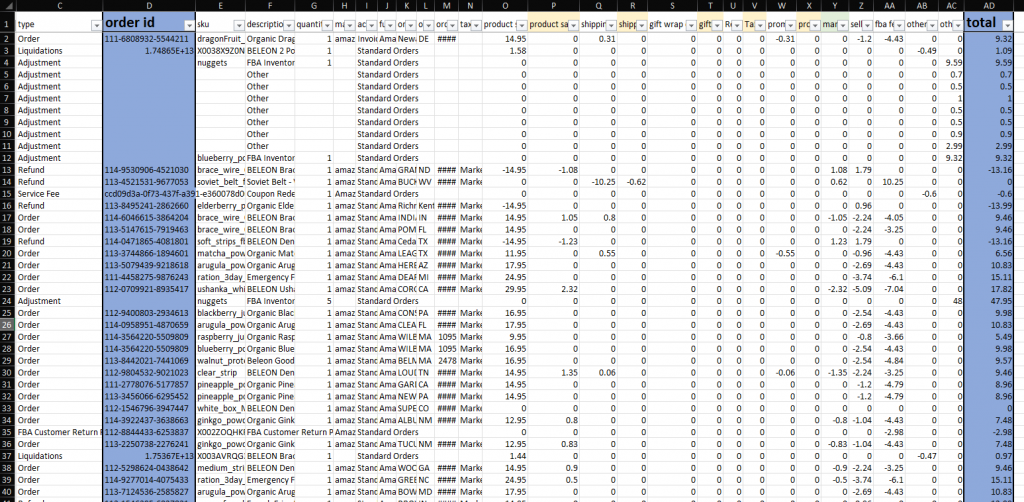
Amazon report includes a lot of transaction details that you don’t need for comparison.
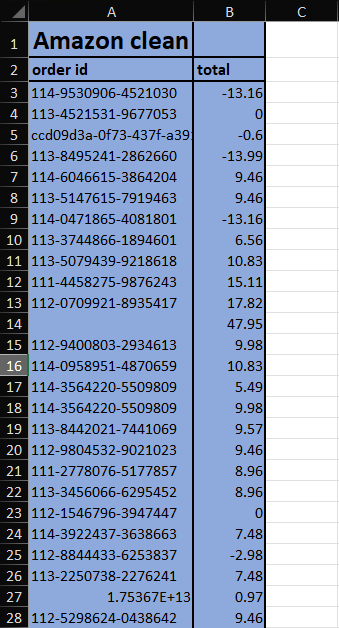
Copy values of order ID and total columns into a new sheet. This will be our Amazon clean report.
Here’s an example of how it should look like.
How to prepare your QuickBooks Online report
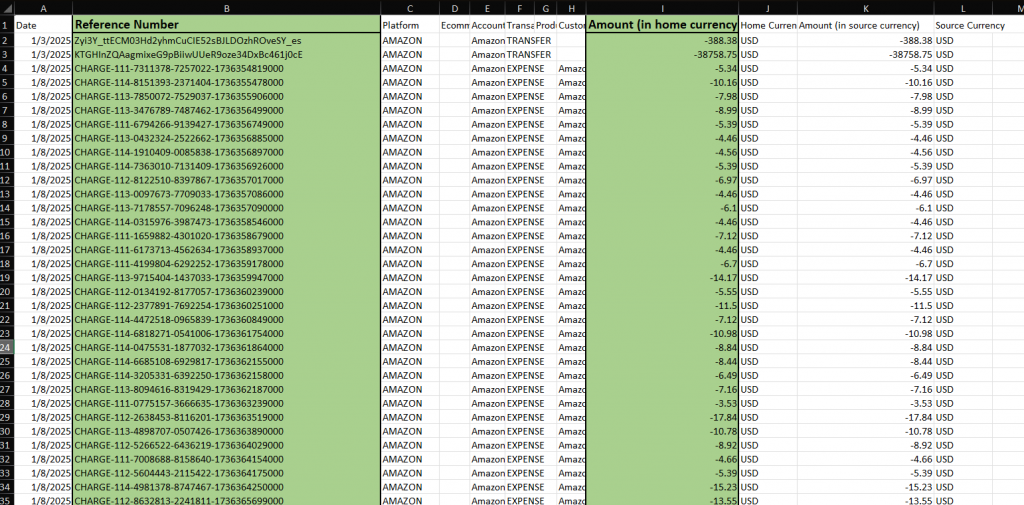
QuickBooks report also has details that you don’t need for comparison.
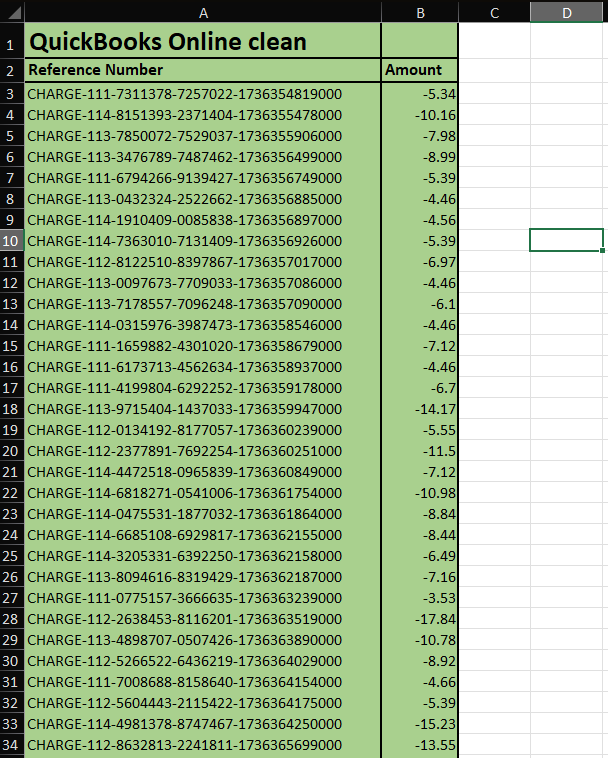
Copy values of Reference Number and Amount(in home currency) columns into a new sheet. This will be our QuickBooks Online clean report.
Here’s an example of how it should look like.
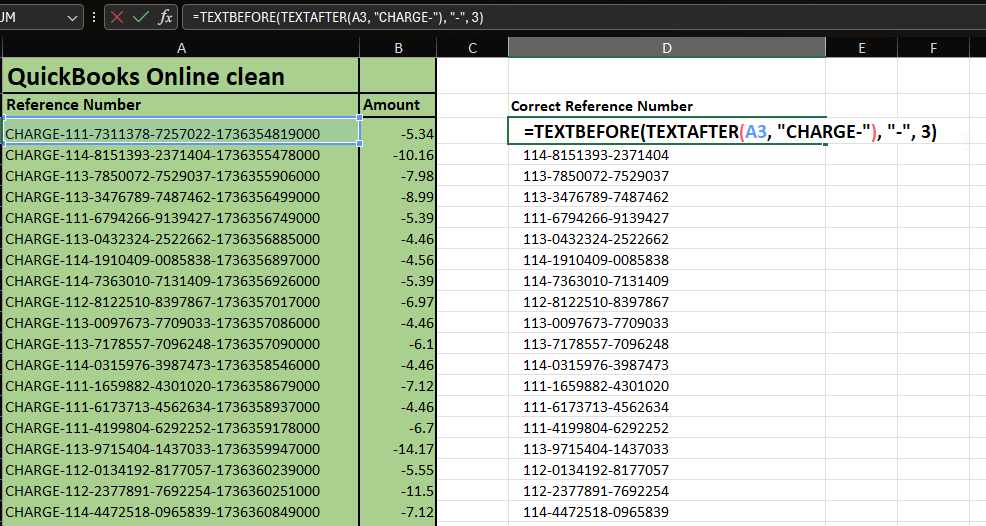
Step 3: Correct QuickBooks Online reference numbers
QuickBooks Online has a slightly different manner of recording order ID. To match it to Amazon, we need to remove unwanted text using formula below:
- =TEXTBEFORE(TEXTAFTER(A3, “CHARGE-“), “-“, 3)
Where A3 is the row where you want to find the reference number.
- Do the same thing for Refunds:
=TEXTBEFORE(TEXTAFTER(A3, “REFUND-“), “-“, 3)
Where A3 is the row where you want to find the reference number.
- And for coupons:
=TEXTBEFORE(TEXTAFTER(A3, “COUPON-“), “-“, 5)
Where A3 is the row where you want to find the reference number.
Step 4: Consolidate multiple lines into one entry per transaction
Amazon transactions may appear as multiple line items in QuickBooks Online (e.g., one per product or fee). For accurate reconciliation, you need to consolidate these into a single row per transaction, showing the total amount. Use Excel’s Consolidate function:
- Click on an empty cell in an empty row.
- Go to Data → Consolidate.
- In the reference box, select both columns A and B (your ID and amount columns).
- Click the + (plus sign) to add this reference.
- In the Use labels in the section, check BOTH boxes:
- ☑️ Top row (uses column headers);
- ☑️ Left column (uses IDs as grouping criteria)
- Click OK.
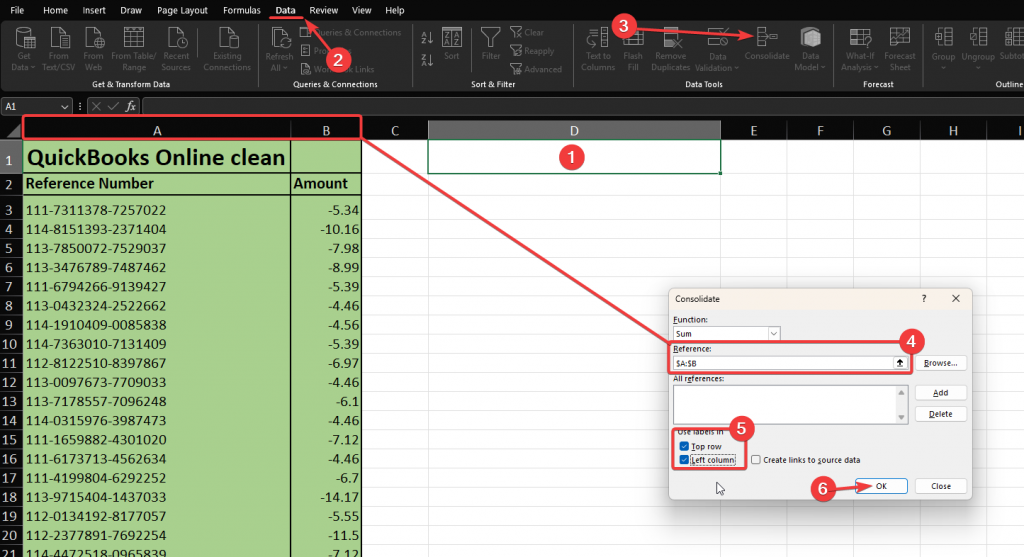
As a result, Excel will group multiple transactions with the same ID into one and sum their amounts.
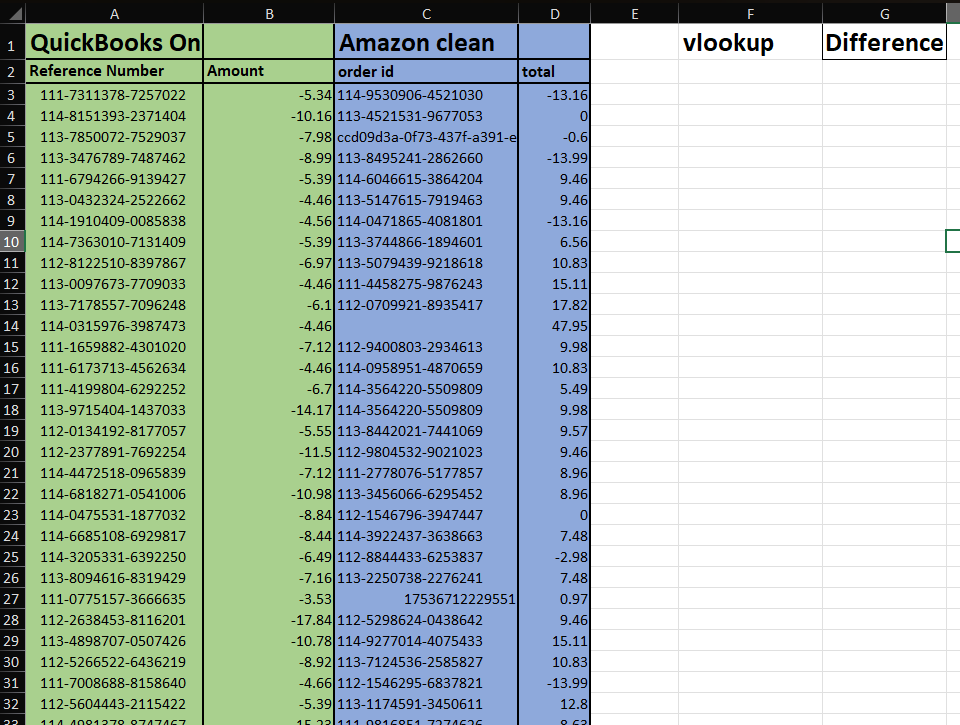
Step 5: Organize your data
1. Create separate worksheets for:
- Amazon original report data
- QuickBooks Online report data
- Comparison Analysis (your working sheet)
2. In your Comparison Analysis sheet, create columns for:
- Amazon Transaction ID
- Amazon Amount
- QuickBooks Transaction ID
- QuickBooks Transaction Amount
- Lookup
- Difference
Here’s how the end result should look:
Step 6: Compare data using VLOOKUP
Our objective is to match transaction amounts from Amazon and QuickBooks Online that have shared IDs. This process helps us identify any discrepancies in amounts or missing transactions within QuickBooks Online.
1. Set up your comparison formula
- Copy your cleaned Amazon IDs and amounts to columns A and B.
- In the Lookup column, use VLOOKUP to find matching QuickBooks Online amounts:
=VLOOKUP(A2,C:D,2,FALSE)
Where:
- A2 = Amazon ID you’re looking up
- C:D = Your QuickBooks Online data range (ID in column C, amount in column D)
- 2 = Returns the amount from the 2nd column (QuickBooks Online amount)
- FALSE = Exact match only
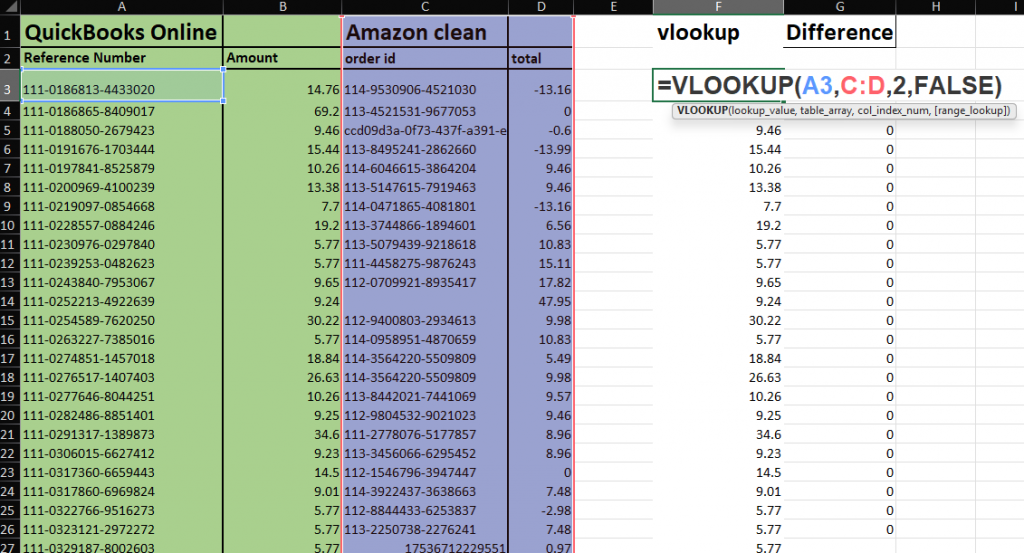
In the Difference column, calculate the difference by subtracting the looked-up amount from the Amazon amount.
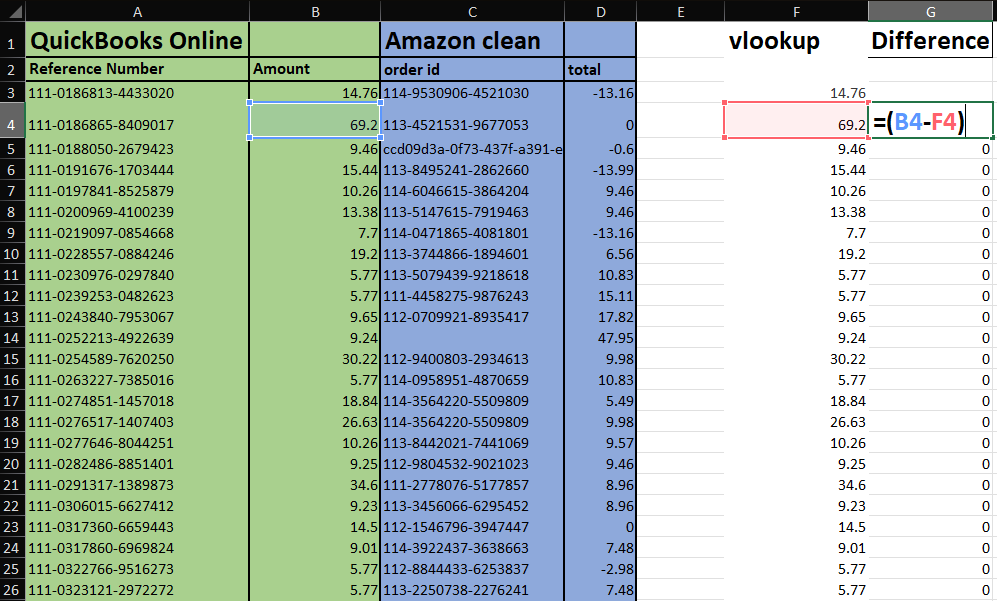
2. Identify discrepancies
Perfect matches should show 0 in the difference column.
Common discrepancy indicators include:
- Negative number = QuickBooks Online amount is higher than the Amazon amount.
- Positive number = Amazon amount is higher than the QuickBooks Online amount.
- N/A = Transaction ID exists in Amazon but not in QuickBooks Online.
Step 7: Address common discrepancies
1. Missing transactions in QuickBooks Online
Possible causes:
- Transaction failed to sync due to network issues
- Transaction filtered out by Synder settings
- Unsupported transaction type
Actions to take:
- Check Synder’s sync logs for failed transactions.
- Force a manual sync in Synder for the missing period.
- Confirm timezone settings match between Amazon reports (PST/UTC) and Synder.
2. Amount differences
Possible causes:
- Currency conversion differences between marketplaces
- Partial refunds not properly matched to original orders
- Difference in fee calculations between Amazon reports and Synder processing
Actions to take:
- Check for currency conversions if selling in multiple countries.
- Look for reserve balance movements in the same period.
- Check for related adjustment entries in subsequent periods.
3. Extra transactions in QuickBooks Online
Possible causes:
- Manual entries created by your accounting team
- Duplicate syncing from multiple sync attempts
- Journal entries or adjustments made outside of Synder
- Starting balance entries when first setting up clearing accounts
Actions to take:
- Check if descriptions indicate manual entry.
- Verify transaction source in QuickBooks Online (look for “Synder” in descriptions).
- Check for duplicate Amazon connections in Synder.
- Review any manual clearing account adjustments.
When to reach out to support
Get in touch with support when you’ve identified specific transactions causing issues but can’t resolve them.
What to include in your support request:
- Reconciliation period (start and end dates)
- Specific transaction IDs
- Screenshots of problematic transactions in both Amazon and QuickBooks Online
- Summary of your findings (e.g., “Found 5 missing fulfillment fees totaling $47.50”)
- Currency/marketplace information if applicable
- Steps already taken to resolve the issue
Best practices for ongoing reconciliation
Staying on top of your clearing accounts requires consistency. Here are key practices to help you keep your books accurate and your reconciliation process smooth over time:
- Reconcile monthly rather than waiting for quarter-end.
- Monitor multiple currency clearing accounts if selling internationally.
- Keep an eye on alerts in Synder for failed sync transactions.
- Maintain timezone consistency across Amazon, Synder, and reconciliation periods.
- Document any manual entries made to clearing accounts.
- Review unsupported transaction types periodically as Synder adds support.
A consistent reconciliation routine saves time, reduces errors, and keeps your financials audit-ready. By following these best practices, you’ll avoid surprises down the line and ensure your clearing accounts stay clean and reliable month after month.