Synder’s Transaction Verification feature helps you ensure that the data imported from your sales platforms perfectly matches the records in Synder. This guide will walk you through the steps to compare your platform data with Synder’s records, identify discrepancies, and confirm the accuracy of your financial data.
Overview:
Getting Started with Transaction Verification
To access the Transaction Verification feature:
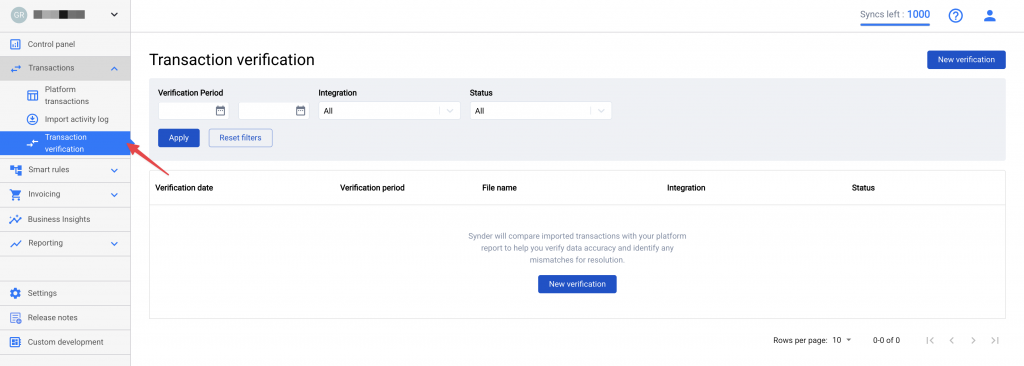
Preparing your data file
Before starting a new verification, make sure to download an export file from the integration and format it into a data file based on the provided template.
Steps to prepare the data file:
1. Export transactions from the integration.
2. Download the Template:
-Start a new verification: on the Transaction Verification page, click New Verification.
-Click on the Download template within the Transaction Verification page.
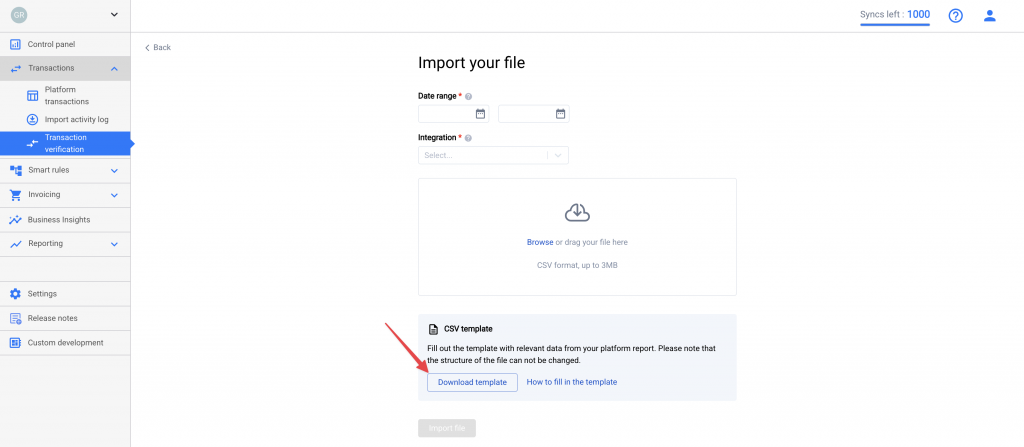
This will download a CSV file with the following columns:
-Transaction ID
-Transaction date/time
-Amount
-Currency
3. Fill out the template:
-Open the CSV file using any spreadsheet software (e.g., Excel, Google Sheets).
-Fill in the template with transaction data exported from your platform.
-Ensure that the data corresponds to the period you wish to verify.
4. Save the file:
-Once you’ve filled in the data, save the file in the CSV format.
Creating a new verification
To create a new verification:
1. Start a new verification: on the Transaction Verification page, click New Verification.
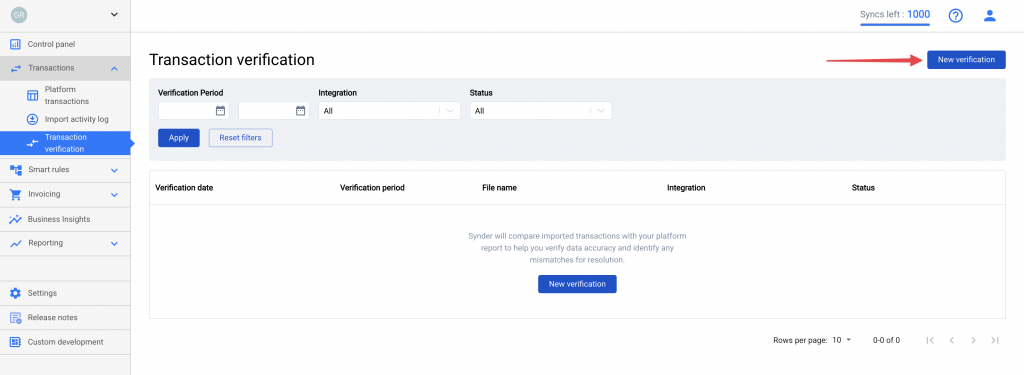
2. Set the date range: Select the period for which you want to verify data using the date picker.
3. Choose the integration: from the dropdown menu, select the integration you want to compare data against.
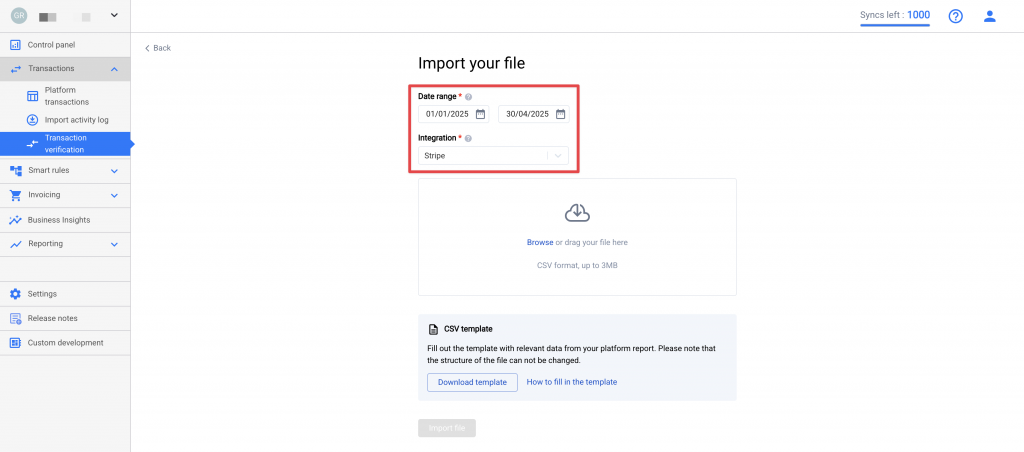
4. Upload your data file:
-Click Browse and select the CSV file you prepared.
-Wait for the file to upload.
5. Complete the import: Click on the Import file to confirm.
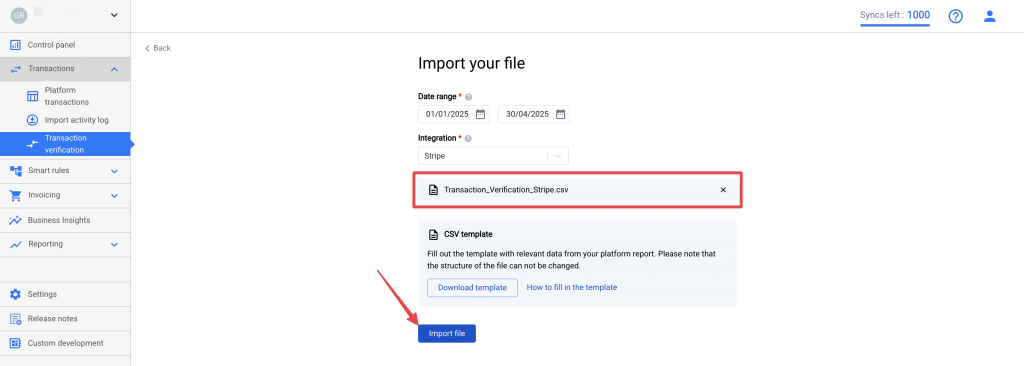
6. Ready for review: Once the file is uploaded and processed, the status will change to Ready for review.
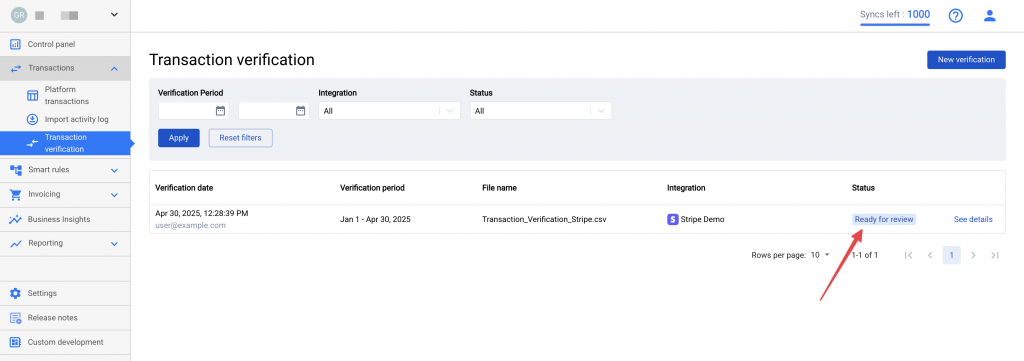
Understanding verification statuses
Each verification intent has a status indicating its current state:
- Pending: The file is being imported and processed.
- Ready for review: The verification is ready for you to review and take action.
- Verified: You’ve confirmed that all data matches and the verification is complete.
- Unable to verify: There are discrepancies that couldn’t be resolved.
- File import failed: There was an error importing your file.
Note: Once a verification is marked as Verified or Unable to verify, the status is final and cannot be changed.
Reviewing verification results
After your verification status is Ready for review, you can proceed to review the results:
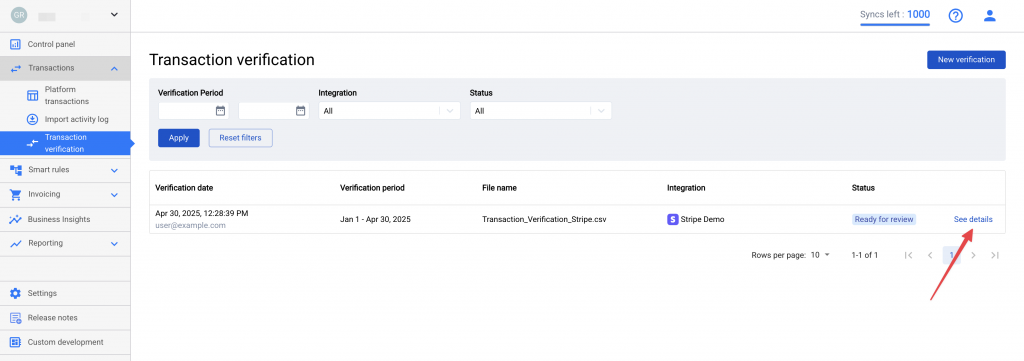
1. On the Transaction Verification page, locate your verification intent.
2. Click See Details to open the verification details page.
Managing transactions
Transactions are categorized into different tabs based on their match status:
Tabs overview:
- Not matched: Transactions that couldn’t be matched by Transaction ID.
- Partially matched: Transactions with matching IDs but discrepancies in other details.
- Matched automatically: Transactions that were perfectly matched by Synder.
- Matched manually: Transactions you’ve matched manually .
- Ignored: Transactions you’ve chosen to exclude from verification.
Actions you can take:
- Match: Manually match selected transactions.
- Unmatch: Undo a match, moving transactions back to Not matched.
- Ignore: Exclude transactions from the verification process.
- Undo: Move ignored transactions back to their original tab.
Matching transactions
To manually match transactions:
1. Select transactions:
-In the Not matched section, select one or more transactions from In file and In Synder.
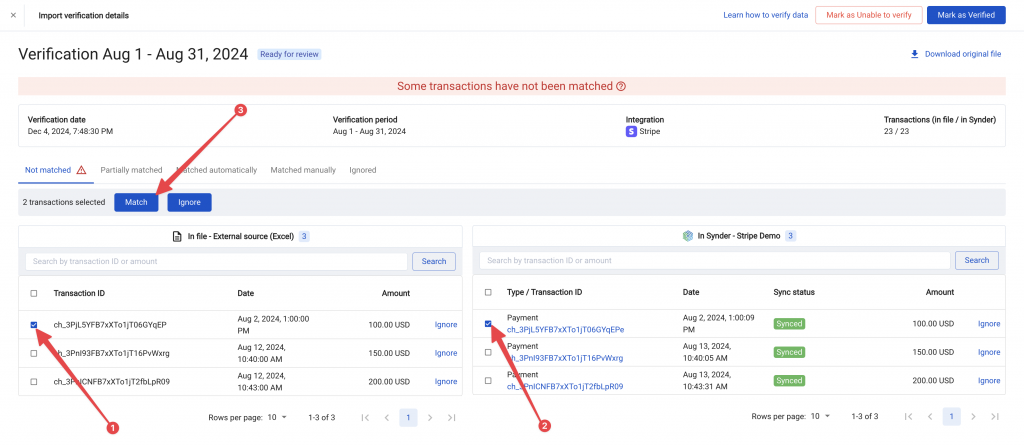
-Or in the Partially matched tab, match the preselected pair.
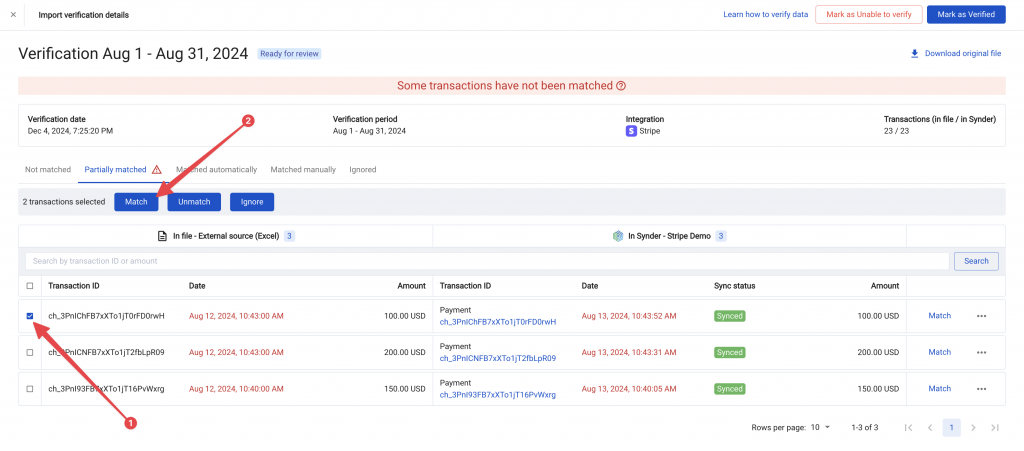
2. Click Match:
-After selecting, click the Match button.
-The matched transactions will move to the Matched manually tab.
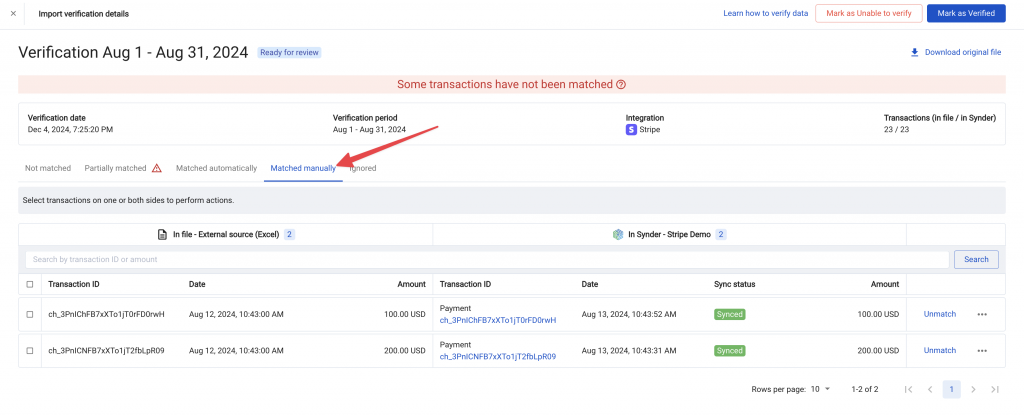
Note: You can manually perform one-to-one, one-to-many, or many-to-many matches. For the best results, it’s recommended to match transactions on a one-to-one basis whenever possible. Use one-to-many or many-to-many matching only when a transaction in the integration export file corresponds to multiple transactions in Synder or vice versa.
Ignoring transactions
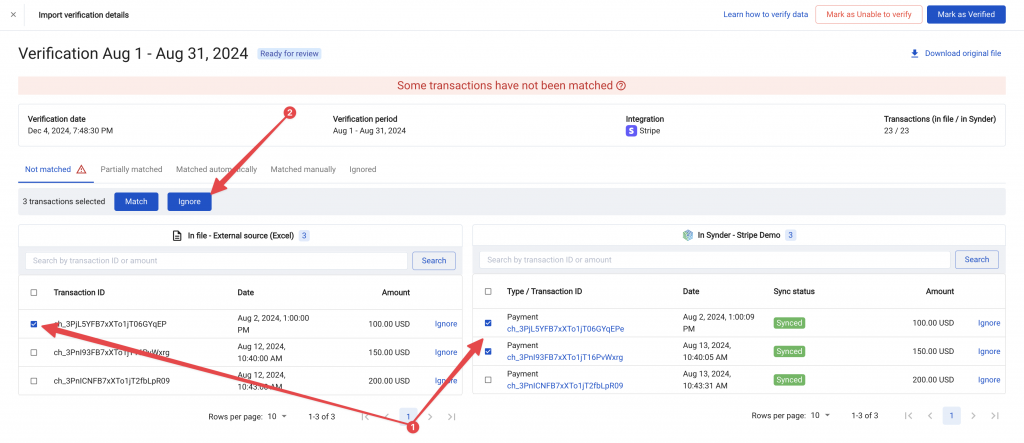
To ignore transactions:
1. Select transactions: Select the transactions you wish to ignore.
2. Click Ignore: The selected transactions will move to the Ignored tab.
Unmatching transactions
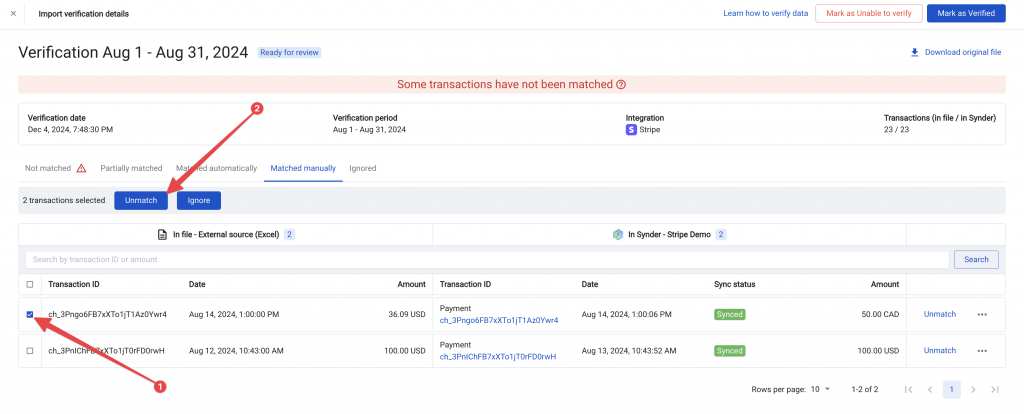
To unmatch transactions:
1. Go to the Matched tab:
-Navigate to Matched automatically or Matched manually tab.
2. Select transactions:
-Select the transactions you want to unmatch.
3. Click Unmatch:
-The transactions will return to the Not matched or Partially matched tab.
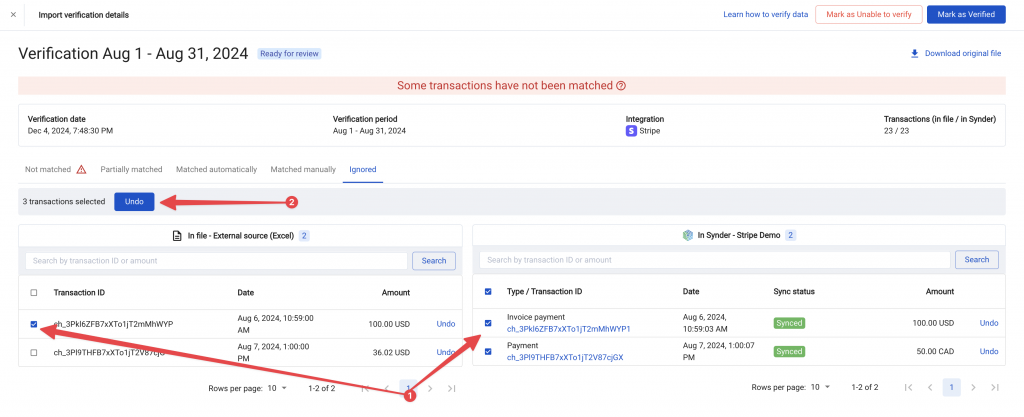
Undoing ignored transactions
To move ignored transactions back:
1. Go to the Ignored tab: Select the Ignored tab.
2. Select transactions: Choose the transactions you wish to restore.
3. Click Undo: The transactions will move back to their respective tabs.
Finalizing the verification
Once you’ve reviewed and managed all transactions:
1. Ensure tabs are empty:
-Aim to have no transactions left in the Not matched and Partially matched tabs.
2. Mark verification:
-If all data matches, click Mark as verified.
-If there are unresolved discrepancies, click Mark as Unable to verify.
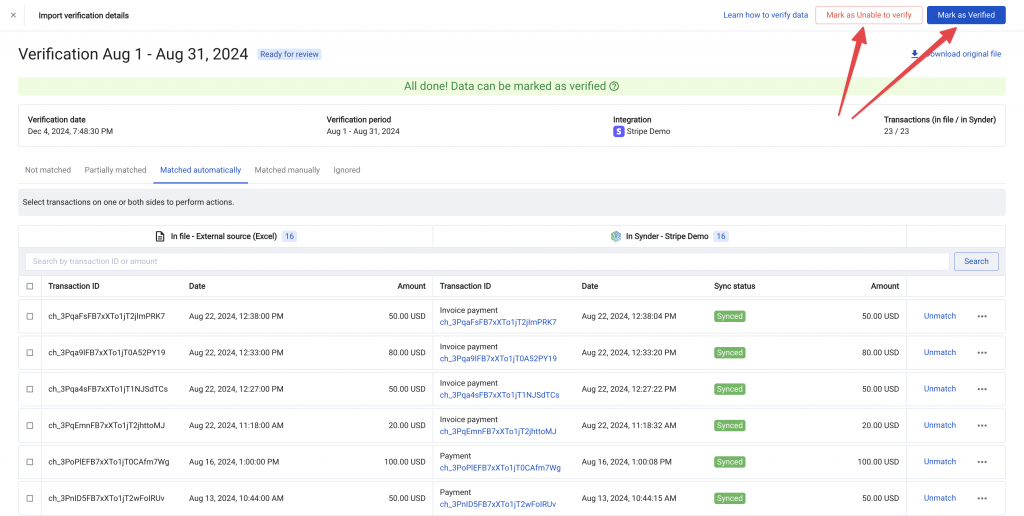
Important: This action is final and can’t be undone.
Edge cases and FAQ
What happens if new transactions appear in Synder after verification?
New transactions**: Any new transactions within the verification period that were added after the verification was initiated won’t be included. To review these, you’ll need to start a new verification.
How are pending or archived transactions handled?
- Pending transactions: These are treated just like any other transactions —you can choose to match or ignore them.
- Archived transactions: These are shown with their latest status and included in the verification process.
What happens if a matched transaction changes in Synder?
Data changes: The transaction remains in its tab, but the displayed data updates doesn’t update. To reflect the changes, you’ll need to create a new verification.
Reach out to the Synder Team via online support chat, phone, or email with any questions you have – we’re always happy to help you!
