
- Overview
- Preparation
- Balance reconciliation process
- Access the Reconciliation Menu
- Balance retrieval
- Balance reconciliation
- If Balances Do Not Match
- Reconciliation history
- FAQ
Overview
This guide walks you through Synder’s Balance Reconciliation feature. You will learn how to confirm that your synchronized summaries match the balances in your payment platform. This feature works with daily and payout-based summaries in Summary Sync mode.
Use this guide if:
- You are using Summary Sync (daily or payout summaries)
- You want to confirm balances before posting to accounting
- You need to reconcile a clearing account (Stripe, Shopify, PayPal, etc.)
- Your summaries are already synced and processed
Preparation
Before you begin, make sure all summaries in the selected period are fully processed.
Summary statuses:
- Fully fetched – All transactions imported
- Partially fetched – Some transactions still importing or failed
- Pending – Transactions still being fetched
If any summaries show a Partially fetched or Pending status, resolve them before you start the reconciliation.
Note: Most failed transactions include troubleshooting instructions directly in the error message on the individual Transaction List. If you need further clarification, reach out to Synder Support.
Balance reconciliation process
Access the Reconciliation Menu
Once you confirm that all summaries are fully processed, you can start the balance reconciliation.
- Navigate to Reconciliation → Balance Reconciliation in the left-side menu.
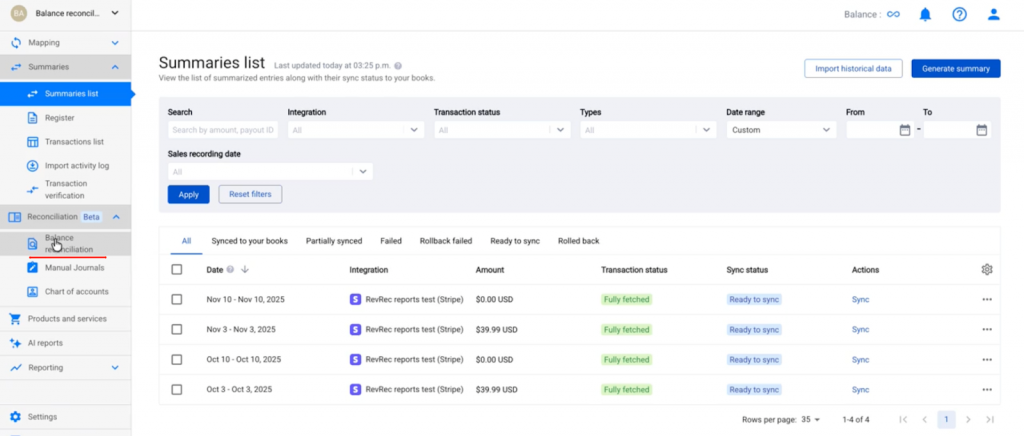
- Select the clearing account corresponding to the integration being reconciled (e.g., Stripe, Shopify, PayPal).

- Enter the beginning balance and the ending date for the reconciliation period.
- Click Start Reconciliation.
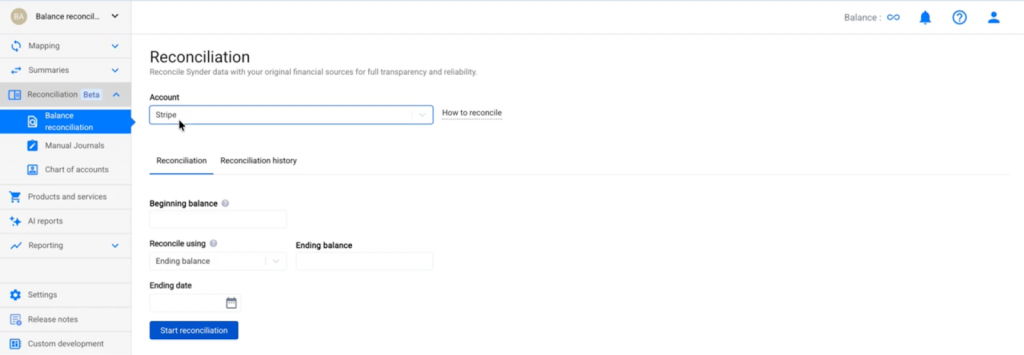
You can reconcile using either the Ending or the Turnover balance.
- Ending Balance reflects the final balance on the last day of the reconciliation period.
- Turnover Balance reflects the total net activity for the selected period.
Balance retrieval
To reconcile accurately, you need to retrieve the correct starting and ending balances from your connected integration.
Example (Stripe):
- Go to Stripe → Reports → Balance summary.
- Set the date range to match the balance reconciliation period in Synder.
- Verify that the time zone in Stripe matches the one set in your Synder organization settings to avoid discrepancies.
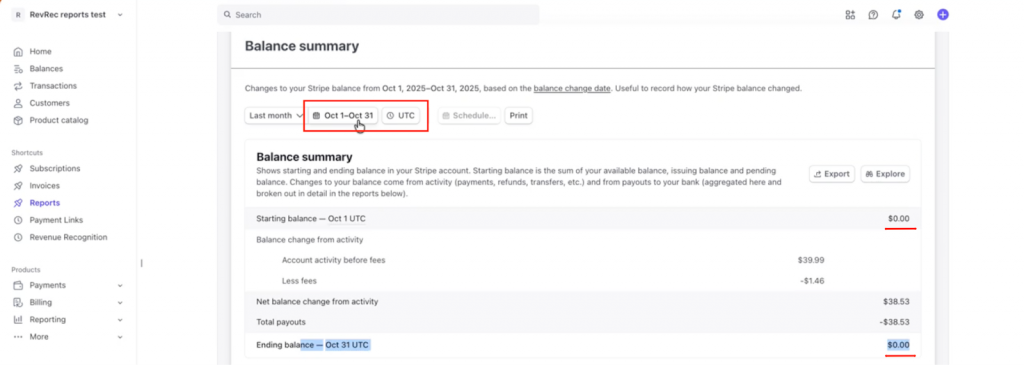
You can calculate the Turnover Balance as the net total for the period (total inflows minus total outflows).
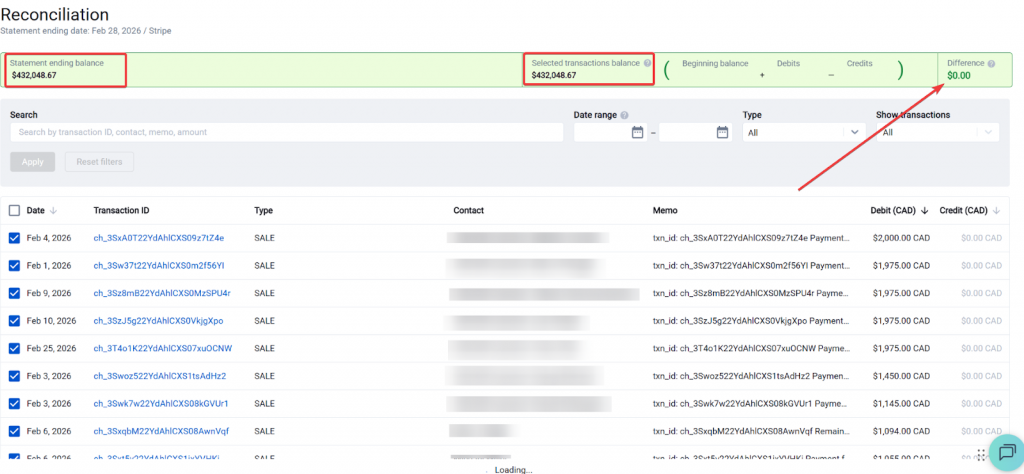
Balance reconciliation
After you enter the balances and select the date range, follow these steps:
- Click Start Reconciliation.
- Review the list of transactions displayed for the period.
- Select transactions that belong to the reconciliation period.
- Once the selected transactions bring your balance difference to zero, click Reconcile.
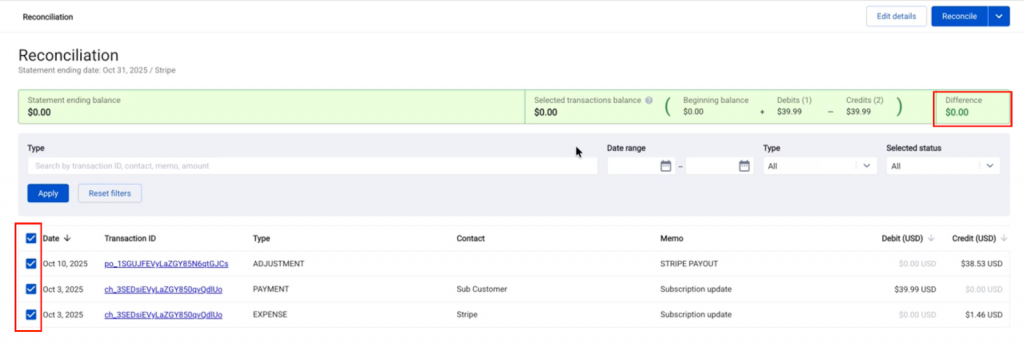
Synder will then mark this period and the selected transactions as reconciled.
If Balances Do Not Match
If the balances do not match, first make sure you have synced all summaries for the reconciliation period.

To sync missing summaries:
- Navigate to Summaries → Summary List.
- Select the reconciliation period.
- Filter by Fetching, Partially fetched, and Attention required statuses.
- Synchronize summaries with Ready to sync status.
- Investigate summaries with Attention required status.

You should investigate any summaries with an Attention required status. Check the error details on each summary for guidance.
Once you synchronize all missing summaries, the statement ending balance should match the total of all synced transactions. At that point, click Reconcile to complete the process.
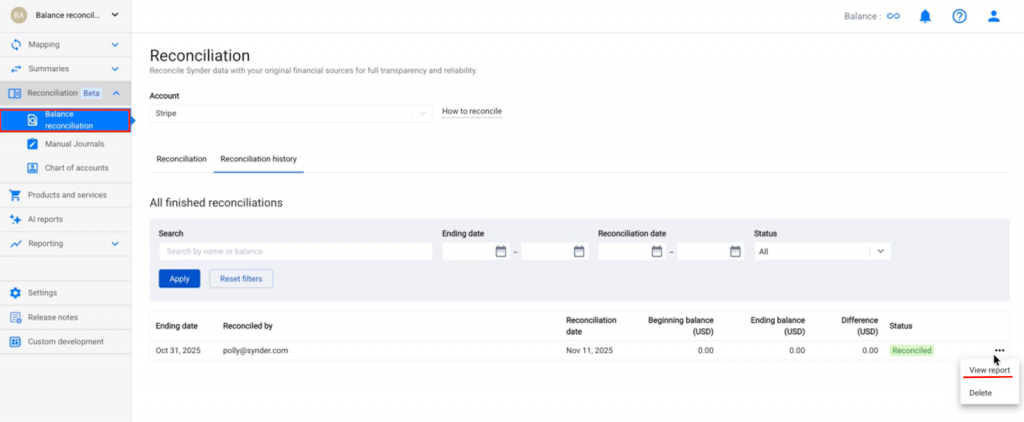
Reconciliation history
Synder records all reconciled periods and their associated transactions in the Reconciliation History section. From here, you can:
- Review previously reconciled periods.
- Identify transactions included in a specific reconciliation
- Investigate balance discrepancies by reviewing matched data
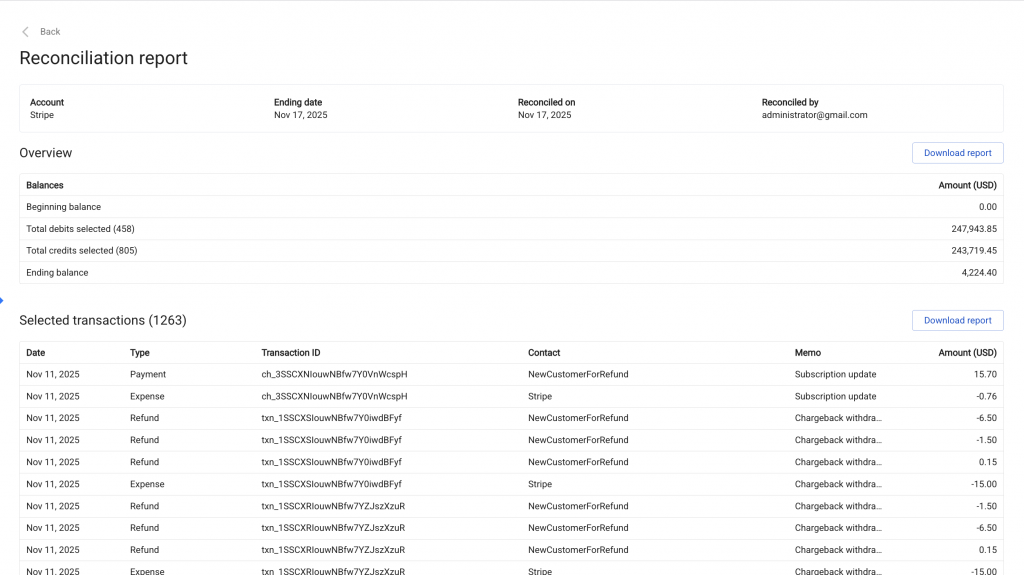
Additionally, you can review the reconciliation report, which lists every transaction matched to a reconciliation period.
Even if you delete previously reconciled transactions, they will still appear in the reconciliation report for reference.
If a starting balance discrepancy appears later (for example, because you deleted or edited summaries), you can review and rebalance directly from this page.
FAQ
What happens if a period was reconciled and transactions were later updated (e.g., refreshed COGS)?
When you update COGS starting from a specific period, Synder deletes and re-adds the affected transactions. Re-added transactions are treated as new and will not remain reconciled.
If the COGS update date falls before the end date of an existing reconciliation, those reconciliations will need updates and Synder will flag them with an Attention Required status.
Can I create overlapping reconciliations?
No. Reconciliation works sequentially — each new period builds on the previous one. Synder treats existing reconciled periods as final, so they cannot overlap with new reconciliations.
Can I change the reconciliation end date or amounts?
Yes, but keep in mind that changing the end date or amounts will delete all subsequent reconciliations. Because Synder locks transactions to specific reconciliation periods, editing one period means you must also adjust all following reconciliations to maintain data integrity.
If you need any assistance with your balance reconciliation or your Summary Sync mode, reach out to our Synder Support Team – we’re happy to help.